This is the multi-page printable view of this section. Click here to print.
Documentation
- 1: Concepts
- 1.1: Architecture
- 1.2: Cluster Inventory
- 1.2.1: ClusterClaim
- 1.2.2: ManagedCluster
- 1.2.3: ManagedClusterSet
- 1.3: Work Distribution
- 1.3.1: ManifestWork
- 1.3.2: ManifestWorkReplicaSet
- 1.4: Content Placement
- 1.4.1: Placement
- 1.5: Add-On Extensibility
- 1.5.1: Add-ons
- 2: Getting Started
- 2.1: Quick Start
- 2.2: Installation
- 2.2.1: Start the control plane
- 2.2.2: Register a cluster
- 2.2.3: Add-on management
- 2.2.4: Running on EKS
- 2.3: Add-ons and Integrations
- 2.3.1: Policy
- 2.3.1.1: Policy framework
- 2.3.1.2: Policy API concepts
- 2.3.1.3: Configuration Policy
- 2.3.1.4: Open Policy Agent Gatekeeper
- 2.3.2: Application lifecycle management
- 2.3.3: Cluster proxy
- 2.3.4: Managed service account
- 2.3.5: Multicluster Control Plane
- 2.4: Administration
- 3: Developer Guides
- 3.1: Add-on Developer Guide
- 3.2: VScode Extension
- 4: User Scenarios
- 4.1: Deploy Kubernetes resources to the managed clusters
- 4.2: Distribute workload with placement selected managed clusters
- 4.3: Extend the multicluster scheduling capabilities with placement
- 4.4: Extending managed clusters with custom attributes
- 4.5: Integration with Argo CD
- 4.6: Manage a cluster with multiple hubs
- 4.7: Migrate workload with placement
- 4.8: Pushing Kubernetes API requests to the managed clusters
- 4.9: Register a cluster to hub through proxy server
- 5: Contribute
- 6: Releases
- 7: Roadmap
- 8: FAQ
- 9: Security
1 - Concepts
1.1 - Architecture
This page is an overview of open cluster management.
Overview
Open Cluster Management (OCM) is a powerful, modular, extensible platform for Kubernetes multi-cluster orchestration. Learning from the past failing lesson of building Kubernetes federation systems in the Kubernetes community, in OCM we will be jumping out of the legacy centric, imperative architecture of Kubefed v2 and embracing the “hub-agent” architecture which is identical to the original pattern of “hub-kubelet” from Kubernetes. Hence, intuitively in OCM our multi-cluster control plane is modeled as a “Hub” and on the other hand each of the clusters being managed by the “Hub” will be a “Klusterlet” which is obviously inspired from the original name of “kubelet”. Here’s a more detailed clarification of the two models we will be frequently using throughout the world of OCM:
-
Hub Cluster: Indicating the cluster that runs the multi-cluster control plane of OCM. Generally the hub cluster is supposed to be a light-weight Kubernetes cluster hosting merely a few fundamental controllers and services.
-
Klusterlet: Indicating the clusters that being managed by the hub cluster. Klusterlet might also be called “managed cluster” or “spoke cluster”. The klusterlet is supposed to actively pulling the latest prescriptions from the hub cluster and consistently reconciles the physical Kubernetes cluster to the expected state.
“Hub-spoke” architecture
Benefiting from the merit of “hub-spoke” architecture, in abstraction we are de-coupling most of the multi-cluster operations generally into (1) computation/decision and (2) execution, and the actual execution against the target cluster will be completely off-loaded into the managed cluster. The hub cluster won’t directly request against the real clusters, instead it just persists its prescriptions declaratively for each cluster, and the klusterlet will be actively pulling the prescriptions from the hub and doing the execution. Hence, the burden of the hub cluster will be greatly relieved because the hub cluster doesn’t need to either deal with flooding events from the managed clusters or be buried in sending requests against the clusters. Imagine in a world where there’s no kubelet in Kubernetes and its control plane is directly operating the container daemons, it will be extremely hard for a centric controller to manage a cluster of 5k+ nodes. Likewise, that’s how OCM trying to breach the bottleneck of scalability, by dividing and offloading the execution into separated agents. So it’s always feasible for a hub cluster to accept and manage thousand-ish clusters.
Each klusterlet will be working independently and autonomously, so they have a weak dependency to the availability of the hub cluster. If the hub goes down (e.g. during maintenance or network partition) the klusterlet or other OCM agents working in the managed cluster are supposed to keep actively managing the hosting cluster until it re-connects. Additionally if the hub cluster and the managed clusters are owned by different admins, it will be easier for the admin of the managed cluster to police the prescriptions from the hub control plane because the klusterlet is running as a “white-box” as a pod instance in the managed cluster. Upon any accident, the klusterlet admin can quickly cut off the connection with the hub cluster without shutting the whole multi-cluster control plane down.

The “hub-agent” architecture also minimized the requirements in the network for registering a new cluster to the hub. Any cluster that can reach the endpoint of the hub cluster will be able to be managed, even a random KinD sandbox cluster on your laptop. That is because the prescriptions are effectively pulled from the hub instead of pushing. In addition to that, OCM also provides a addon named “cluster-proxy” which automatically manages a reverse proxy tunnel for proactive access to the managed clusters by leveraging on the Kubernetes’ subproject konnectivity.
Modularity and extensibility
Not only OCM will bring you a fluent user-experience of managing a number of
clusters on ease, but also it will be equally friendly to further customization
or second-time development. Every functionality working in OCM is expected to
be freely-pluggable by modularizing the atomic capability into separated
building blocks, except for the mandatory core module named registration
which is responsible for controlling the lifecycle of a managed controller
and exporting the elementary ManagedCluster model.
Another good example surfacing our modularity will be the placement, a standalone module focusing at dynamically selecting the proper list of the managed clusters from the user’s prescription. You can build any advanced multi-cluster orchestration on the top of placement, e.g. multi-cluster workload re-balancing, multi-cluster helm charts replication, etc. On the other hand if you’re not satisfied by the current capacities from our placement module, you can quickly opt-out and replace it with your customized ones, and reach out to our community so that we can converge in the future if possible.
Concepts
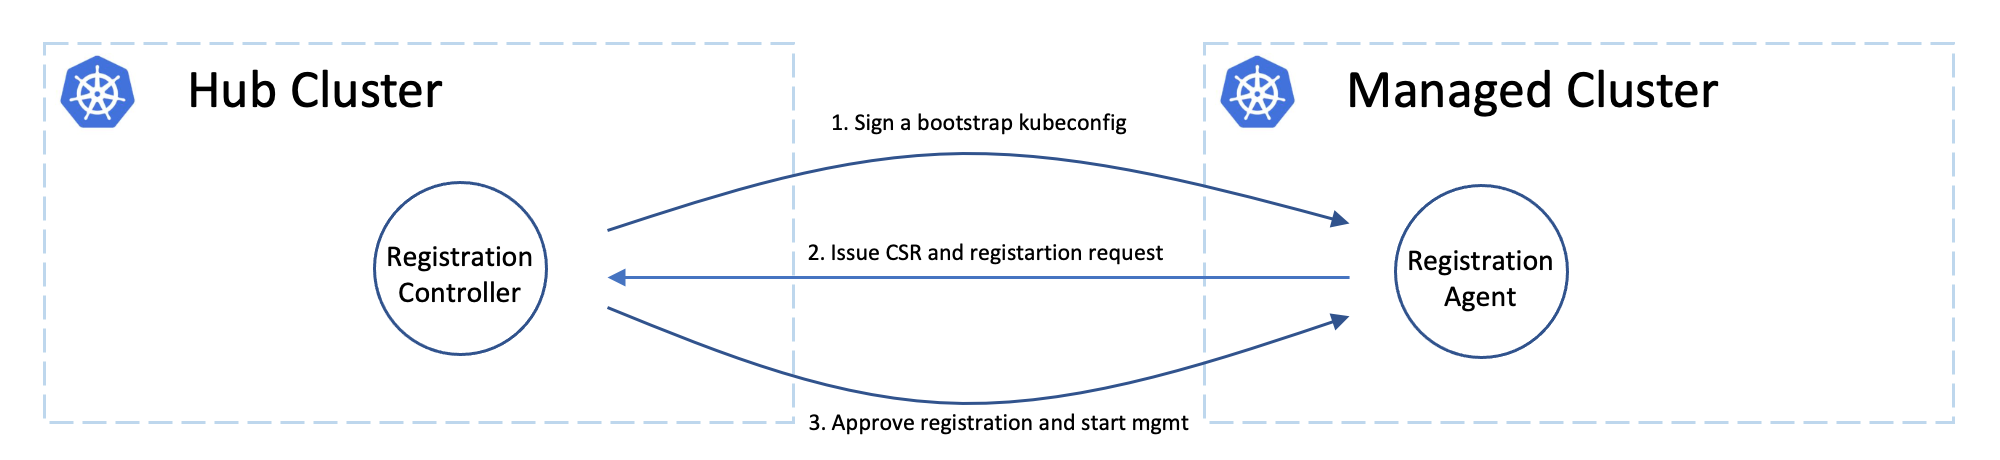
Cluster registering: “double opt-in handshaking”
Practically the hub cluster and the managed cluster can be owned/maintained by different admins, so in OCM we clearly separated the roles and make the cluster registration require approval from the both sides defending from unwelcome requests. In terms of terminating the registration, the hub admin can kick out a registered cluster by denying the rotation of hub cluster’s certificate, on the other hand from the perspective of a managed cluster’s admin, he can either brutally deleting the agent instances or revoking the granted RBAC permissions for the agents. Note that the hub controller will be automatically preparing environment for the newly registered cluster and cleaning up neatly upon kicking a managed cluster.
Cluster registration security model
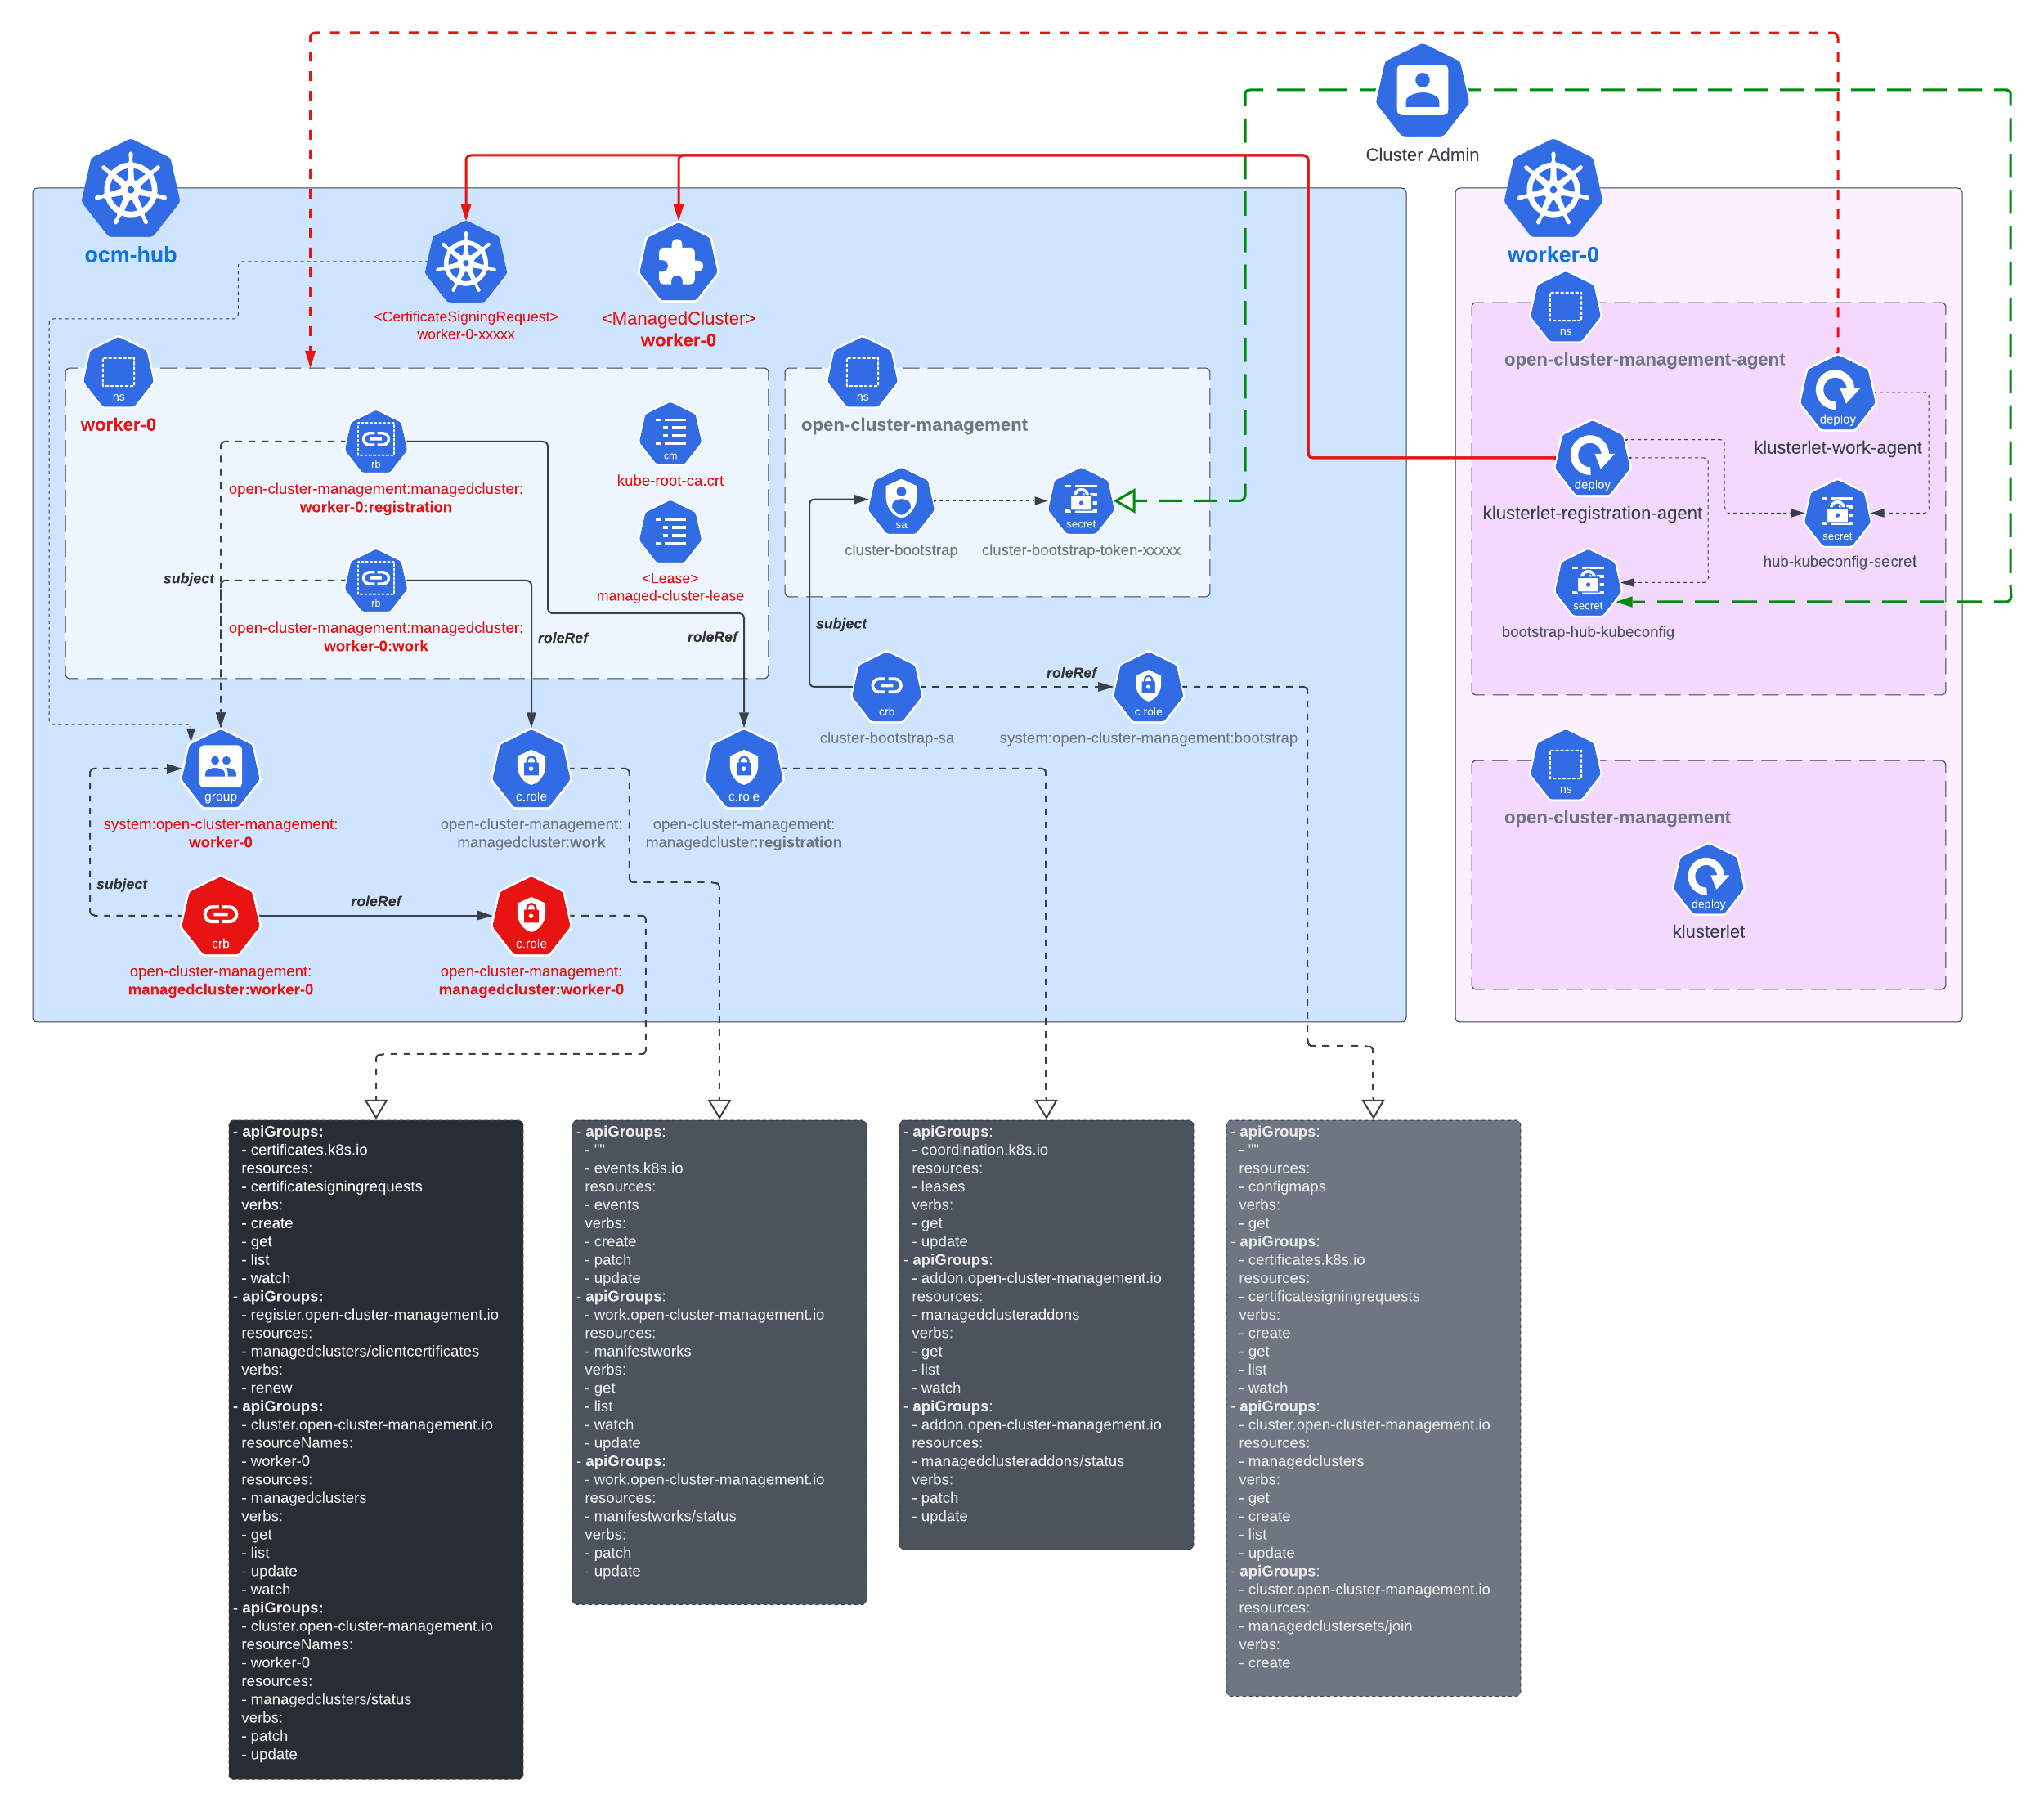
The worker cluster admin can list and read any managed cluster’s CSR, but those CSR cannot be used to impersonate due to the fact that CSR only contains the certificate. The client authentication requires both the key and certificate. The key is stored in each managed cluster, and it will not be transmitted across the network.
The worker cluster admin cannot approve his or her own cluster registration by default. Two separate RBAC rules are needed to approve a cluster registration. The permission to approve the CSR and the permission to accept the managed cluster. Only the cluster admin on hub has both permissions and can accept the cluster registration request. The second accept permission is gated by a webhook.
Cluster namespace
Kubernetes has a native soft multi-tenancy isolation in the granularity of
its namespace resources, so in OCM, for each of the managed cluster we will
be provisioning a dedicated namespace for the managed cluster and grants
sufficient RBAC permissions so that the klusterlet can persist some data
in the hub cluster. This dedicated namespace is the “cluster namespace” which
is majorly for saving the prescriptions from the hub. e.g. we can create
ManifestWork in a cluster namespace in order to deploy some resources towards
the corresponding cluster. Meanwhile, the cluster namespace can also be used
to save the uploaded stats from the klusterlet e.g. the healthiness of an
addon, etc.
Addons
Addon is a general concept for the optional, pluggable customization built over
the extensibility from OCM. It can be a controller in the hub cluster, or just
a customized agent in the managed cluster, or even the both collaborating
in peers. The addons are expected to implement the ClusterManagementAddon or
ManagedClusterAddOn API of which a detailed elaboration can be found here.
Building blocks
The following is a list of commonly-used modules/subprojects that you might be interested in the journey of OCM:
Registration
The core module of OCM manages the lifecycle of the managed clusters. The registration controller in the hub cluster can be intuitively compared to a broker that represents and manages the hub cluster in terms of cluster registration, while the registration agent working in the managed cluster is another broker that represents the managed cluster. After a successful registration, the registration controller and agent will also be consistently probing each other’s healthiness. i.e. the cluster heartbeats.
Work
The module for dispatching resources from the hub cluster to the managed
clusters, which can be easily done by writing a ManifestWork resource into
a cluster namespace. See more details about the API here.
Placement
Building custom advanced topology across the clusters by either grouping
clusters via the labels or the cluster-claims. The placement module is
completely decoupled from the execution, the output from placement will
be merely a list of names of the matched clusters in the PlacementDecision
API, so the consumer controller of the decision output can reactively
discovery the topology or availability change from the managed clusters by
simply list-watching the decision API.
Application lifecycle
The application lifecycle defines the processes that are used to manage application resources on your managed clusters. A multi-cluster application uses a Kubernetes specification, but with additional automation of the deployment and lifecycle management of resources to individual clusters. A multi-cluster application allows you to deploy resources on multiple clusters, while maintaining easy-to-reconcile service routes, as well as full control of Kubernetes resource updates for all aspects of the application.
Governance and risk
Governance and risk is the term used to define the processes that are used to manage security and compliance from the hub cluster. Ensure the security of your cluster with the extensible policy framework. After you configure a hub cluster and a managed cluster, you can create, modify and delete policies on the hub and apply policies to the managed clusters.
Registration operator
Automating the installation and upgrading of a few built-in modules in OCM. You can either deploy the operator standalone or delegate the registration operator to the operator lifecycle framework.
1.2 - Cluster Inventory
1.2.1 - ClusterClaim
What is ClusterClaim?
ClusterClaim is a cluster-scoped API available to users on a managed cluster.
The ClusterClaim objects are collected from the managed cluster and saved into
the status of the corresponding ManagedCluster object on the hub.
Usage
ClusterCaim is used to specify additional properties of the managed cluster like
the clusterID, version, vendor and cloud provider. We defined some reserved ClusterClaims
like id.k8s.io which is a unique identifier for the managed cluster.
In addition to the reserved ClusterClaims, users can also customize 20 ClusterClaims by default.
The maximum count of customized ClusterClaims can be configured via the flag
max-custom-cluster-claims of registration agent on the managed cluster.
The ClusterClaim with the label open-cluster-management.io/spoke-only will not be synced
to the status of ManagedCluster.
Example
Here is a ClusterClaim example specifying a id.k8s.io:
apiVersion: cluster.open-cluster-management.io/v1alpha1
kind: ClusterClaim
metadata:
  name: id.k8s.io
spec:
  value: myCluster
After applying the ClusterClaim above to any managed cluster, the value of the ClusterClaim
is reflected in the ManagedCluster on the hub cluster:
apiVersion: cluster.open-cluster-management.io/v1
kind: ManagedCluster
metadata: ...
spec: ...
status:
  clusterClaims:
    - name: id.k8s.io
      value: myCluster
About-API Support in Open Cluster Management
Open Cluster Management (OCM) supports the use of ClusterProperty via the
about-api,
which allows administrators to define and expose cluster-scoped properties. These properties are
synced to the managed cluster’s ManagedCluster status and can coexist with
ClusterClaim but take precedence if a same-named property exists.
Enabling the Feature
To enable the ClusterProperty feature on the spoke cluster, the ClusterProperty feature gate must be
set on the Klusterlet component. This can be done by setting the feature gate in the Klusterlet configuration:
featureGates:
  ClusterProperty: "true"
Ensure that the feature gate is enabled appropriately based on your cluster management strategy.
Using ClusterProperty
Creating a ClusterProperty
Cluster administrators can create a ClusterProperty custom resource in the spoke cluster. The following
is an example YAML for creating a ClusterProperty:
apiVersion: about.k8s.io/v1alpha1
kind: ClusterProperty
metadata:
  name: example-property
spec:
  value: "example-value"
Once created, the ClusterProperty will be automatically synced to the hub cluster and reflected within
the ManagedCluster resource’s status.
Syncing Existing Properties
After enabling the feature, any existing ClusterProperty resources will be synced to the ManagedCluster
status on the hub cluster.
Example: If example-property with value example-value already exists on the spoke cluster, its value
will populate into the ManagedCluster as:
status:
  clusterClaims:
    - name: "example-property"
      value: "example-value"
Handling Conflicts with ClusterClaim
In case a ClusterClaim resource with the same name as a ClusterProperty exists, the ClusterProperty
will take precedence and the corresponding ClusterClaim will be ignored.
Updating ClusterProperties
Updating the value of an existing ClusterProperty will automatically reflect the change in the managed
cluster’s status:
spec:
  value: "updated-value"
Deleting ClusterProperties
When a ClusterProperty is deleted from the spoke cluster, its corresponding entry in the ManagedCluster
status is removed:
kubectl delete clusterproperty example-property
This will result in the removal of the example-property from the ManagedCluster status on the hub cluster.
Additional Notes
- Both
ClusterPropertyandClusterClaimcan co-exist, withClusterPropertytaking precedence in naming conflicts. - The feature uses the existing OCM infrastructure for status synchronization, ensuring minimal disruption to ongoing operations.
- Ensure compatibility and testing in your environment before enabling the
ClusterPropertyfeature gate in production settings.
1.2.2 - ManagedCluster
What is ManagedCluster?
ManagedCluster is a cluster scoped API in the hub cluster representing the
registered or pending-for-acceptance Kubernetes clusters in OCM. The
klusterlet agent
working in the managed cluster is expected to actively maintain/refresh the
status of the corresponding ManagedCluster resource on the hub cluster.
On the other hand, removing the ManagedCluster from the hub cluster indicates
the cluster is denied/exiled from the hub cluster. The following is the
introduction of how the cluster registration lifecycle works under the hood:
Cluster registration and acceptance
Bootstrapping registration
Firstly, the cluster registration process should be initiated by the registration agent which requires a bootstrap kubeconfig e.g.:
apiVersion: v1
kind: Secret
metadata:
  name: bootstrap-hub-kubeconfig
  namespace: open-cluster-management-agent
type: Opaque
data:
  kubeconfig: <base64-encoded kubeconfig>
A minimal RBAC permission required for the subject in the bootstrap kubeconfig will be:
CertificateSigningRequest’s “get”, “list”, “watch”, “create”, “update”.ManagedCluster’s “get”, “list”, “create”, “update”
Note that ideally the bootstrap kubeconfig is supposed to live shortly (hour-ish) after signed by the hub cluster so that it won’t be abused by unwelcome clients.
Last but not least, you can always live an easier life by leveraging OCM’s
command-line tool clusteradm to manage the whole registration process.
Approving registration
When we’re registering a new cluster into OCM, the registration agent will be
starting by creating an unaccepted ManagedCluster into the hub cluster along
with a temporary CertificateSigningRequest (CSR)
resource. The cluster will be accepted by the hub control plane, if the
following requirements is meet:
- The CSR is approved and signed by any certificate provider setting filling
.status.certificatewith legit X.509 certificates. - The
ManagedClusterresource is approved by setting.spec.hubAcceptsClientto true in the spec.
Note that the cluster approval process above can be done by one-line:
$ clusteradm accept --clusters <cluster name>
Upon the approval, the registration agent will observe the signed certificate and persist them as a local secret named “hub-kubeconfig-secret” (by default in the “open-cluster-management-agent” namespace) which will be mounted to the other fundamental components of klusterlet such as the work agent. In a word, if you can find your “hub-kubeconfig-secret” successfully present in your managed cluster, the cluster registration is all set!
Overall the registration process in OCM is called double opt-in mechanism,
which means that a successful cluster registration requires both sides of
approval and commitment from the hub cluster and the managed cluster. This
will be especially useful when the hub cluster and managed clusters are
operated by different admins or teams. In OCM, we assume the clusters are
mutually untrusted in the beginning then set up the connection between them
gracefully with permission and validity under control.
Note that the functionality mentioned above are all managed by OCM’s registration sub-project, which is the “root dependency” in the OCM world. It includes an agent in the managed cluster to register to the hub and a controller in the hub cluster to coordinate with the agent.
Cluster heartbeats and status
By default, the registration will be reporting and refreshing its healthiness
state to the hub cluster on a one-minute basis, and that interval can be easily
overridden by setting .spec.leaseDurationSeconds on the ManagedCluster.
In addition to that, a few commonly-used information will also be reflected
in the status of the ManagedCluster, e.g.:
  status:
    version:
      kubernetes: v1.20.11
    allocatable:
      cpu: 11700m
      ephemeral-storage: "342068531454"
      hugepages-1Gi: "0"
      hugepages-2Mi: "0"
      memory: 17474228Ki
      pods: "192"
    capacity:
      cpu: "12"
      ephemeral-storage: 371168112Ki
      hugepages-1Gi: "0"
      hugepages-2Mi: "0"
      memory: 23777972Ki
      pods: "192"
    conditions: ...
Cluster taints and tolerations
To support filtering unhealthy/not-reporting clusters and keep workloads from being placed in unhealthy or unreachable clusters, we introduce the similar concept of taint/toleration in Kubernetes. It also allows user to add a customized taint to deselect a cluster from placement. This is useful when the user wants to set a cluster to maintenance mode and evict workload from this cluster.
In OCM, Taints and Tolerations work together to allow users to control the selection of managed clusters more flexibly.
Taints of ManagedClusters
Taints are properties of ManagedClusters, they allow a Placement to repel a set of ManagedClusters. A Taint includes the following fields:
- Key (required). The taint key applied to a cluster. e.g. bar or foo.example.com/bar.
- Value (optional). The taint value corresponding to the taint key.
- Effect (required). The Effect of the taint on Placements that do not
tolerate the taint. Valid effects are
NoSelect. It means Placements are not allowed to select a cluster unless they tolerate this taint. The cluster will be removed from the placement decision if it has already been selected by the Placement.PreferNoSelect. It means the scheduler tries not to select the cluster, rather than prohibiting Placements from selecting the cluster entirely. (This is not implemented yet, currently clusters with effectPreferNoSelectwill always be selected.)NoSelectIfNew. It means Placements are not allowed to select the cluster unless: 1) they tolerate the taint; 2) they have already had the cluster in their cluster decisions;
- TimeAdded (required). The time at which the taint was added. It is set automatically and the user should not to set/update its value.
Builtin taints to reflect the status of ManagedClusters
There are two builtin taints, which will be automatically added to ManagedClusters, according to their conditions.
cluster.open-cluster-management.io/unavailable. The taint is added to a ManagedCluster when it is not available. To be specific, the cluster has a condition ‘ManagedClusterConditionAvailable’ with status of ‘False’. The taint has the effectNoSelectand an empty value. Example,apiVersion: cluster.open-cluster-management.io/v1 kind: ManagedCluster metadata: name: cluster1 spec: hubAcceptsClient: true taints: - effect: NoSelect key: cluster.open-cluster-management.io/unavailable timeAdded: '2022-02-21T08:11:54Z'cluster.open-cluster-management.io/unreachable. The taint is added to a ManagedCluster when it is not reachable. To be specific,-
- The cluster has no condition ‘ManagedClusterConditionAvailable’;
-
- Or the status of condition ‘ManagedClusterConditionAvailable’ is
‘Unknown’;
The taint has the effect
NoSelectand an empty value. Example,
- Or the status of condition ‘ManagedClusterConditionAvailable’ is
‘Unknown’;
The taint has the effect
apiVersion: cluster.open-cluster-management.io/v1 kind: ManagedCluster metadata: name: cluster1 spec: hubAcceptsClient: true taints: - effect: NoSelect key: cluster.open-cluster-management.io/unreachable timeAdded: '2022-02-21T08:11:06Z'-
Tolerations of Placements
Tolerations are applied to Placements, and allow Placements to select ManagedClusters with matching taints. Refer to Placement Taints/Tolerations to see how it is used for cluster selection.
Cluster removal
A previously registered cluster can opt-out cutting off the connection from either hub cluster or managed cluster. This is helpful for tackling emergency problems in your OCM environment, e.g.:
- When the hub cluster is overloaded, under emergency
- When the managed cluster is intended to detach from OCM
- When the hub cluster is found sending wrong orders to the managed cluster
- When the managed cluster is spamming requests to the hub cluster
Unregister from hub cluster
A recommended way to unregister a managed cluster will flip the
.spec.hubAcceptsClient bit back to false, which will be triggering the hub
control plane to offload the managed cluster from effective management.
Meanwhile, a permanent way to kick a managed cluster from the hub control plane
is simply deleting its ManagedCluster resource.
$ kubectl delete managedcluster <cluster name>
This is also revoking the previously-granted RBAC permission for the managed cluster instantly in the background. If we hope to defer the rejection to the next time when the klusterlet agent is renewing its certificate, as a minimal operation we can remove the following RBAC rules from the cluster’s effective cluster role resource:
# ClusterRole: open-cluster-management:managedcluster:<cluster name>
# Removing the following RBAC rule to stop the certificate rotation.
- apiGroups:
    - register.open-cluster-management.io
  resources:
    - managedclusters/clientcertificates
  verbs:
    - renew
Unregister from the managed cluster
The admin of the managed cluster can disable the prescriptions from hub cluster
by scaling the OCM klusterlet agents to 0. Or just permanently deleting the
agent components from the managed cluster.
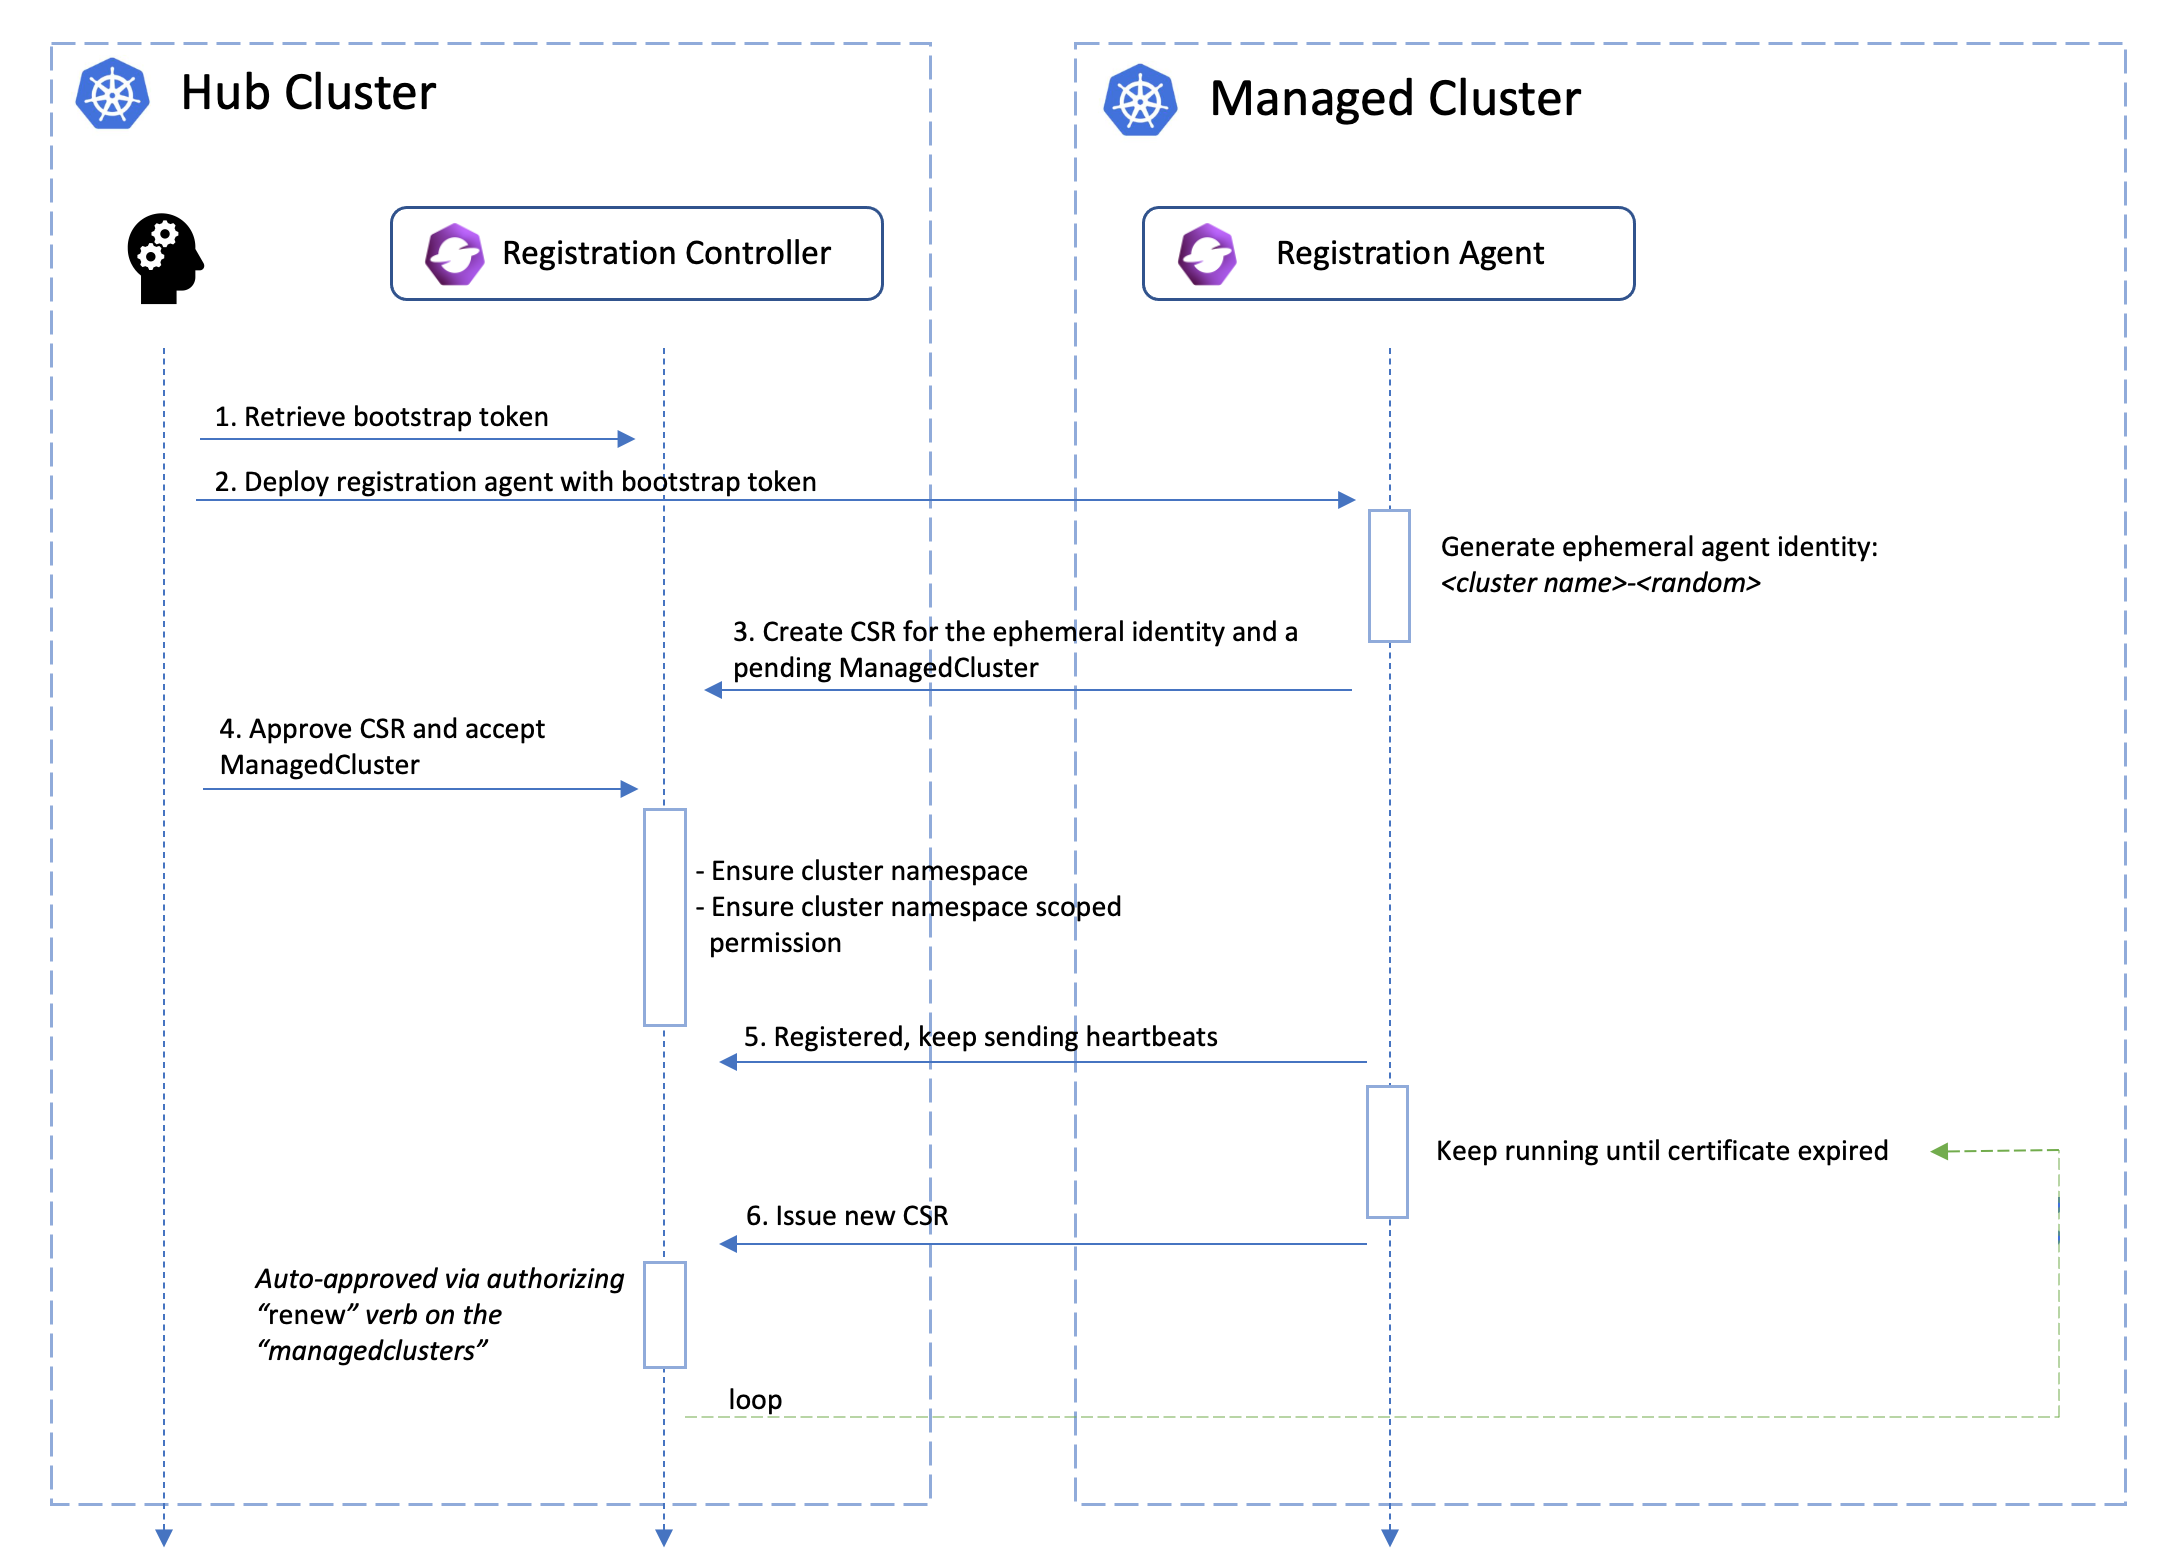
Managed Cluster’s certificate rotation
The certificates used by the agents from the managed cluster to talk to the hub control plane will be periodically rotated with an ephemeral and random identity. The following picture shows the automated certificate rotation works.
What’s next?
Furthermore, we can do advanced cluster matching/selecting within a managedclusterset using the placement module.
1.2.3 - ManagedClusterSet
API-CHANGE NOTE:
The ManagedClusterSet and ManagedClusterSetBinding API v1beta1 version will no longer be served in OCM v0.12.0.
- Migrate manifests and API clients to use the
ManagedClusterSetandManagedClusterSetBindingAPI v1beta2 version, available since OCM v0.9.0. - All existing persisted objects are accessible via the new API.
- Notable changes:
- The default cluster selector type will be
ExclusiveClusterSetLabelin v1beta2, and typeLegacyClusterSetLabelin v1beta1 is removed.
- The default cluster selector type will be
What is ManagedClusterSet?
ManagedClusterSet is a cluster-scoped API in the hub cluster for grouping a
few managed clusters into a “set” so that hub admin can operate these clusters
altogether in a higher level. The concept is inspired by the enhancement
from the Kubernetes SIG-Multicluster. Member clusters in the set are supposed
to have common/similar attributes e.g. purpose of use, deployed regions, etc.
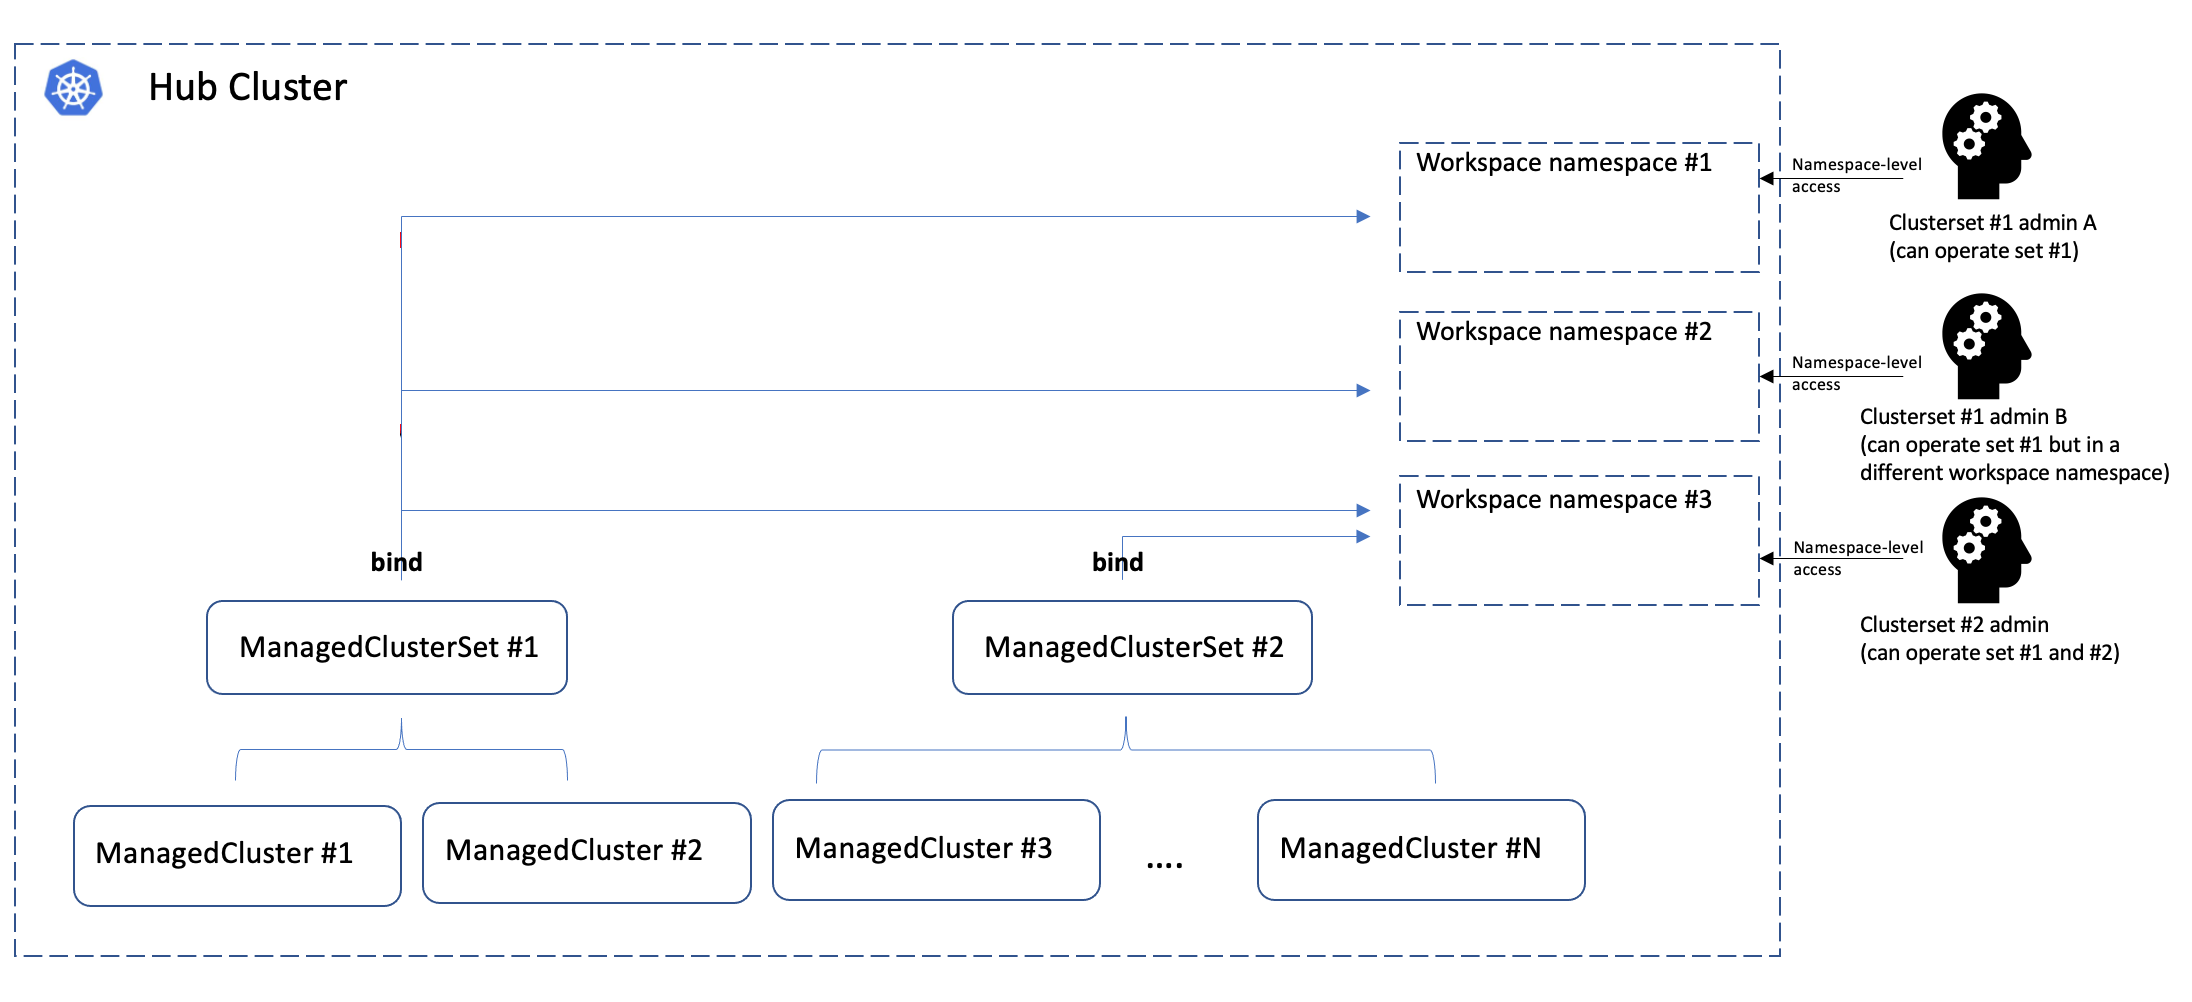
ManagedClusterSetBinding is a namespace-scoped API in the hub cluster to project
a ManagedClusterSet into a certain namespace. Each ManagedClusterSet can be
managed/administrated by different hub admins, and their RBAC permissions can
also be isolated by binding the ManagedClusterSet to a “workspace namespace” in
the hub cluster via ManagedClusterSetBinding.
Note that ManagedClusterSet and “workspace namespace” has an M*N
relationship:
- Bind multiple cluster sets to one workspace namespace indicates that the admin of that namespace can operate the member clusters from both sets.
- Bind one cluster set to multiple workspace namespace indicates that the cluster set can be operated from all the bound namespaces at the same time.
The cluster set admin can flexibly operate the member clusters in the workspace namespace using Placement API, etc.
The following picture shows the hierarchies of how the cluster set works:
Operates ManagedClusterSet using clusteradm
Creating a ManagedClusterSet
Running the following command to create an example cluster set:
$ clusteradm create clusterset example-clusterset
$ clusteradm get clustersets
<ManagedClusterSet>
└── <default>
│   ├── <BoundNamespace>
│   ├── <Status> No ManagedCluster selected
└── <example-clusterset>
│   ├── <BoundNamespace>
│   ├── <Status> No ManagedCluster selected
└── <global>
    └── <BoundNamespace>
    └── <Status> 1 ManagedClusters selected
The newly created cluster set will be empty by default, so we can move on adding member clusters to the set.
Adding a ManagedCluster to a ManagedClusterSet
Running the following command to add a cluster to the set:
$ clusteradm clusterset set example-clusterset --clusters managed1
$ clusteradm get clustersets
<ManagedClusterSet>
└── <default>
│   ├── <BoundNamespace>
│   ├── <Status> No ManagedCluster selected
└── <example-clusterset>
│   ├── <BoundNamespace>
│   ├── <Status> 1 ManagedClusters selected
└── <global>
    └── <BoundNamespace>
    └── <Status> 1 ManagedClusters selected
Note that adding a cluster to a cluster set will require the admin to have “managedclustersets/join” access in the hub cluster.
Now the cluster set contains 1 valid cluster, and in order to operate that cluster set we are supposed to bind it to an existing namespace to make it a “workspace namespace”.
Binding the ManagedClusterSet to a workspace namespace
Running the following command to bind the cluster set to a namespace. Note that the namespace SHALL NOT be an existing “cluster namespace” (i.e. the namespace has the same name of a registered managed cluster).
Note that binding a cluster set to a namespace means that granting access from that namespace to its member clusters. And the bind process requires “managedclustersets/bind” access in the hub cluster which is clarified below.
$ clusteradm clusterset bind example-clusterset --namespace default
$ clusteradm get clustersets
<ManagedClusterSet>
└── <default>
│   ├── <BoundNamespace>
│   ├── <Status> No ManagedCluster selected
└── <example-clusterset>
│   ├── <Status> 1 ManagedClusters selected
│   ├── <BoundNamespace> default
└── <global>
    └── <BoundNamespace>
    └── <Status> 1 ManagedClusters selected
So far we successfully created a new cluster set containing 1 cluster and bind it a “workspace namespace”.
A glance at the “ManagedClusterSet” API
The ManagedClusterSet is a vanilla Kubernetes custom resource which can be
checked by the command kubectl get managedclusterset <cluster set name> -o yaml:
apiVersion: cluster.open-cluster-management.io/v1beta2
kind: ManagedClusterSet
metadata:
  name: example-clusterset
spec:
  clusterSelector:
    selectorType: ExclusiveClusterSetLabel
status:
  conditions:
  - lastTransitionTime: "2022-02-21T09:24:38Z"
    message: 1 ManagedClusters selected
    reason: ClustersSelected
    status: "False"
    type: ClusterSetEmpty
apiVersion: cluster.open-cluster-management.io/v1beta2
kind: ManagedClusterSet
metadata:
  name: example-openshift-clusterset
spec:
  clusterSelector:
    labelSelector:
      matchLabels:
        vendor: OpenShift
    selectorType: LabelSelector
status:
  conditions:
  - lastTransitionTime: "2022-06-20T08:23:28Z"
    message: 1 ManagedClusters selected
    reason: ClustersSelected
    status: "False"
    type: ClusterSetEmpty
The ManagedClusterSetBinding can also be checked by the command
kubectl get managedclustersetbinding <cluster set name> -n <workspace-namespace> -oyaml:
apiVersion: cluster.open-cluster-management.io/v1beta2
kind: ManagedClusterSetBinding
metadata:
  name: example-clusterset
  namespace: default
spec:
  clusterSet: example-clusterset
status:
  conditions:
  - lastTransitionTime: "2022-12-19T09:55:10Z"
    message: ""
    reason: ClusterSetBound
    status: "True"
    type: Bound
Clusterset RBAC permission control
Adding member cluster to a clusterset
Adding a new member cluster to a clusterset requires RBAC permission of
updating the managed cluster and managedclustersets/join subresource. We can
manually apply the following clusterrole to allow a hub user to manipulate
that clusterset:
apiVersion: rbac.authorization.k8s.io/v1
kind: ClusterRole
metadata: ...
rules:
  - apiGroups:
      - cluster.open-cluster-management.io
    resources:
      - managedclusters
    verbs:
      - update
  - apiGroups:
      - cluster.open-cluster-management.io
    resources:
      - managedclustersets/join
    verbs:
      - create
Binding a clusterset to a namespace
The “binding” process of a cluster set is policed by a validating webhook that
checks whether the requester has sufficient RBAC access to the
managedclustersets/bind subresource. We can also manually apply the following
clusterrole to grant a hub user the permission to bind cluster sets:
apiVersion: rbac.authorization.k8s.io/v1
kind: ClusterRole
metadata: ...
rules:
  - apiGroups:
      - cluster.open-cluster-management.io
    resources:
      - managedclustersets/bind
    verbs:
      - create
Default ManagedClusterSet
For easier management, we introduce a ManagedClusterSet called default.
A default ManagedClusterSet will be automatically created initially. Any clusters not specifying a ManagedClusterSet will be added into the default.
The user can move the cluster from the default clusterset to another clusterset using the command:
clusteradm clusterset set target-clusterset --clusters cluster-name
default clusterset is an alpha feature that can be disabled by disabling the feature gate in registration controller as:
- "--feature-gates=DefaultClusterSet=false"
Global ManagedClusterSet
For easier management, we also introduce a ManagedClusterSet called global.
A global ManagedClusterSet will be automatically created initially. The global ManagedClusterSet include all ManagedClusters.
global clusterset is an alpha feature that can be disabled by disabling the feature gate in registration controller as:
- "--feature-gates=DefaultClusterSet=false"
global ManagedClusterSet detail:
apiVersion: cluster.open-cluster-management.io/v1beta2
kind: ManagedClusterSet
metadata:
  name: global
spec:
  clusterSelector:
    labelSelector: {}
    selectorType: LabelSelector
status:
  conditions:
  - lastTransitionTime: "2022-06-20T08:23:28Z"
    message: 1 ManagedClusters selected
    reason: ClustersSelected
    status: "False"
    type: ClusterSetEmpty
1.3 - Work Distribution
1.3.1 - ManifestWork
What is ManifestWork
ManifestWork is used to define a group of Kubernetes resources on the hub to be applied to the managed cluster. In the open-cluster-management project, a ManifestWork resource must be created in the cluster namespace. A work agent implemented in work project is run on the managed cluster and monitors the ManifestWork resource in the cluster namespace on the hub cluster.
An example of ManifestWork to deploy a deployment to the managed cluster is shown in the following example.
apiVersion: work.open-cluster-management.io/v1
kind: ManifestWork
metadata:
  namespace: <target managed cluster>
  name: hello-work-demo
spec:
  workload:
    manifests:
      - apiVersion: apps/v1
        kind: Deployment
        metadata:
          name: hello
          namespace: default
        spec:
          selector:
            matchLabels:
              app: hello
          template:
            metadata:
              labels:
                app: hello
            spec:
              containers:
                - name: hello
                  image: quay.io/asmacdo/busybox
                  command:
                    ["sh", "-c", 'echo "Hello, Kubernetes!" && sleep 3600']
Status tracking
Work agent will track all the resources defined in ManifestWork and update its status. There are two types of status in manifestwork. The resourceStatus tracks the status of each manifest in the ManifestWork and conditions reflects the overall status of the ManifestWork. Work agent currently checks whether a resource is Available, meaning the resource exists on the managed cluster, and Applied means the resource defined in ManifestWork has been applied to the managed cluster.
Here is an example.
apiVersion: work.open-cluster-management.io/v1
kind: ManifestWork
metadata: ...
spec: ...
status:
  conditions:
    - lastTransitionTime: "2021-06-15T02:26:02Z"
      message: Apply manifest work complete
      reason: AppliedManifestWorkComplete
      status: "True"
      type: Applied
    - lastTransitionTime: "2021-06-15T02:26:02Z"
      message: All resources are available
      reason: ResourcesAvailable
      status: "True"
      type: Available
  resourceStatus:
    manifests:
      - conditions:
          - lastTransitionTime: "2021-06-15T02:26:02Z"
            message: Apply manifest complete
            reason: AppliedManifestComplete
            status: "True"
            type: Applied
          - lastTransitionTime: "2021-06-15T02:26:02Z"
            message: Resource is available
            reason: ResourceAvailable
            status: "True"
            type: Available
        resourceMeta:
          group: apps
          kind: Deployment
          name: hello
          namespace: default
          ordinal: 0
          resource: deployments
          version: v1
Fine-grained field values tracking
Optionally, we can let the work agent aggregate and report certain fields from
the distributed resources to the hub clusters by setting FeedbackRule for
the ManifestWork:
apiVersion: work.open-cluster-management.io/v1
kind: ManifestWork
metadata: ...
spec:
  workload: ...
  manifestConfigs:
    - resourceIdentifier:
        group: apps
        resource: deployments
        namespace: default
        name: hello
      feedbackRules:
        - type: WellKnownStatus
        - type: JSONPaths
          jsonPaths:
            - name: isAvailable
              path: '.status.conditions[?(@.type=="Available")].status'
The feedback rules prescribe the work agent to periodically get the latest
states of the resources, and scrape merely those expected fields from them,
which is helpful for trimming the payload size of the status. Note that the
collected feedback values on the ManifestWork will not be updated unless
the latest value is changed/different from the previous recorded value.
Currently, it supports two kinds of FeedbackRule:
WellKnownStatus: Using the pre-built template of feedback values for those well-known kubernetes resources.JSONPaths: A valid Kubernetes JSON-Path that selects a scalar field from the resource. Currently supported types are Integer, String, Boolean and JsonRaw. JsonRaw returns only when you have enabled the RawFeedbackJsonString feature gate on the agent. The agent will return the whole structure as a JSON string.
The default feedback value scraping interval is 30 second, and we can override
it by setting --status-sync-interval on your work agent. Too short period can
cause excessive burden to the control plane of the managed cluster, so generally
a recommended lower bound for the interval is 5 second.
In the end, the scraped values from feedback rules will be shown in the status:
apiVersion: work.open-cluster-management.io/v1
kind: ManifestWork
metadata: ...
spec: ...
status:
  resourceStatus:
    manifests:
    - conditions: ...
      resourceMeta: ...
      statusFeedback:
        values:
        - fieldValue:
            integer: 1
            type: Integer
          name: ReadyReplicas
        - fieldValue:
            integer: 1
            type: Integer
          name: Replicas
        - fieldValue:
            integer: 1
            type: Integer
          name: AvailableReplicas
        - fieldValue:
            string: "True"
            type: String
          name: isAvailable
Garbage collection
To ensure the resources applied by ManifestWork are reliably recorded, the work agent creates an AppliedManifestWork on the managed cluster for each ManifestWork as an anchor for resources relating to ManifestWork. When ManifestWork is deleted, work agent runs a Foreground deletion, that ManifestWork will stay in deleting state until all its related resources has been fully cleaned in the managed cluster.
Delete options
User can explicitly choose not to garbage collect the applied resources when a ManifestWork is deleted. The user should specify the deleteOption in the ManifestWork. By default, deleteOption is set as Foreground
which means the applied resources on the spoke will be deleted with the removal of ManifestWork. User can set it to
Orphan so the applied resources will not be deleted. Here is an example:
apiVersion: work.open-cluster-management.io/v1
kind: ManifestWork
metadata: ...
spec:
  workload: ...
  deleteOption:
    propagationPolicy: Orphan
Alternatively, user can also specify a certain resource defined in the ManifestWork to be orphaned by setting the
deleteOption to be SelectivelyOrphan. Here is an example with SelectivelyOrphan specified. It ensures the removal of deployment resource specified in the ManifestWork while the service resource is kept.
apiVersion: work.open-cluster-management.io/v1
kind: ManifestWork
metadata:
  name: selective-delete-work
spec:
  workload: ...
  deleteOption:
    propagationPolicy: SelectivelyOrphan
    selectivelyOrphans:
      orphaningRules:
      - group: ""
        resource: services
        namespace: default
        name: helloworld
Resource Race and Adoption
It is possible to create two ManifestWorks for the same cluster with the same resource defined.
For example, the user can create two Manifestworks on cluster1, and both Manifestworks have the
deployment resource hello in default namespace. If the content of the resource is different, the
two ManifestWorks will fight, and it is desired since each ManifestWork is treated as equal and
each ManifestWork is declaring the ownership of the resource. If there is another controller on
the managed cluster that tries to manipulate the resource applied by a ManifestWork, this
controller will also fight with work agent.
When one of the ManifestWork is deleted, the applied resource will not be removed no matter
DeleteOption is set or not. The remaining ManifestWork will still keep the ownership of the resource.
To resolve such conflict, user can choose a different update strategy to alleviate the resource conflict.
CreateOnly: with this strategy, the work-agent will only ensure creation of the certain manifest if the resource does not exist. work-agent will not update the resource, hence the ownership of the whole resource can be taken over by anotherManifestWorkor controller.ServerSideApply: with this strategy, the work-agent will run server side apply for the certain manifest. The default field manager iswork-agent, and can be customized. If anotherManifestWorkor controller takes the ownership of a certain field in the manifest, the originalManifestWorkwill report conflict. User can prune the originalManifestWorkso only field that it will own maintains.ReadOnly: with this strategy, the work-agent will not apply manifests onto the cluster, but it still can read resource fields and return results when feedback rules are defined. Only metadata of the manifest is required to be defined in the spec of theManifestWorkwith this strategy.
An example of using ServerSideApply strategy as following:
- User creates a
ManifestWorkwithServerSideApplyspecified:
apiVersion: work.open-cluster-management.io/v1
kind: ManifestWork
metadata:
  namespace: <target managed cluster>
  name: hello-work-demo
spec:
  workload: ...
  manifestConfigs:
    - resourceIdentifier:
        group: apps
        resource: deployments
        namespace: default
        name: hello
      updateStrategy:
        type: ServerSideApply
- User creates another
ManifestWorkwithServerSideApplybut with different field manager.
apiVersion: work.open-cluster-management.io/v1
kind: ManifestWork
metadata:
  namespace: <target managed cluster>
  name: hello-work-replica-patch
spec:
  workload:
    manifests:
      - apiVersion: apps/v1
        kind: Deployment
        metadata:
          name: hello
          namespace: default
        spec:
          replicas: 3
  manifestConfigs:
    - resourceIdentifier:
        group: apps
        resource: deployments
        namespace: default
        name: hello
      updateStrategy:
        type: ServerSideApply
        serverSideApply:
          force: true
          fieldManager: work-agent-another
The second ManifestWork only defines replicas in the manifest, so it takes the ownership of replicas. If the
first ManifestWork is updated to add replicas field with different value, it will get conflict condition and
manifest will not be updated by it.
Instead of create the second ManifestWork, user can also set HPA for this deployment. HPA will also take the ownership
of replicas, and the update of replicas field in the first ManifestWork will return conflict condition.
Ignore fields in Server Side Apply
To avoid work-agent returning conflict error, when using ServerSideApply as the update strategy, users can specify certain
fields to be ignored, such that when work agent is applying the resource to the ManagedCluster, the change on the
specified fields will not be updated onto the resource.
It is useful when other actors on the ManagedCluster is updating the same field on the resources
that the ManifestWork is owning. One example as below:
apiVersion: work.open-cluster-management.io/v1
kind: ManifestWork
metadata:
  namespace: <target managed cluster>
  name: hello-work-demo
spec:
  workload: ...
  manifestConfigs:
    - resourceIdentifier:
        resource: configmaps
        namespace: default
        name: some-configmap
      updateStrategy:
        type: ServerSideApply
        force: true
        serverSideApply:
          ignoreFields:
            - condition: OnSpokePresent
              jsonPaths:
                - .data
It indicates that when the configmap is applied on the ManagedCluster, any additional change
on the data field will be ignored by the work agent, no matter the change comes from another
actor on the ManagedCluster, or from this or another ManifestWork. It applies as long as the
configmap exists on the ManagedCluster.
Alternatively, user can also set the condition field in the above example to OnSpokeChange, which
indicates that the change of the data field will not be ignored if it comes from this ManifestWork
However, change from other actors on the ManagedCluster will be ignored.
Permission setting for work agent
All workload manifests are applied to the managed cluster by the work-agent, and by default the work-agent has the following permission for the managed cluster:
- clusterRole
admin(instead of thecluster-admin) to apply kubernetes common resources - managing
customresourcedefinitions, but can not manage a specific custom resource instance - managing
clusterrolebindings,rolebindings,clusterroles,roles, including thebindandescalatepermission, this is why we can grant work-agent service account extra permissions using ManifestWork
So if the workload manifests to be applied on the managed cluster exceeds the above permission, for example some
Custom Resource instances, there will be an error ... is forbidden: User "system:serviceaccount:open-cluster-management-agent:klusterlet-work-sa" cannot get resource ...
reflected on the ManifestWork status.
To prevent this, the work-agent needs to be given the corresponding permissions. You can add the permission by creating RBAC resources on the managed cluster directly, or by creating a ManifestWork including the RBAC resources on the hub cluster, then the work-agent will apply the RBAC resources to the managed cluster. As for creating the RBAC resources, there are several options:
- Option 1: Create clusterRoles with label
"open-cluster-management.io/aggregate-to-work": "true"for your to-be-applied resources, the rules defined in the clusterRoles will be aggregated to the work-agent automatically; (Supported since OCM version >= v0.12.0, Recommended) - Option 2: Create clusterRoles with label
rbac.authorization.k8s.io/aggregate-to-admin: "true"for your to-be-applied resources, the rules defined in the clusterRoles will be aggregated to the work-agent automatically; (Deprecated since OCM version >= v0.12.0, use the Option 1 instead) - Option 3: Create role/clusterRole roleBinding/clusterRoleBinding for the
klusterlet-work-saservice account; (Deprecated since OCM version >= v0.12.0, use the Option 1 instead)
Below is an example use ManifestWork to give the work-agent permission for resource machines.cluster.x-k8s.io
- Option 1: Use label
"open-cluster-management.io/aggregate-to-work": "true"to aggregate the permission; Recommended
apiVersion: work.open-cluster-management.io/v1
kind: ManifestWork
metadata:
  namespace: cluster1
  name: permission-set
spec:
  workload:
    manifests:
      - apiVersion: rbac.authorization.k8s.io/v1
        kind: ClusterRole
        metadata:
          name: open-cluster-management:klusterlet-work:my-role
          labels:
            open-cluster-management.io/aggregate-to-work: "true"  # with this label, the clusterRole will be selected to aggregate
        rules:
          # Allow agent to managed machines
          - apiGroups: ["cluster.x-k8s.io"]
            resources: ["machines"]
            verbs: ["get", "list", "watch", "create", "update", "patch", "delete"]
- Option 2: Use clusterRole and clusterRoleBinding; Deprecated since OCM version >= v0.12.0, use the Option 1 instead.
Because the work-agent might be running in a different namespace than the
open-cluster-management-agent
apiVersion: work.open-cluster-management.io/v1
kind: ManifestWork
metadata:
  namespace: cluster1
  name: permission-set
spec:
  workload:
    manifests:
      - apiVersion: rbac.authorization.k8s.io/v1
        kind: ClusterRole
        metadata:
          name: open-cluster-management:klusterlet-work:my-role
        rules:
          # Allow agent to managed machines
          - apiGroups: ["cluster.x-k8s.io"]
            resources: ["machines"]
            verbs: ["get", "list", "watch", "create", "update", "patch", "delete"]
      - apiVersion: rbac.authorization.k8s.io/v1
        kind: ClusterRoleBinding
        metadata:
          name: open-cluster-management:klusterlet-work:my-binding
        roleRef:
          apiGroup: rbac.authorization.k8s.io
          kind: ClusterRole
          name: open-cluster-management:klusterlet-work:my-role
        subjects:
          - kind: ServiceAccount
            name: klusterlet-work-sa
            namespace: open-cluster-management-agent
Treating defaulting/immutable fields in API
The kube-apiserver sets the defaulting/immutable fields for some APIs if the user does not set them. And it may fail to
deploy these APIs using ManifestWork. Because in the reconcile loop, the work agent will try to update the immutable
or default field after comparing the desired manifest in the ManifestWork and existing resource in the cluster, and
the update will fail or not take effect.
Let’s use Job as an example. The kube-apiserver will set a default selector and label on the Pod of Job if the user does
not set spec.Selector in the Job. The fields are immutable, so the ManifestWork will report AppliedManifestFailed
when we apply a Job without spec.Selector using ManifestWork.
apiVersion: work.open-cluster-management.io/v1
kind: ManifestWork
metadata:
  namespace: cluster1
  name: exmaple-job
spec:
  workload:
    manifests:
      - apiVersion: batch/v1
        kind: Job
        metadata:
          name: pi
          namespace: default
        spec:
          template:
            spec:
              containers:
              - name: pi
                image: perl:5.34.0
                command: ["perl",  "-Mbignum=bpi", "-wle", "print bpi(2000)"]
              restartPolicy: Never
          backoffLimit: 4
There are 2 options to fix this issue.
- Specify the fields manually if they are configurable. For example, set
spec.manualSelector=trueand your own labels in thespec.selectorof the Job, and set the same labels for the containers.
apiVersion: work.open-cluster-management.io/v1
kind: ManifestWork
metadata:
  namespace: cluster1
  name: exmaple-job-1
spec:
  workload:
    manifests:
      - apiVersion: batch/v1
        kind: Job
        metadata:
          name: pi
          namespace: default
        spec:
          manualSelector: true
          selector:
            matchLabels:
              job: pi
          template:
            metadata:
              labels:
                job: pi
            spec:
              containers:
              - name: pi
                image: perl:5.34.0
                command: ["perl",  "-Mbignum=bpi", "-wle", "print bpi(2000)"]
              restartPolicy: Never
          backoffLimit: 4
- Set the updateStrategy ServerSideApply in the
ManifestWorkfor the API.
apiVersion: work.open-cluster-management.io/v1
kind: ManifestWork
metadata:
  namespace: cluster1
  name: exmaple-job
spec:
  manifestConfigs:
    - resourceIdentifier:
        group: batch
        resource: jobs
        namespace: default
        name: pi
      updateStrategy:
        type: ServerSideApply
  workload:
    manifests:
      - apiVersion: batch/v1
        kind: Job
        metadata:
          name: pi
          namespace: default
        spec:
          template:
            spec:
              containers:
              - name: pi
                image: perl:5.34.0
                command: ["perl",  "-Mbignum=bpi", "-wle", "print bpi(2000)"]
              restartPolicy: Never
          backoffLimit: 4
Dynamic identity authorization
All manifests in ManifestWork are applied by the work-agent using the mounted service account to raise requests
against the managed cluster by default. And the work agent has very high permission to access the managed cluster which
means that any hub user with write access to the ManifestWork resources will be able to dispatch any resources that
the work-agent can manipulate to the managed cluster.
The executor subject feature(introduced in release 0.9.0) provides a way to clarify the owner identity(executor) of the ManifestWork before it
takes effect so that we can explicitly check whether the executor has sufficient permission in the managed cluster.
The following example clarifies the owner “executor1” of the ManifestWork, so before the work-agent applies the
“default/test” ConfigMap to the managed cluster, it will first check whether the ServiceAccount “default/executor”
has the permission to apply this ConfigMap
apiVersion: work.open-cluster-management.io/v1
kind: ManifestWork
metadata:
  namespace: cluster1
  name: example-manifestwork
spec:
  executor:
    subject:
      type: ServiceAccount
      serviceAccount:
        namespace: default
        name: executor1
  workload:
    manifests:
      - apiVersion: v1
        data:
          a: b
        kind: ConfigMap
        metadata:
          namespace: default
          name: test
Not any hub user can specify any executor at will. Hub users can only use the executor for which they have an
execute-as(virtual verb) permission. For example, hub users bound to the following Role can use the “executor1”
ServiceAccount in the “default” namespace on the managed cluster.
apiVersion: rbac.authorization.k8s.io/v1
kind: Role
metadata:
  name: cluster1-executor1
  namespace: cluster1
rules:
- apiGroups:
  - work.open-cluster-management.io
  resources:
  - manifestworks
  verbs:
  - execute-as
  resourceNames:
  - system:serviceaccount:default:executor1
For backward compatibility, if the executor is absent, the work agent will keep using the mounted service account to
apply resources. But using the executor is encouraged, so we have a feature gate NilExecutorValidating to control
whether any hub user is allowed to not set the executor. It is disabled by default, we can use the following
configuration to the ClusterManager to enable it. When it is enabled, not setting executor will be regarded as using
the “/klusterlet-work-sa” (namespace is empty, name is klusterlet-work-sa) virtual service account on the managed
cluster for permission verification, which means only hub users with “execute-as” permissions on the
“system:serviceaccount::klusterlet-work-sa” ManifestWork are allowed not to set the executor.
spec:
  workConfiguration:
    featureGates:
    - feature: NilExecutorValidating
      mode: Enable
Work-agent uses the SubjectAccessReview API to check whether an executor has permission to the manifest resources, which
will cause a large number of SAR requests to the managed cluster API-server, so we provided a new feature gate
ExecutorValidatingCaches(in release 0.10.0) to cache the result of the executor’s permission to the manifest
resource, it only works when the managed cluster uses
RBAC mode authorization,
and is disabled by default as well, but can be enabled by using the following configuration for Klusterlet:
spec:
  workConfiguration:
    featureGates:
    - feature: ExecutorValidatingCaches
      mode: Enable
Enhancement proposal: Work Executor Group
1.3.2 - ManifestWorkReplicaSet
What is ManifestWorkReplicaSet
ManifestWorkReplicaSet is an aggregator API that uses Manifestwork and Placement to create manifestwork for the placement-selected clusters.
View an example of ManifestWorkReplicaSet to deploy a CronJob and Namespace for a group of clusters selected by placements.
apiVersion: work.open-cluster-management.io/v1alpha1
kind: ManifestWorkReplicaSet
metadata:
  name: mwrset-cronjob
  namespace: ocm-ns
spec:
  placementRefs:
    - name: placement-rollout-all # Name of a created Placement
      rolloutStrategy:
        rolloutType: All
    - name: placement-rollout-progressive # Name of a created Placement
      rolloutStrategy:
        rolloutType: Progressive
        progressive:
          minSuccessTime: 5m
          progressDeadline: 10m
          maxFailures: 5%
          mandatoryDecisionGroups:
          - groupName: "prod-canary-west"
          - groupName: "prod-canary-east"
    - name: placement-rollout-progressive-per-group # Name of a created Placement
      rolloutStrategy:
        rolloutType: ProgressivePerGroup
        progressivePerGroup:
          progressDeadline: 10m
          maxFailures: 2
  manifestWorkTemplate:
    deleteOption:
      propagationPolicy: SelectivelyOrphan
      selectivelyOrphans:
        orphaningRules:
          - group: ''
            name: ocm-ns
            namespace: ''
            resource: Namespace
    manifestConfigs:
      - feedbackRules:
          - jsonPaths:
              - name: lastScheduleTime
                path: .status.lastScheduleTime
              - name: lastSuccessfulTime
                path: .status.lastSuccessfulTime
            type: JSONPaths
        resourceIdentifier:
          group: batch
          name: sync-cronjob
          namespace: ocm-ns
          resource: cronjobs
    workload:
      manifests:
        - kind: Namespace
          apiVersion: v1
          metadata:
            name: ocm-ns
        - kind: CronJob
          apiVersion: batch/v1
          metadata:
            name: sync-cronjob
            namespace: ocm-ns
          spec:
            schedule: '* * * * *'
            concurrencyPolicy: Allow
            suspend: false
            jobTemplate:
              spec:
                backoffLimit: 2
                template:
                  spec:
                    containers:
                      - name: hello
                        image: 'quay.io/prometheus/busybox:latest'
                        args:
                          - /bin/sh
                          - '-c'
                          - date; echo Hello from the Kubernetes cluster
The PlacementRefs uses the Rollout Strategy API to apply the manifestWork to the selected clusters. In the example above; the placementRefs refers to three placements; placement-rollout-all, placement-rollout-progressive and placement-rollout-progressive-per-group. For more info regards the rollout strategies check the Rollout Strategy section at the placement document. Note: The placement reference must be in the same namespace as the manifestWorkReplicaSet.
Status tracking
The ManifestWorkReplicaSet example above refers to three placements each one will have its placementSummary in ManifestWorkReplicaSet status. The PlacementSummary shows the number of manifestWorks applied to the placement’s clusters based on the placementRef’s rolloutStrategy and total number of clusters. The manifestWorkReplicaSet Summary aggregate the placementSummaries showing the total number of applied manifestWorks to all clusters.
The manifestWorkReplicaSet has three status conditions;
- PlacementVerified verify the placementRefs status; not exist or empty cluster selection.
- PlacementRolledOut verify the rollout strategy status; progressing or complete.
- ManifestWorkApplied verify the created manifestWork status; applied, progressing, degraded or available.
The manifestWorkReplicaSet determine the ManifestWorkApplied condition status based on the resource state (applied or available) of each manifestWork.
Here is an example.
apiVersion: work.open-cluster-management.io/v1alpha1
kind: ManifestWorkReplicaSet
metadata:
  name: mwrset-cronjob
  namespace: ocm-ns
spec:
  placementRefs:
    - name: placement-rollout-all
      ...
    - name: placement-rollout-progressive
      ...
    - name: placement-rollout-progressive-per-group
      ...
  manifestWorkTemplate:
     ...
status:
 conditions:
   - lastTransitionTime: '2023-04-27T02:30:54Z'
     message: ''
     reason: AsExpected
     status: 'True'
     type: PlacementVerified
   - lastTransitionTime: '2023-04-27T02:30:54Z'
     message: ''
     reason: Progressing
     status: 'False'
     type: PlacementRolledOut
   - lastTransitionTime: '2023-04-27T02:30:54Z'
     message: ''
     reason: AsExpected
     status: 'True'
     type: ManifestworkApplied
 placementSummary:
 - name: placement-rollout-all
   availableDecisionGroups: 1 (10 / 10 clusters applied)
   summary:
     applied: 10
     available: 10
     progressing: 0
     degraded: 0
     total: 10
 - name: placement-rollout-progressive
   availableDecisionGroups: 3 (20 / 30 clusters applied)
   summary:
     applied: 20
     available: 20
     progressing: 0
     degraded: 0
     total: 20
 - name: placement-rollout-progressive-per-group
   availableDecisionGroups: 4 (15 / 20 clusters applied)
   summary:
     applied: 15
     available: 15
     progressing: 0
     degraded: 0
     total: 15
 summary:
   applied: 45
   available: 45
   progressing: 0
   degraded: 0
   total: 45
Release and Enable Feature
ManifestWorkReplicaSet is in alpha release and it is not enabled by default. In order to enable the ManifestWorkReplicaSet feature, it has to be enabled in the cluster-manager instance in the hub. Use the following command to edit the cluster-manager CR (custom resource) in the hub cluster.
$ oc edit ClusterManager cluster-manager
Add the workConfiguration field to the cluster-manager CR as below and save.
kind: ClusterManager
metadata:
  name: cluster-manager
spec:
   ...
  workConfiguration:
    featureGates:
    - feature: ManifestWorkReplicaSet
      mode: Enable
In order to assure the ManifestWorkReplicaSet has been enabled successfully check the cluster-manager using the command below
$ oc get ClusterManager cluster-manager -o yml
You should find under the status->generation the cluster-manager-work-controller deployment has been added as below
kind: ClusterManager
metadata:
  name: cluster-manager
spec:
   ...
status:
   ...
  generations:
    ...
  - group: apps
    lastGeneration: 2
    name: cluster-manager-work-webhook
    namespace: open-cluster-management-hub
    resource: deployments
    version: v1
  - group: apps
    lastGeneration: 1
    name: cluster-manager-work-controller
    namespace: open-cluster-management-hub
    resource: deployments
    version: v1
1.4 - Content Placement
1.4.1 - Placement
CHANGE NOTE:
-
The
PlacementandPlacementDecisionAPI v1alpha1 version will no longer be served in OCM v0.9.0.- Migrate manifests and API clients to use the
PlacementandPlacementDecisionAPI v1beta1 version, available since OCM v0.7.0. - All existing persisted objects are accessible via the new API.
- Notable changes:
- The field
spec.prioritizerPolicy.configurations.nameinPlacementAPI v1alpha1 is removed and replaced byspec.prioritizerPolicy.configurations.scoreCoordinate.builtInin v1beta1.
- The field
- Migrate manifests and API clients to use the
-
Clusters in terminating state will not be selected by placements from OCM v0.14.0.
Overall
Placement concept is used to dynamically select a set of managedClusters
in one or multiple ManagedClusterSet so that higher level
users can either replicate Kubernetes resources to the member clusters or run
their advanced workload i.e. multi-cluster scheduling.
The “input” and “output” of the scheduling process are decoupled into two
separated Kubernetes API Placement and PlacementDecision. As is shown in
the following picture, we prescribe the scheduling policy in the spec of
Placement API and the placement controller in the hub will help us to
dynamically select a slice of managed clusters from the given cluster sets.
The selected clusters will be listed in PlacementDecision.
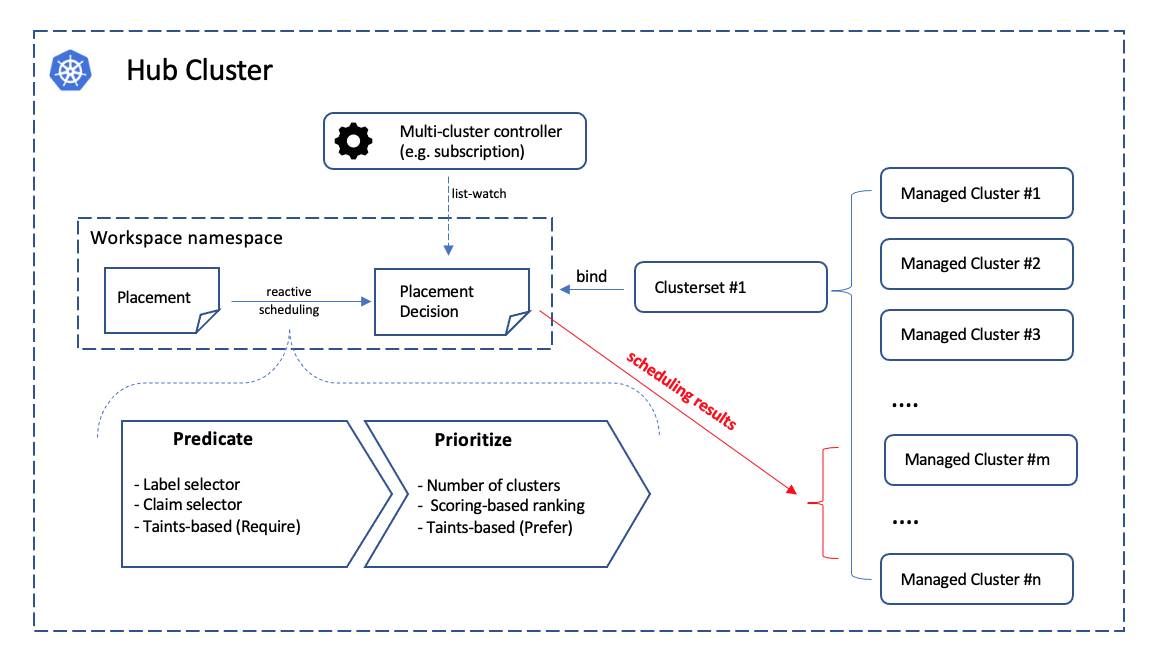
Following the architecture of Kubernetes’ original scheduling framework, the multi-cluster scheduling is logically divided into two phases internally:
- Predicate: Hard requirements for the selected clusters.
- Prioritize: Rank the clusters by the soft requirements and select a subset among them.
Select clusters in ManagedClusterSet
By following the previous section about
ManagedClusterSet, now we’re supposed to have one or multiple valid cluster
sets in the hub clusters. Then we can move on and create a placement in the
“workspace namespace” by specifying predicates and prioritizers in the
Placement API to define our own multi-cluster scheduling policy.
Notes:
- Clusters in terminating state will not be selected by placements.
Predicates
In the predicates section, you can select clusters by labels, clusterClaims, or CEL expressions.
Label or ClusterClaim Selection
For instance, you can select 3 clusters with label purpose=test and
clusterClaim platform.open-cluster-management.io=aws as seen in the following
examples:
apiVersion: cluster.open-cluster-management.io/v1beta1
kind: Placement
metadata:
  name: placement1
  namespace: ns1
spec:
  numberOfClusters: 3
  clusterSets:
    - prod
  predicates:
    - requiredClusterSelector:
        labelSelector:
          matchLabels:
            purpose: test
        claimSelector:
          matchExpressions:
            - key: platform.open-cluster-management.io
              operator: In
              values:
                - aws
Note that the distinction between label-selecting and claim-selecting is elaborated in this page about how to extend attributes for the managed clusters.
CEL Expression Selection
apiVersion: cluster.open-cluster-management.io/v1beta1
kind: Placement
metadata:
  name: placement1
  namespace: ns1
spec:
  numberOfClusters: 3
  clusterSets:
    - prod
  predicates:
  - requiredClusterSelector:
      celSelector:
        celExpressions:
          # Select clusters by Kubernetes version listed in managedCluster.Status.version.kubernetes.
          - managedCluster.status.version.kubernetes == "v1.31.0"
          # Select clusters by info stored in clusterClaims.
          - managedCluster.status.clusterClaims.exists(c, c.name == "kubeversion.open-cluster-management.io" && c.value == "v1.31.0")
          # Use CEL Standard macros and Standard functions on the managedCluster fields.
          - managedCluster.metadata.labels["version"].matches('^1\\.(30|31)\\.\\d+$')
          # Use Kubernetes semver library functions isLessThan and isGreaterThan to select clusters by version comparison.
          - semver(managedCluster.metadata.labels["version"]).isGreaterThan(semver("1.30.0"))
          # Use OCM customized function scores to select clusters by AddonPlacementScore.
          - managedCluster.scores("resource-usage-score").filter(s, s.name == 'memNodeAvailable').all(e, e.value > 0)
The CEL expressions provide more flexible and powerful selection capabilities with built-in libraries. For more detailed usage of CEL expressions, refer to:
Taints/Tolerations
To support filtering unhealthy/not-reporting clusters and keep workloads from being placed in unhealthy or unreachable clusters, we introduce the similar concept of taint/toleration in Kubernetes. It also allows user to add a customized taint to deselect a cluster from placement. This is useful when the user wants to set a cluster to maintenance mode and evict workload from this cluster.
In OCM, Taints and Tolerations work together to allow users to control the selection of managed clusters more flexibly.
Taints are properties of ManagedClusters, they allow a Placement to repel a set of ManagedClusters in predicates stage.
Tolerations are applied to Placements, and allow Placements to select ManagedClusters with matching taints.
The following example shows how to tolerate clusters with taints.
-
Tolerate clusters with taint
Suppose your managed cluster has taint added as below.
apiVersion: cluster.open-cluster-management.io/v1
kind: ManagedCluster
metadata:
  name: cluster1
spec:
  hubAcceptsClient: true
  taints:
    - effect: NoSelect
      key: gpu
      value: "true"
      timeAdded: '2022-02-21T08:11:06Z'
By default, the placement won’t select this cluster unless you define tolerations.
apiVersion: cluster.open-cluster-management.io/v1beta1
kind: Placement
metadata:
  name: placement1
  namespace: ns1
spec:
  tolerations:
    - key: gpu
      value: "true"
      operator: Equal
With the above tolerations defined, cluster1 could be selected by placement because of the
key: gpuandvalue: "true"match. -
Tolerate clusters with taint for a period of time
TolerationSecondsrepresents the period of time the toleration tolerates the taint. It could be used for the case like, when a managed cluster gets offline, users can make applications deployed on this cluster to be transferred to another available managed cluster after a tolerated time.apiVersion: cluster.open-cluster-management.io/v1 kind: ManagedCluster metadata: name: cluster1 spec: hubAcceptsClient: true taints: - effect: NoSelect key: cluster.open-cluster-management.io/unreachable timeAdded: '2022-02-21T08:11:06Z'If define a placement with
TolerationSecondsas below, then the workload will be transferred to another available managed cluster after 5 minutes.apiVersion: cluster.open-cluster-management.io/v1alpha1 kind: Placement metadata: name: placement1 namespace: ns1 spec: tolerations: - key: cluster.open-cluster-management.io/unreachable operator: Exists tolerationSeconds: 300
In tolerations section, it includes the
following fields:
- Key (optional). Key is the taint key that the toleration applies to.
- Value (optional). Value is the taint value the toleration matches to.
- Operator (optional). Operator represents a key’s relationship to the
value. Valid operators are
ExistsandEqual. Defaults toEqual. A toleration “matches” a taint if the keys are the same and the effects are the same, and the operator is:Equal. The operator is Equal and the values are equal.Exists. Exists is equivalent to wildcard for value, so that a placement can tolerate all taints of a particular category.
- Effect (optional). Effect indicates the taint effect to match. Empty means
match all taint effects. When specified, allowed values are
NoSelect,PreferNoSelectandNoSelectIfNew. (PreferNoSelectis not implemented yet, currently clusters with effectPreferNoSelectwill always be selected.) - TolerationSeconds (optional). TolerationSeconds represents the period of
time the toleration (which must be of effect
NoSelect/PreferNoSelect, otherwise this field is ignored) tolerates the taint. The default value is nil, which indicates it tolerates the taint forever. The start time of counting the TolerationSeconds should be theTimeAddedin Taint, not the cluster scheduled time orTolerationSecondsadded time.
Prioritizers
Score-based prioritizer
In prioritizerPolicy section, you can define the policy of prioritizers.
The following example shows how to select clusters with prioritizers.
-
Select a cluster with the largest allocatable memory.
apiVersion: cluster.open-cluster-management.io/v1beta1
kind: Placement
metadata:
  name: placement1
  namespace: ns1
spec:
  numberOfClusters: 1
  prioritizerPolicy:
    configurations:
      - scoreCoordinate:
          builtIn: ResourceAllocatableMemory
The prioritizer policy has default mode additive and default prioritizers
SteadyandBalance.In the above example, the prioritizers actually come into effect are
Steady,BalanceandResourceAllocatableMemory.And the end of this section has more description about the prioritizer policy mode and default prioritizers.
-
Select a cluster with the largest allocatable CPU and memory, and make placement sensitive to resource changes.
apiVersion: cluster.open-cluster-management.io/v1beta1
kind: Placement
metadata:
  name: placement1
  namespace: ns1
spec:
  numberOfClusters: 1
  prioritizerPolicy:
    configurations:
      - scoreCoordinate:
          builtIn: ResourceAllocatableCPU
        weight: 2
      - scoreCoordinate:
          builtIn: ResourceAllocatableMemory
        weight: 2
The prioritizer policy has default mode additive and default prioritizers
SteadyandBalance, and their default weight is 1.In the above example, the prioritizers actually come into effect are
Steadywith weight 1,Balancewith weight 1,ResourceAllocatableCPUwith weight 2 andResourceAllocatableMemorywith weight 2. The cluster score will be a combination of the 4 prioritizers score. SinceResourceAllocatableCPUandResourceAllocatableMemoryhave higher weight, they will be weighted more in the results, and make placement sensitive to resource changes.And the end of this section has more description about the prioritizer weight and how the final score is calculated.
-
Select two clusters with the largest addon score CPU ratio, and pin the placement decisions.
apiVersion: cluster.open-cluster-management.io/v1beta1
kind: Placement
metadata:
  name: placement1
  namespace: ns1
spec:
  numberOfClusters: 2
  prioritizerPolicy:
    mode: Exact
    configurations:
      - scoreCoordinate:
          builtIn: Steady
        weight: 3
      - scoreCoordinate:
          type: AddOn
          addOn:
            resourceName: default
            scoreName: cpuratio
In the above example, explicitly define the mode as exact. The prioritizers actually come into effect are
Steadywith weight 3 and addon score cpuratio with weight 1. Go into the Extensible scheduling section to learn more about addon score.
In prioritizerPolicy section, it includes the following fields:
modeis eitherExact,Additiveor"", where""isAdditiveby default.- In
Additivemode, any prioritizer not explicitly enumerated is enabled in its defaultConfigurations, in whichSteadyandBalanceprioritizers have the weight of 1 while other prioritizers have the weight of 0.Additivedoesn’t require configuring all prioritizers. The defaultConfigurationsmay change in the future, and additional prioritization will happen. - In
Exactmode, any prioritizer not explicitly enumerated is weighted as zero.Exactrequires knowing the full set of prioritizers you want, but avoids behavior changes between releases.
- In
configurationsrepresents the configuration of prioritizers.scoreCoordinaterepresents the configuration of the prioritizer and score source.typedefines the type of the prioritizer score. Type is eitherBuiltIn,AddOnor “”, where "" isBuiltInby default. When the type isBuiltIn, aBuiltInprioritizer name must be specified. When the type isAddOn, need to configure the score source inAddOn.builtIndefines the name of aBuiltInprioritizer. Below are the validBuiltInprioritizer names.Balance: balance the decisions among the clusters.Steady: ensure the existing decision is stabilized.ResourceAllocatableCPU: sort clusters based on the allocatable CPU.ResourceAllocatableMemory: sort clusters based on the allocatable memory.
addOndefines the resource name and score name.AddOnPlacementScoreis introduced to describe addon scores, go into the Extensible scheduling section to learn more about it.resourceNamedefines the resource name of theAddOnPlacementScore. The placement prioritizer selectsAddOnPlacementScoreCR by this name.scoreNamedefines the score name insideAddOnPlacementScore.AddOnPlacementScorecontains a list of score name and score value,scoreNamespecifies the score to be used by the prioritizer.
weightdefines the weight of the prioritizer. The value must be ranged in [-10,10]. Each prioritizer will calculate an integer score of a cluster in the range of [-100, 100]. The final score of a cluster will be sum(weight * prioritizer_score). A higher weight indicates that the prioritizer weights more in the cluster selection, while 0 weight indicates that the prioritizer is disabled. A negative weight indicates wanting to select the last ones.
Extensible scheduling
In placement resource based scheduling, in some cases the prioritizer needs extra data (more than the default value provided by ManagedCluster) to calculate the score of the managed cluster. For example, schedule the clusters based on cpu or memory usage data of the clusters fetched from a monitoring system.
So we provide a new API AddOnPlacementScore to support a more extensible way
to schedule based on customized scores.
- As a user, as mentioned in the above section, can specify the score in placement yaml to select clusters.
- As a score provider, a 3rd party controller could run on either hub or managed
cluster, to maintain the lifecycle of
AddOnPlacementScoreand update score into it.
Extend the multi-cluster scheduling capabilities with placement introduces how to implement a customized score provider.
Refer to the enhancements to learn more.
PlacementDecisions
A slice of PlacementDecision will be created by placement controller in the
same namespace, each with a label of
cluster.open-cluster-management.io/placement={placement name}.
PlacementDecision contains the results of the cluster selection as seen in the
following examples.
apiVersion: cluster.open-cluster-management.io/v1beta1
kind: PlacementDecision
metadata:
  labels:
    cluster.open-cluster-management.io/placement: placement1
  name: placement1-decision-1
  namespace: default
status:
  decisions:
    - clusterName: cluster1
    - clusterName: cluster2
    - clusterName: cluster3
The status.decisions lists the top N clusters with the highest score and ordered
by names. The status.decisions changes over time, the scheduling result update
based on what endpoints exist.
The scheduling result in the PlacementDecision API is designed to
be paginated with its page index as the name’s suffix to avoid “too large
object” issue from the underlying Kubernetes API framework.
PlacementDecision can be consumed by another operand to decide how the
workload should be placed in multiple clusters.
Decision strategy
The decisionStrategy section of Placement can be used to divide the created
PlacementDecision into groups and define the number of clusters per decision group.
Assume an environment has 310 clusters, 10 of which have the label prod-canary-west and 10 have the label prod-canary-east. The following example demonstrates how to group the clusters with the labels prod-canary-west and prod-canary-east into 2 groups, and group the remaining clusters into groups with a maximum of 150 clusters each.
apiVersion: cluster.open-cluster-management.io/v1beta1
kind: Placement
metadata:
  name: placement1
  namespace: default
spec:
  clusterSets:
    - global
  decisionStrategy:
    groupStrategy:
      clustersPerDecisionGroup: 150
      decisionGroups:
      - groupName: prod-canary-west
        groupClusterSelector:
          labelSelector:
            matchExpressions:
              - key: prod-canary-west
                operator: Exists
      - groupName: prod-canary-east
        groupClusterSelector:
          labelSelector:
            matchExpressions:
              - key: prod-canary-east
                operator: Exists
The decisionStrategy section includes the following fields:
decisionGroups: Represents a list of predefined groups to put decision results. Decision groups will be constructed based on thedecisionGroupsfield at first. The clusters not included in thedecisionGroupswill be divided to other decision groups afterwards. Each decision group should not have the number of clusters larger than theclustersPerDecisionGroup.groupName: Represents the name to be added as the value of label keycluster.open-cluster-management.io/decision-group-nameof createdPlacementDecisions.groupClusterSelector: Defines the label selector to select clusters subset by label.
clustersPerDecisionGroup: A specific number or percentage of the total selected clusters. The specific number will divide the placementDecisions to decisionGroups, the max number of clusters in each group equal to that specific number.
With this decision strategy defined, the placement status will list the group result,
including the decision group name and index, the cluster count, and the corresponding
PlacementDecision names.
status:
...
  decisionGroups:
  - clusterCount: 10
    decisionGroupIndex: 0
    decisionGroupName: prod-canary-west
    decisions:
    - placement1-decision-1
  - clusterCount: 10
    decisionGroupIndex: 1
    decisionGroupName: prod-canary-east
    decisions:
    - placement1-decision-2
  - clusterCount: 150
    decisionGroupIndex: 2
    decisionGroupName: ""
    decisions:
    - placement1-decision-3
    - placement1-decision-4
  - clusterCount: 140
    decisionGroupIndex: 3
    decisionGroupName: ""
    decisions:
    - placement1-decision-5
    - placement1-decision-6
  numberOfSelectedClusters: 310
The PlacementDecision will have labels cluster.open-cluster-management.io/decision-group-name
and cluster.open-cluster-management.io/decision-group-index to indicate which group name
and group index it belongs to.
apiVersion: cluster.open-cluster-management.io/v1beta1
kind: PlacementDecision
metadata:
  labels:
    cluster.open-cluster-management.io/placement: placement1
    cluster.open-cluster-management.io/decision-group-index: "0"
    cluster.open-cluster-management.io/decision-group-name: prod-canary-west
  name: placement1-decision-1
  namespace: default
...
Rollout Strategy
Rollout Strategy API facilitate the use of placement decision strategy with OCM workload applier APIs such as Policy, Addon and ManifestWorkReplicaSet to apply workloads.
    placements:
    - name: placement-example
      rolloutStrategy:
        type: Progressive
        progressive:
          mandatoryDecisionGroups:
          - groupName: "prod-canary-west"
          - groupName: "prod-canary-east"
          maxConcurrency: 25%
          minSuccessTime: 5m
          progressDeadline: 10m
          maxFailures: 2
The Rollout Strategy API provides three rollout types;
- All: means apply the workload to all clusters in the decision groups at once.
- Progressive: means apply the workload to the selected clusters progressively per cluster. The workload will not be applied to the next cluster unless one of the current applied clusters reach the successful state and haven’t breached the MaxFailures configuration.
- ProgressivePerGroup: means apply the workload to decisionGroup clusters progressively per group. The workload will not be applied to the next decisionGroup unless all clusters in the current group reach the successful state and haven’t breached the MaxFailures configuration.
The RollOut Strategy API also provides rollOut config to fine-tune the workload apply progress based on the use-case requirements;
- MinSuccessTime: defined in seconds/minutes/hours for how long workload applier controller will wait from the beginning of the rollout to proceed with the next rollout, assuming a successful state had been reached and MaxFailures hasn’t been breached. Default is 0 meaning the workload applier proceeds immediately after a successful state is reached.
- ProgressDeadline: defined in seconds/minutes/hours for how long workload applier controller will wait until the workload reaches a successful state in the spoke cluster. If the workload does not reach a successful state after ProgressDeadline, the controller will stop waiting and workload will be treated as “timeout” and be counted into MaxFailures. Once the MaxFailures is breached, the rollout will stop. Default value is “None”, meaning the workload applier will wait for a successful state indefinitely.
- MaxFailures: defined as the maximum percentage of or number of clusters that can fail in order to proceed with the rollout. Fail means the cluster has a failed status or timeout status (does not reach successful status after ProgressDeadline). Once the MaxFailures is breached, the rollout will stop. Default is 0 means that no failures are tolerated.
- MaxConcurrency: is the max number of clusters to deploy workload concurrently. The MaxConcurrency can be defined only in case rollout type is progressive.
- MandatoryDecisionGroups: is a list of decision groups to apply the workload first. If mandatoryDecisionGroups not defined the decision group index is considered to apply the workload in groups by order. The MandatoryDecisionGroups can be defined only in case rollout type is progressive or progressivePerGroup.
Troubleshooting
If no PlacementDecision generated after you creating Placement, you can run below commands to troubleshoot.
Check the Placement conditions
For example:
$ kubectl describe placement <placement-name>
Name:         demo-placement
Namespace:    default
Labels:       <none>
Annotations:  <none>
API Version:  cluster.open-cluster-management.io/v1beta1
Kind:         Placement
...
Status:
  Conditions:
    Last Transition Time:       2022-09-30T07:39:45Z
    Message:                    Placement configurations check pass
    Reason:                     Succeedconfigured
    Status:                     False
    Type:                       PlacementMisconfigured
    Last Transition Time:       2022-09-30T07:39:45Z
    Message:                    No valid ManagedClusterSetBindings found in placement namespace
    Reason:                     NoManagedClusterSetBindings
    Status:                     False
    Type:                       PlacementSatisfied
  Number Of Selected Clusters:  0
...
The Placement has 2 types of condition, PlacementMisconfigured and PlacementSatisfied.
- If the condition
PlacementMisconfiguredis true, means your placement has configuration errors, the message tells you more details about the failure. - If the condition
PlacementSatisfiedis false, means noManagedClustersatisfy this placement, the message tells you more details about the failure. In this example, it is because noManagedClusterSetBindingsfound in placement namespace.
Check the Placement events
For example:
$ kubectl describe placement <placement-name>
Name:         demo-placement
Namespace:    default
Labels:       <none>
Annotations:  <none>
API Version:  cluster.open-cluster-management.io/v1beta1
Kind:         Placement
...
Events:
  Type    Reason          Age   From                 Message
  ----    ------          ----  ----                 -------
  Normal  DecisionCreate  2m10s   placementController  Decision demo-placement-decision-1 is created with placement demo-placement in namespace default
  Normal  DecisionUpdate  2m10s   placementController  Decision demo-placement-decision-1 is updated with placement demo-placement in namespace default
  Normal  ScoreUpdate     2m10s   placementController  cluster1:0 cluster2:100 cluster3:200
  Normal  DecisionUpdate  3s      placementController  Decision demo-placement-decision-1 is updated with placement demo-placement in namespace default
  Normal  ScoreUpdate     3s      placementController  cluster1:200 cluster2:145 cluster3:189 cluster4:200
The placement controller will give a score to each filtered ManagedCluster and generate an event for it. When the cluster score
changes, a new event will generate. You can check the score of each cluster in the Placment events, to know why some clusters with lower score are not selected.
Debug
If you want to know more defails of how clusters are selected in each step, can following below step to access the debug endpoint.
Create clusterrole “debugger” to access debug path and bind this to anonymous user.
kubectl create clusterrole "debugger" --verb=get --non-resource-url="/debug/*"
kubectl create clusterrolebinding debugger --clusterrole=debugger --user=system:anonymous
Export placement 8443 port to local.
kubectl port-forward -n open-cluster-management-hub deploy/cluster-manager-placement-controller 8443:8443
Curl below url to debug one specific placement.
curl -k https://127.0.0.1:8443/debug/placements/<namespace>/<name>
For example, the environment has a Placement named placement1 in default namespace, which selects 2 ManagedClusters, the output would be like:
$ curl -k  https://127.0.0.1:8443/debug/placements/default/placement1
{"filteredPiplieResults":[{"name":"Predicate","filteredClusters":["cluster1","cluster2"]},{"name":"Predicate,TaintToleration","filteredClusters":["cluster1","cluster2"]}],"prioritizeResults":[{"name":"Balance","weight":1,"scores":{"cluster1":100,"cluster2":100}},{"name":"Steady","weight":1,"scores":{"cluster1":100,"cluster2":100}}]}
Future work
In addition to selecting cluster by predicates, we are still working on other advanced features including
1.5 - Add-On Extensibility
All available Add-Ons are listed in the Add-ons and Integrations section.
1.5.1 - Add-ons
What is an add-on?
Open-cluster-management has a built-in mechanism named addon-framework to help developers to develop an extension based on the foundation components for the purpose of working with multiple clusters in custom cases. A typical addon should consist of two kinds of components:
-
Addon Agent: A kubernetes controller in the managed cluster that manages the managed cluster for the hub admins. A typical addon agent is expected to be working by subscribing the prescriptions (e.g. in forms of CustomResources) from the hub cluster and then consistently reconcile the state of the managed cluster like an ordinary kubernetes operator does.
-
Addon Manager: A kubernetes controller in the hub cluster that applies manifests to the managed clusters via the ManifestWork api. In addition to resource dispatching, the manager can optionally manage the lifecycle of CSRs for the addon agents or even the RBAC permission bond to the CSRs’ requesting identity.
In general, if a management tool working inside the managed cluster needs to discriminate configuration for each managed cluster, it will be helpful to model its implementation as a working addon agent. The configurations for each agent are supposed to be persisted in the hub cluster, so the hub admin will be able to prescribe the agent to do its job in a declarative way. In abstraction, via the addon we will be decoupling a multi-cluster control plane into (1) strategy dispatching and (2) execution. The addon manager doesn’t actually apply any changes directly to the managed cluster, instead it just places its prescription to a dedicated namespace allocated for the accepted managed cluster. Then the addon agent pulls the prescriptions consistently and does the execution.
In addition to dispatching configurations before the agents, the addon manager will be automatically doing some fiddly preparation before the agent bootstraps, such as:
- CSR applying, approving and signing.
- Injecting and managing client credentials used by agents to access the hub cluster.
- The RBAC permission for the agents both in the hub cluster or the managed cluster.
- Installing strategy.
Architecture
The following architecture graph shows how the coordination between addon manager and addon agent works.
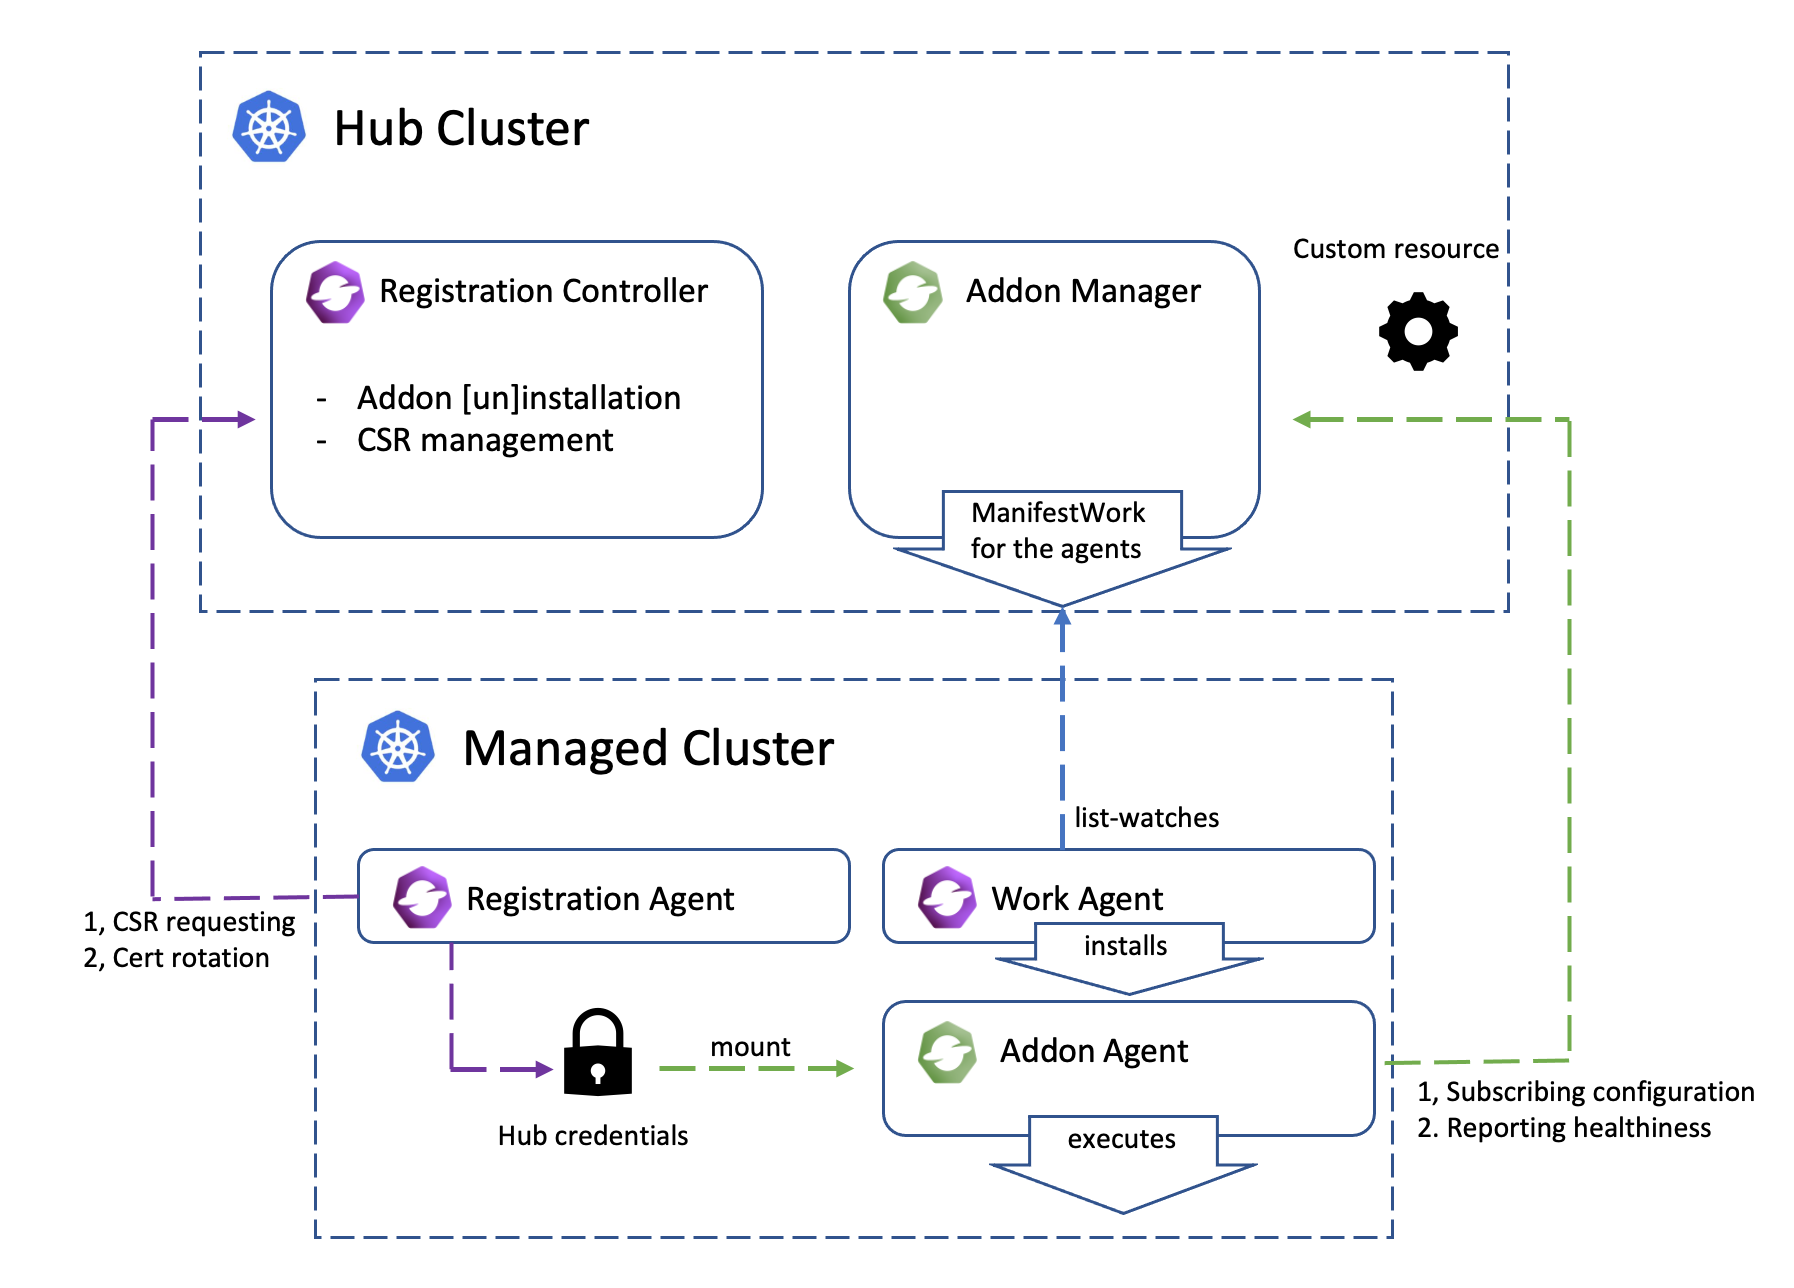
Add-on lifecycle management
Add-on lifecycle management refers to how to enable and disable an add-on on a managed cluster, how to set the add-on installation strategy and rollout strategy.
Please refer to the Add-on management for more details.
Install strategy
InstallStrategy represents that related ManagedClusterAddOns should be installed on certain clusters.
Rollout strategy
With the rollout strategy defined in the ClusterManagementAddOn API, users can
control the upgrade behavior of the addon when there are changes in the configurations.
Add-on configurations
Add-on configurations allow users to customize the behavior of add-ons across managed clusters. They include default configurations applicable to all clusters, specific configurations defined per install strategy for groups of clusters, and individual configurations for each managed cluster. This flexibility ensures that each cluster can be tailored to meet its unique requirements while maintaining a consistent management framework.
Please refer to the Add-on management for more details.
Examples
All available Add-Ons are listed in the Add-ons and Integrations section.
The addon-contrib repository hosts a collection of Open Cluster Management (OCM) addons for staging and testing Proof of Concept (PoC) purposes.
Add-on Development
Add-on framework provides a library for developers to develop an add-ons in open-cluster-management more easily.
Please refer to the add-on development guide for more details.
2 - Getting Started
2.1 - Quick Start
Prerequisites
- Ensure kubectl and kustomize are installed.
- Ensure kind(greater than
v0.9.0+, or the latest version is preferred) is installed.
Install clusteradm CLI tool
Run the following command to download and install the latest clusteradm command-line tool:
curl -L https://raw.githubusercontent.com/open-cluster-management-io/clusteradm/main/install.sh | bash
Setup hub and managed cluster
Run the following command to quickly setup a hub cluster and 2 managed clusters by kind.
curl -L https://raw.githubusercontent.com/open-cluster-management-io/OCM/main/solutions/setup-dev-environment/local-up.sh | bash
If you want to setup OCM in a production environment or on a different kubernetes distribution, please refer to the Start the control plane and Register a cluster guides.
What is next
Now you have the OCM control plane with 2 managed clusters connected! Let’s start your OCM journey.
- Deploy kubernetes resources onto a managed cluster
- Visit kubernetes apiserver of managedcluster from cluster-proxy
- Visit integration to check if any certain OCM addon will meet your use cases.
- Use the OCM VScode Extension to easily generate OCM related Kubernetes resources and track your cluster
2.2 - Installation
Install the core control plane that includes cluster registration and manifests distribution on the hub cluster.
Install the klusterlet agent on the managed cluster so that it can be registered and managed by the hub cluster.
2.2.1 - Start the control plane
Prerequisite
- The hub cluster should be
v1.19+. (To run on hub cluster version between [v1.16,v1.18], please manually enable feature gate “V1beta1CSRAPICompatibility”). - Currently the bootstrap process relies on client authentication via CSR. Therefore, if your Kubernetes distributions (like EKS) don’t support it, you can:
- follow this article to run OCM natively on EKS
- or choose the multicluster-controlplane as the hub controlplane
- Ensure kubectl and kustomize are installed.
Network requirements
Configure your network settings for the hub cluster to allow the following connections.
| Direction | Endpoint | Protocol | Purpose | Used by |
|---|---|---|---|---|
| Inbound | https://{hub-api-server-url}:{port} | TCP | Kubernetes API server of the hub cluster | OCM agents, including the add-on agents, running on the managed clusters |
Install clusteradm CLI tool
It’s recommended to run the following command to download and install the
latest release of the clusteradm command-line tool:
curl -L https://raw.githubusercontent.com/open-cluster-management-io/clusteradm/main/install.sh | bash
You can also install the latest development version (main branch) by running:
# Installing clusteradm to $GOPATH/bin/
GO111MODULE=off go get -u open-cluster-management.io/clusteradm/...
Bootstrap a cluster manager
Before actually installing the OCM components into your clusters, export
the following environment variables in your terminal before running our
command-line tool clusteradm so that it can correctly discriminate the
hub cluster.
# The context name of the clusters in your kubeconfig
export CTX_HUB_CLUSTER=<your hub cluster context>
Call clusteradm init:
 # By default, it installs the latest release of the OCM components.
 # Use e.g. "--bundle-version=latest" to install latest development builds.
 # NOTE: For hub cluster version between v1.16 to v1.19 use the parameter: --use-bootstrap-token
 clusteradm init --wait --context ${CTX_HUB_CLUSTER}
The clusteradm init command installs the
registration-operator
on the hub cluster, which is responsible for consistently installing
and upgrading a few core components for the OCM environment.
After the init command completes, a generated command is output on the console to
register your managed clusters. An example of the generated command is shown below.
clusteradm join \
    --hub-token <your token data> \
    --hub-apiserver <your hub kube-apiserver endpoint> \
    --wait \
    --cluster-name <cluster_name>
It’s recommended to save the command somewhere secure for future use. If it’s lost, you can use
clusteradm get token to get the generated command again.
Check out the running instances of the control plane
kubectl -n open-cluster-management get pod --context ${CTX_HUB_CLUSTER}
NAME                               READY   STATUS    RESTARTS   AGE
cluster-manager-695d945d4d-5dn8k   1/1     Running   0          19d
Additionally, to check out the instances of OCM’s hub control plane, run the following command:
kubectl -n open-cluster-management-hub get pod --context ${CTX_HUB_CLUSTER}
NAME                               READY   STATUS    RESTARTS   AGE
cluster-manager-placement-controller-857f8f7654-x7sfz      1/1     Running   0          19d
cluster-manager-registration-controller-85b6bd784f-jbg8s   1/1     Running   0          19d
cluster-manager-registration-webhook-59c9b89499-n7m2x      1/1     Running   0          19d
cluster-manager-work-webhook-59cf7dc855-shq5p              1/1     Running   0          19d
...
The overall installation information is visible on the clustermanager custom resource:
kubectl get clustermanager cluster-manager -o yaml --context ${CTX_HUB_CLUSTER}
Uninstall the OCM from the control plane
Before uninstalling the OCM components from your clusters, please detach the managed cluster from the control plane.
clusteradm clean --context ${CTX_HUB_CLUSTER}
Check the instances of OCM’s hub control plane are removed.
kubectl -n open-cluster-management-hub get pod --context ${CTX_HUB_CLUSTER}
No resources found in open-cluster-management-hub namespace.
kubectl -n open-cluster-management get pod --context ${CTX_HUB_CLUSTER}
No resources found in open-cluster-management namespace.
Check the clustermanager resource is removed from the control plane.
kubectl get clustermanager --context ${CTX_HUB_CLUSTER}
error: the server doesn't have a resource type "clustermanager"
2.2.2 - Register a cluster
After the cluster manager is installed on the hub cluster, you need to install the klusterlet agent on another cluster so that it can be registered and managed by the hub cluster.
Prerequisite
Network requirements
Configure your network settings for the managed clusters to allow the following connections.
| Direction | Endpoint | Protocol | Purpose | Used by |
|---|---|---|---|---|
| Outbound | https://{hub-api-server-url}:{port} | TCP | Kubernetes API server of the hub cluster | OCM agents, including the add-on agents, running on the managed clusters |
To use a proxy, please make sure the proxy server is well configured to allow the above connections and the proxy server is reachable for the managed clusters. See Register a cluster to hub through proxy server for more details.
Install clusteradm CLI tool
It’s recommended to run the following command to download and install the
latest release of the clusteradm command-line tool:
curl -L https://raw.githubusercontent.com/open-cluster-management-io/clusteradm/main/install.sh | bash
You can also install the latest development version (main branch) by running:
# Installing clusteradm to $GOPATH/bin/
GO111MODULE=off go get -u open-cluster-management.io/clusteradm/...
Bootstrap a klusterlet
Before actually installing the OCM components into your clusters, export
the following environment variables in your terminal before running our
command-line tool clusteradm so that it can correctly discriminate the managed cluster:
# The context name of the clusters in your kubeconfig
export CTX_HUB_CLUSTER=<your hub cluster context>
export CTX_MANAGED_CLUSTER=<your managed cluster context>
Copy the previously generated command – clusteradm join, and add the arguments respectively based
on the different distribution.
NOTE: If there is no configmap kube-root-ca.crt in kube-public namespace of the hub cluster,
the flag –ca-file should be set to provide a valid hub ca file to help set
up the external client.
# NOTE: For KinD clusters use the parameter: --force-internal-endpoint-lookup
clusteradm join \
    --hub-token <your token data> \
    --hub-apiserver <your hub cluster endpoint> \
    --wait \
    --cluster-name "cluster1" \    # Or other arbitrary unique name
    --force-internal-endpoint-lookup \
    --context ${CTX_MANAGED_CLUSTER}
clusteradm join \
    --hub-token <your token data> \
    --hub-apiserver <your hub cluster endpoint> \
    --wait \
    --cluster-name "cluster1" \   # Or other arbitrary unique name
    --context ${CTX_MANAGED_CLUSTER}
Bootstrap a klusterlet in hosted mode(Optional)
Using the above command, the klusterlet components(registration-agent and work-agent) will be deployed on the managed cluster, it is mandatory to expose the hub cluster to the managed cluster. We provide an option for running the klusterlet components outside the managed cluster, for example, on the hub cluster(hosted mode).
The hosted mode deploying is till in experimental stage, consider to use it only when:
- want to reduce the footprints of the managed cluster.
- do not want to expose the hub cluster to the managed cluster directly
In hosted mode, the cluster where the klusterlet is running is called the hosting cluster. Running the following command to the hosting cluster to register the managed cluster to the hub.
# NOTE for KinD clusters:
#  1. hub is KinD, use the parameter: --force-internal-endpoint-lookup
#  2. managed is Kind, --managed-cluster-kubeconfig should be internal: `kind get kubeconfig --name managed --internal`
clusteradm join \
    --hub-token <your token data> \
    --hub-apiserver <your hub cluster endpoint> \
    --wait \
    --cluster-name "cluster1" \    # Or other arbitrary unique name
    --mode hosted \
    --managed-cluster-kubeconfig <your managed cluster kubeconfig> \    # Should be an internal kubeconfig
    --force-internal-endpoint-lookup \
    --context <your hosting cluster context>
clusteradm join \
    --hub-token <your token data> \
    --hub-apiserver <your hub cluster endpoint> \
    --wait \
    --cluster-name "cluster1" \    # Or other arbitrary unique name
    --mode hosted \
    --managed-cluster-kubeconfig <your managed cluster kubeconfig> \
    --context <your hosting cluster context>
Bootstrap a klusterlet in singleton mode
To reduce the footprint of agent in the managed cluster, singleton mode is introduced since v0.12.0.
In the singleton mode, the work and registration agent will be run as a single pod in the managed
cluster.
Note: to run klusterlet in singleton mode, you must have a clusteradm version equal or higher than
v0.12.0
# NOTE: For KinD clusters use the parameter: --force-internal-endpoint-lookup
clusteradm join \
    --hub-token <your token data> \
    --hub-apiserver <your hub cluster endpoint> \
    --wait \
    --cluster-name "cluster1" \    # Or other arbitrary unique name
    --singleton \
    --force-internal-endpoint-lookup \
    --context ${CTX_MANAGED_CLUSTER}
clusteradm join \
    --hub-token <your token data> \
    --hub-apiserver <your hub cluster endpoint> \
    --wait \
    --cluster-name "cluster1" \   # Or other arbitrary unique name
    --singleton \
    --context ${CTX_MANAGED_CLUSTER}
Accept the join request and verify
After the OCM agent is running on your managed cluster, it will be sending a “handshake” to your hub cluster and waiting for an approval from the hub cluster admin. In this section, we will walk through accepting the registration requests from the perspective of an OCM’s hub admin.
-
Wait for the creation of the CSR object which will be created by your managed clusters’ OCM agents on the hub cluster:
kubectl get csr -w --context ${CTX_HUB_CLUSTER} | grep cluster1 # or the previously chosen cluster nameAn example of a pending CSR request is shown below:
cluster1-tqcjj 33s kubernetes.io/kube-apiserver-client system:serviceaccount:open-cluster-management:cluster-bootstrap Pending -
Accept the join request using the
clusteradmtool:clusteradm accept --clusters cluster1 --context ${CTX_HUB_CLUSTER}After running the
acceptcommand, the CSR from your managed cluster named “cluster1” will be approved. Additionally, it will instruct the OCM hub control plane to setup related objects (such as a namespace named “cluster1” in the hub cluster) and RBAC permissions automatically. -
Verify the installation of the OCM agents on your managed cluster by running:
kubectl -n open-cluster-management-agent get pod --context ${CTX_MANAGED_CLUSTER} NAME READY STATUS RESTARTS AGE klusterlet-registration-agent-598fd79988-jxx7n 1/1 Running 0 19d klusterlet-work-agent-7d47f4b5c5-dnkqw 1/1 Running 0 19d -
Verify that the
cluster1ManagedClusterobject was created successfully by running:kubectl get managedcluster --context ${CTX_HUB_CLUSTER}Then you should get a result that resembles the following:
NAME       HUB ACCEPTED   MANAGED CLUSTER URLS      JOINED   AVAILABLE   AGE
cluster1   true           <your endpoint>           True     True        5m23s
If the managed cluster status is not true, refer to Troubleshooting to debug on your cluster.
Apply a Manifestwork
After the managed cluster is registered, test that you can deploy a pod to the managed cluster from the hub cluster. Create a manifest-work.yaml as shown in this example:
apiVersion: work.open-cluster-management.io/v1
kind: ManifestWork
metadata:
  name: mw-01
  namespace: ${MANAGED_CLUSTER_NAME}
spec:
  workload:
    manifests:
      - apiVersion: v1
        kind: Pod
        metadata:
          name: hello
          namespace: default
        spec:
          containers:
            - name: hello
              image: busybox
              command: ["sh", "-c", 'echo "Hello, Kubernetes!" && sleep 3600']
          restartPolicy: OnFailure
Apply the yaml file to the hub cluster.
kubectl apply -f manifest-work.yaml --context ${CTX_HUB_CLUSTER}
Verify that the manifestwork resource was applied to the hub.
kubectl -n ${MANAGED_CLUSTER_NAME} get manifestwork/mw-01 --context ${CTX_HUB_CLUSTER} -o yaml
Check on the managed cluster and see the hello Pod has been deployed from the hub cluster.
$ kubectl -n default get pod --context ${CTX_MANAGED_CLUSTER}
NAME    READY   STATUS    RESTARTS   AGE
hello   1/1     Running   0          108s
Troubleshooting
-
If the managed cluster status is not true.
For example, the result below is shown when checking managedcluster.
$ kubectl get managedcluster --context ${CTX_HUB_CLUSTER}
NAME                   HUB ACCEPTED   MANAGED CLUSTER URLS   JOINED   AVAILABLE   AGE
${MANAGED_CLUSTER_NAME} true           https://localhost               Unknown     46m
There are many reasons for this problem. You can use the commands below to get more debug info. If the provided info doesn’t help, please log an issue to us.
On the hub cluster, check the managedcluster status.
kubectl get managedcluster ${MANAGED_CLUSTER_NAME} --context ${CTX_HUB_CLUSTER} -o yamlOn the hub cluster, check the lease status.
kubectl get lease -n ${MANAGED_CLUSTER_NAME} --context ${CTX_HUB_CLUSTER}On the managed cluster, check the klusterlet status.
kubectl get klusterlet -o yaml --context ${CTX_MANAGED_CLUSTER}
Detach the cluster from hub
Remove the resources generated when registering with the hub cluster.
clusteradm unjoin --cluster-name "cluster1" --context ${CTX_MANAGED_CLUSTER}
Check the installation of the OCM agent is removed from the managed cluster.
kubectl -n open-cluster-management-agent get pod --context ${CTX_MANAGED_CLUSTER}
No resources found in open-cluster-management-agent namespace.
Check the klusterlet is removed from the managed cluster.
kubectl get klusterlet --context ${CTX_MANAGED_CLUSTER}
error: the server doesn't have a resource type "klusterlet
Resource cleanup when the managed cluster is deleted
When a user deletes the managedCluster resource, all associated resources within the cluster namespace must also be removed. This includes managedClusterAddons, manifestWorks, and the roleBindings for the klusterlet agent. Resource cleanup follows a specific sequence to prevent resources from being stuck in a terminating state:
- managedClusterAddons are deleted first.
- manifestWorks are removed subsequently after all managedClusterAddons are deleted.
- For the same resource as managedClusterAddon or manifestWork, custom deletion ordering can be defined using the
open-cluster-management.io/cleanup-priorityannotation:- Priority values range from 0 to 100 (lower values execute first).
The open-cluster-management.io/cleanup-priority annotation controls deletion order when resource instances have dependencies. For example:
A manifestWork that applies a CRD and operator should be deleted after a manifestWork that creates a CR instance, allowing the operator to perform cleanup after the CR is removed.
The ResourceCleanup featureGate for cluster registration on the Hub cluster enables automatic cleanup of managedClusterAddons and manifestWorks within the cluster namespace after cluster unjoining.
Version Compatibility:
- The
ResourceCleanupfeatureGate was introdueced in OCM v0.13.0, and was disabled by default in OCM v0.16.0 and earlier versions. To activate it, need to modify the clusterManager CR configuration:
registrationConfiguration:
  featureGates:
  - feature: ResourceCleanup
    mode: Enable
- Starting with OCM v0.17.0, the
ResourceCleanupfeatureGate has been upgraded from Alpha to Beta status and is enabled by default.
Disabling the Feature: To deactivate this functionality, update the clusterManager CR on the hub cluster:
registrationConfiguration:
  featureGates:
  - feature: ResourceCleanup
    mode: Disable
2.2.3 - Add-on management
Add-on enablement
From a user’s perspective, to install the addon to the hub cluster the hub admin
should register a globally-unique ClusterManagementAddon resource as a singleton
placeholder in the hub cluster. For instance, the helloworld
add-on can be registered to the hub cluster by creating:
apiVersion: addon.open-cluster-management.io/v1alpha1
kind: ClusterManagementAddOn
metadata:
  name: helloworld
spec:
  addOnMeta:
    displayName: helloworld
Enable the add-on manually
The addon manager running on the hub is taking responsibility of configuring the
installation of addon agents for each managed cluster. When a user wants to enable
the add-on for a certain managed cluster, the user should create a
ManagedClusterAddOn resource on the cluster namespace. The name of the
ManagedClusterAddOn should be the same name of the corresponding
ClusterManagementAddon. For instance, the following example enables helloworld
add-on in “cluster1”:
apiVersion: addon.open-cluster-management.io/v1alpha1
kind: ManagedClusterAddOn
metadata:
  name: helloworld
  namespace: cluster1
spec:
  installNamespace: helloworld
Enable the add-on automatically
If the addon is developed with automatic installation,
which support auto-install by cluster discovery,
then the ManagedClusterAddOn will be created for all managed cluster namespaces
automatically, or be created for the selected managed cluster namespaces automatically.
Enable the add-on by install strategy
If the addon is developed following the guidelines mentioned in managing the add-on agent lifecycle by addon-manager,
the user can define an installStrategy in the ClusterManagementAddOn
to specify on which clusters the ManagedClusterAddOn should be enabled. Details see install strategy.
Add-on healthiness
The healthiness of the addon instances are visible when we list the addons via kubectl:
$ kubectl get managedclusteraddon -A
NAMESPACE   NAME                     AVAILABLE   DEGRADED   PROGRESSING
<cluster>   <addon>                  True
The addon agent are expected to report its healthiness periodically as long as it’s running. Also the versioning of the addon agent can be reflected in the resources optionally so that we can control the upgrading the agents progressively.
Clean the add-ons
Last but not least, a neat uninstallation of the addon is also supported by simply
deleting the corresponding ClusterManagementAddon resource from the hub cluster
which is the “root” of the whole addon. The OCM platform will automatically sanitize
the hub cluster for you after the uninstalling by removing all the components either
in the hub cluster or in the manage clusters.
Add-on lifecycle management
Install strategy
InstallStrategy represents that related ManagedClusterAddOns should be installed
on certain clusters. For example, the following example enables the helloworld
add-on on clusters with the aws label.
apiVersion: addon.open-cluster-management.io/v1alpha1
kind: ClusterManagementAddOn
metadata:
  name: helloworld
  annotations:
    addon.open-cluster-management.io/lifecycle: "addon-manager"
spec:
  addOnMeta:
    displayName: helloworld
  installStrategy:
    type: Placements
    placements:
    - name: placement-aws
      namespace: default
apiVersion: cluster.open-cluster-management.io/v1beta1
kind: Placement
metadata:
  name: placement-aws
  namespace: default
spec:
  predicates:
    - requiredClusterSelector:
        claimSelector:
          matchExpressions:
            - key: platform.open-cluster-management.io
              operator: In
              values:
                - aws
Rollout strategy
With the rollout strategy defined in the ClusterManagementAddOn API, users can
control the upgrade behavior of the addon when there are changes in the
configurations.
For example, if the add-on user updates the “deploy-config” and wants to apply the change to the add-ons to a “canary” decision group first. If all the add-on upgrade successfully, then upgrade the rest of clusters progressively per cluster at a rate of 25%. The rollout strategy can be defined as follows:
apiVersion: addon.open-cluster-management.io/v1alpha1
kind: ClusterManagementAddOn
metadata:
  name: helloworld
  annotations:
    addon.open-cluster-management.io/lifecycle: "addon-manager"
spec:
  addOnMeta:
    displayName: helloworld
  installStrategy:
    type: Placements
    placements:
    - name: placement-aws
      namespace: default
      configs:
      - group: addon.open-cluster-management.io
        resource: addondeploymentconfigs
        name: deploy-config
        namespace: open-cluster-management
      rolloutStrategy:
        type: Progressive
        progressive:
          mandatoryDecisionGroups:
          - groupName: "prod-canary-west"
          - groupName: "prod-canary-east"
          maxConcurrency: 25%
          minSuccessTime: 5m
          progressDeadline: 10m
          maxFailures: 2
In the above example with type Progressive, once user updates the “deploy-config”, controller
will rollout on the clusters in mandatoryDecisionGroups first, then rollout on the other
clusters with the rate defined in maxConcurrency.
minSuccessTimeis a “soak” time, means the controller will wait for 5 minutes when a cluster reach a successful state andmaxFailuresisn’t breached. If, after this 5 minutes interval, the workload status remains successful, the rollout progresses to the next.progressDeadlinemeans the controller will wait for a maximum of 10 minutes for the workload to reach a successful state. If, the workload fails to achieve success within 10 minutes, the controller stops waiting, marking the workload as “timeout,” and includes it in the count ofmaxFailures.maxFailuresmeans the controller can tolerate update to 2 clusters with failed status, oncemaxFailuresis breached, the rollout will stop.
Currently add-on supports 3 types of rolloutStrategy,
they are All, Progressive and ProgressivePerGroup, for more info regards the rollout strategies
check the Rollout Strategy document.
Add-on configurations
Default configurations
In ClusterManagementAddOn, spec.supportedConfigs is a list of configuration
types supported by the add-on. defaultConfig represents the namespace and name of
the default add-on configuration. In scenarios where all add-ons have the same
configuration. Only one configuration of the same group and resource can be specified
in the defaultConfig.
In the example below, add-ons on all the clusters will use “default-deploy-config” and “default-example-config”.
apiVersion: addon.open-cluster-management.io/v1alpha1
kind: ClusterManagementAddOn
metadata:
  name: helloworld
  annotations:
    addon.open-cluster-management.io/lifecycle: "addon-manager"
spec:
  addOnMeta:
    displayName: helloworld
  supportedConfigs:
  - defaultConfig:
      name: default-deploy-config
      namespace: open-cluster-management
    group: addon.open-cluster-management.io
    resource: addondeploymentconfigs
  - defaultConfig:
      name: default-example-config
      namespace: open-cluster-management
    group: example.open-cluster-management.io
    resource: exampleconfigs
Configurations per install strategy
In ClusterManagementAddOn, spec.installStrategy.placements[].configs lists the
configuration of ManagedClusterAddon during installation for a group of clusters.
For the need to use multiple configurations with the same group and resource can be defined
in this field since OCM v0.15.0. It will override the Default configurations
on certain clusters by group and resource.
In the example below, add-ons on clusters selected by Placement placement-aws will
use “deploy-config”, “example-config-1” and “example-config-2”, while all the other add-ons
will still use “default-deploy-config” and “default-example-config”.
apiVersion: addon.open-cluster-management.io/v1alpha1
kind: ClusterManagementAddOn
metadata:
  name: helloworld
  annotations:
    addon.open-cluster-management.io/lifecycle: "addon-manager"
spec:
  addOnMeta:
    displayName: helloworld
  supportedConfigs:
  - defaultConfig:
      name: default-deploy-config
      namespace: open-cluster-management
    group: addon.open-cluster-management.io
    resource: addondeploymentconfigs
  installStrategy:
    type: Placements
    placements:
    - name: placement-aws
      namespace: default
      configs:
      - group: addon.open-cluster-management.io
        resource: addondeploymentconfigs
        name: deploy-config
        namespace: open-cluster-management
      - group: example.open-cluster-management.io
        resource: exampleconfigs
        name: example-config-1
        namespace: open-cluster-management
      - group: example.open-cluster-management.io
        resource: exampleconfigs
        name: example-config-2
        namespace: open-cluster-management
Configurations per cluster
In ManagedClusterAddOn, spec.configs is a list of add-on configurations.
In scenarios where the current add-on has its own configurations. It also supports
defining multiple configurations with the same group and resource since OCM v0.15.0.
It will override the Default configurations and
Configurations per install strategy defined
in ClusterManagementAddOn by group and resource.
In the below example, add-on on cluster1 will use “cluster1-deploy-config” and “cluster1-example-config”.
apiVersion: addon.open-cluster-management.io/v1alpha1
kind: ManagedClusterAddOn
metadata:
  name: helloworld
  namespace: cluster1
spec:
  configs:
  - group: addon.open-cluster-management.io
    resource: addondeploymentconfigs
    name: cluster1-deploy-config
    namespace: open-cluster-management
  - group: example.open-cluster-management.io
    resource: exampleconfigs
    name: cluster1-example-config
    namespace: open-cluster-management
Supported configurations
Supported configurations is a list of configuration types that are allowed to override
the add-on configurations defined in ClusterManagementAddOn spec. They are listed in the
ManagedClusterAddon status.supportedConfigs, for example:
apiVersion: addon.open-cluster-management.io/v1alpha1
kind: ManagedClusterAddOn
metadata:
  name: helloworld
  namespace: cluster1
spec:
...
status:
...
  supportedConfigs:
  - group: addon.open-cluster-management.io
    resource: addondeploymentconfigs
  - group: example.open-cluster-management.io
    resource: exampleconfigs
Effective configurations
As the above described, there are 3 places to define the add-on configurations,
they have an override order and eventually only one takes effect. The final effective
configurations are listed in the ManagedClusterAddOn status.configReferences.
desiredConfigrecord the desired config and it’s spec hash.lastAppliedConfigrecord the config when the corresponding ManifestWork is applied successfully.
For example:
apiVersion: addon.open-cluster-management.io/v1alpha1
kind: ManagedClusterAddOn
metadata:
  name: helloworld
  namespace: cluster1
...
status:
...
  configReferences:
  - desiredConfig:
      name: cluster1-deploy-config
      namespace: open-cluster-management
      specHash: dcf88f5b11bd191ed2f886675f967684da8b5bcbe6902458f672277d469e2044
    group: addon.open-cluster-management.io
    lastAppliedConfig:
      name: cluster1-deploy-config
      namespace: open-cluster-management
      specHash: dcf88f5b11bd191ed2f886675f967684da8b5bcbe6902458f672277d469e2044
    lastObservedGeneration: 1
    name: cluster1-deploy-config
    resource: addondeploymentconfigs
2.2.4 - Running on EKS
Use this solution to use AWS EKS cluster as a hub. This solution uses AWS IAM roles for authentication, hence only Managed Clusters running on EKS will be able to use this solution.
Refer this article for detailed registration instructions.
2.3 - Add-ons and Integrations
Enhance the open-cluster-management core control plane with optional add-ons and integrations.
2.3.1 - Policy
The Policy Add-on enables auditing and enforcement of configuration across clusters managed by OCM, enhancing security, easing maintenance burdens, and increasing consistency across the clusters for your compliance and reliability requirements.
View the following sections to learn more about the Policy Add-on:
-
Policy framework
Learn about the architecture of the Policy Add-on that delivers policies defined on the hub cluster to the managed clusters and how to install and enable the add-on for your OCM clusters.
-
Policy API concepts
Learn about the APIs that the Policy Add-on uses and how the APIs are related to one another to deliver policies to the clusters managed by OCM.
-
Supported managed cluster policy engines
-
Configuration policy
The
ConfigurationPolicyis provided by OCM and defines Kubernetes manifests to compare with objects that currently exist on the cluster. The action that theConfigurationPolicywill take is determined by itscomplianceType. Compliance types includemusthave,mustnothave, andmustonlyhave.musthavemeans the object should have the listed keys and values as a subset of the larger object.mustnothavemeans an object matching the listed keys and values should not exist.mustonlyhaveensures objects only exist with the keys and values exactly as defined. -
Open Policy Agent Gatekeeper
Gatekeeper is a validating webhook with auditing capabilities that can enforce custom resource definition-based policies that are run with the Open Policy Agent (OPA). Gatekeeper
ConstraintTemplatesand constraints can be provided in an OCMPolicyto sync to managed clusters that have Gatekeeper installed on them.
-
2.3.1.1 - Policy framework
The policy framework provides governance capabilities to OCM managed Kubernetes clusters. Policies provide visibility and drive remediation for various security and configuration aspects to help IT administrators meet their requirements.
API Concepts
View the Policy API page for additional details about the Policy API managed by the Policy Framework components, including:
Architecture
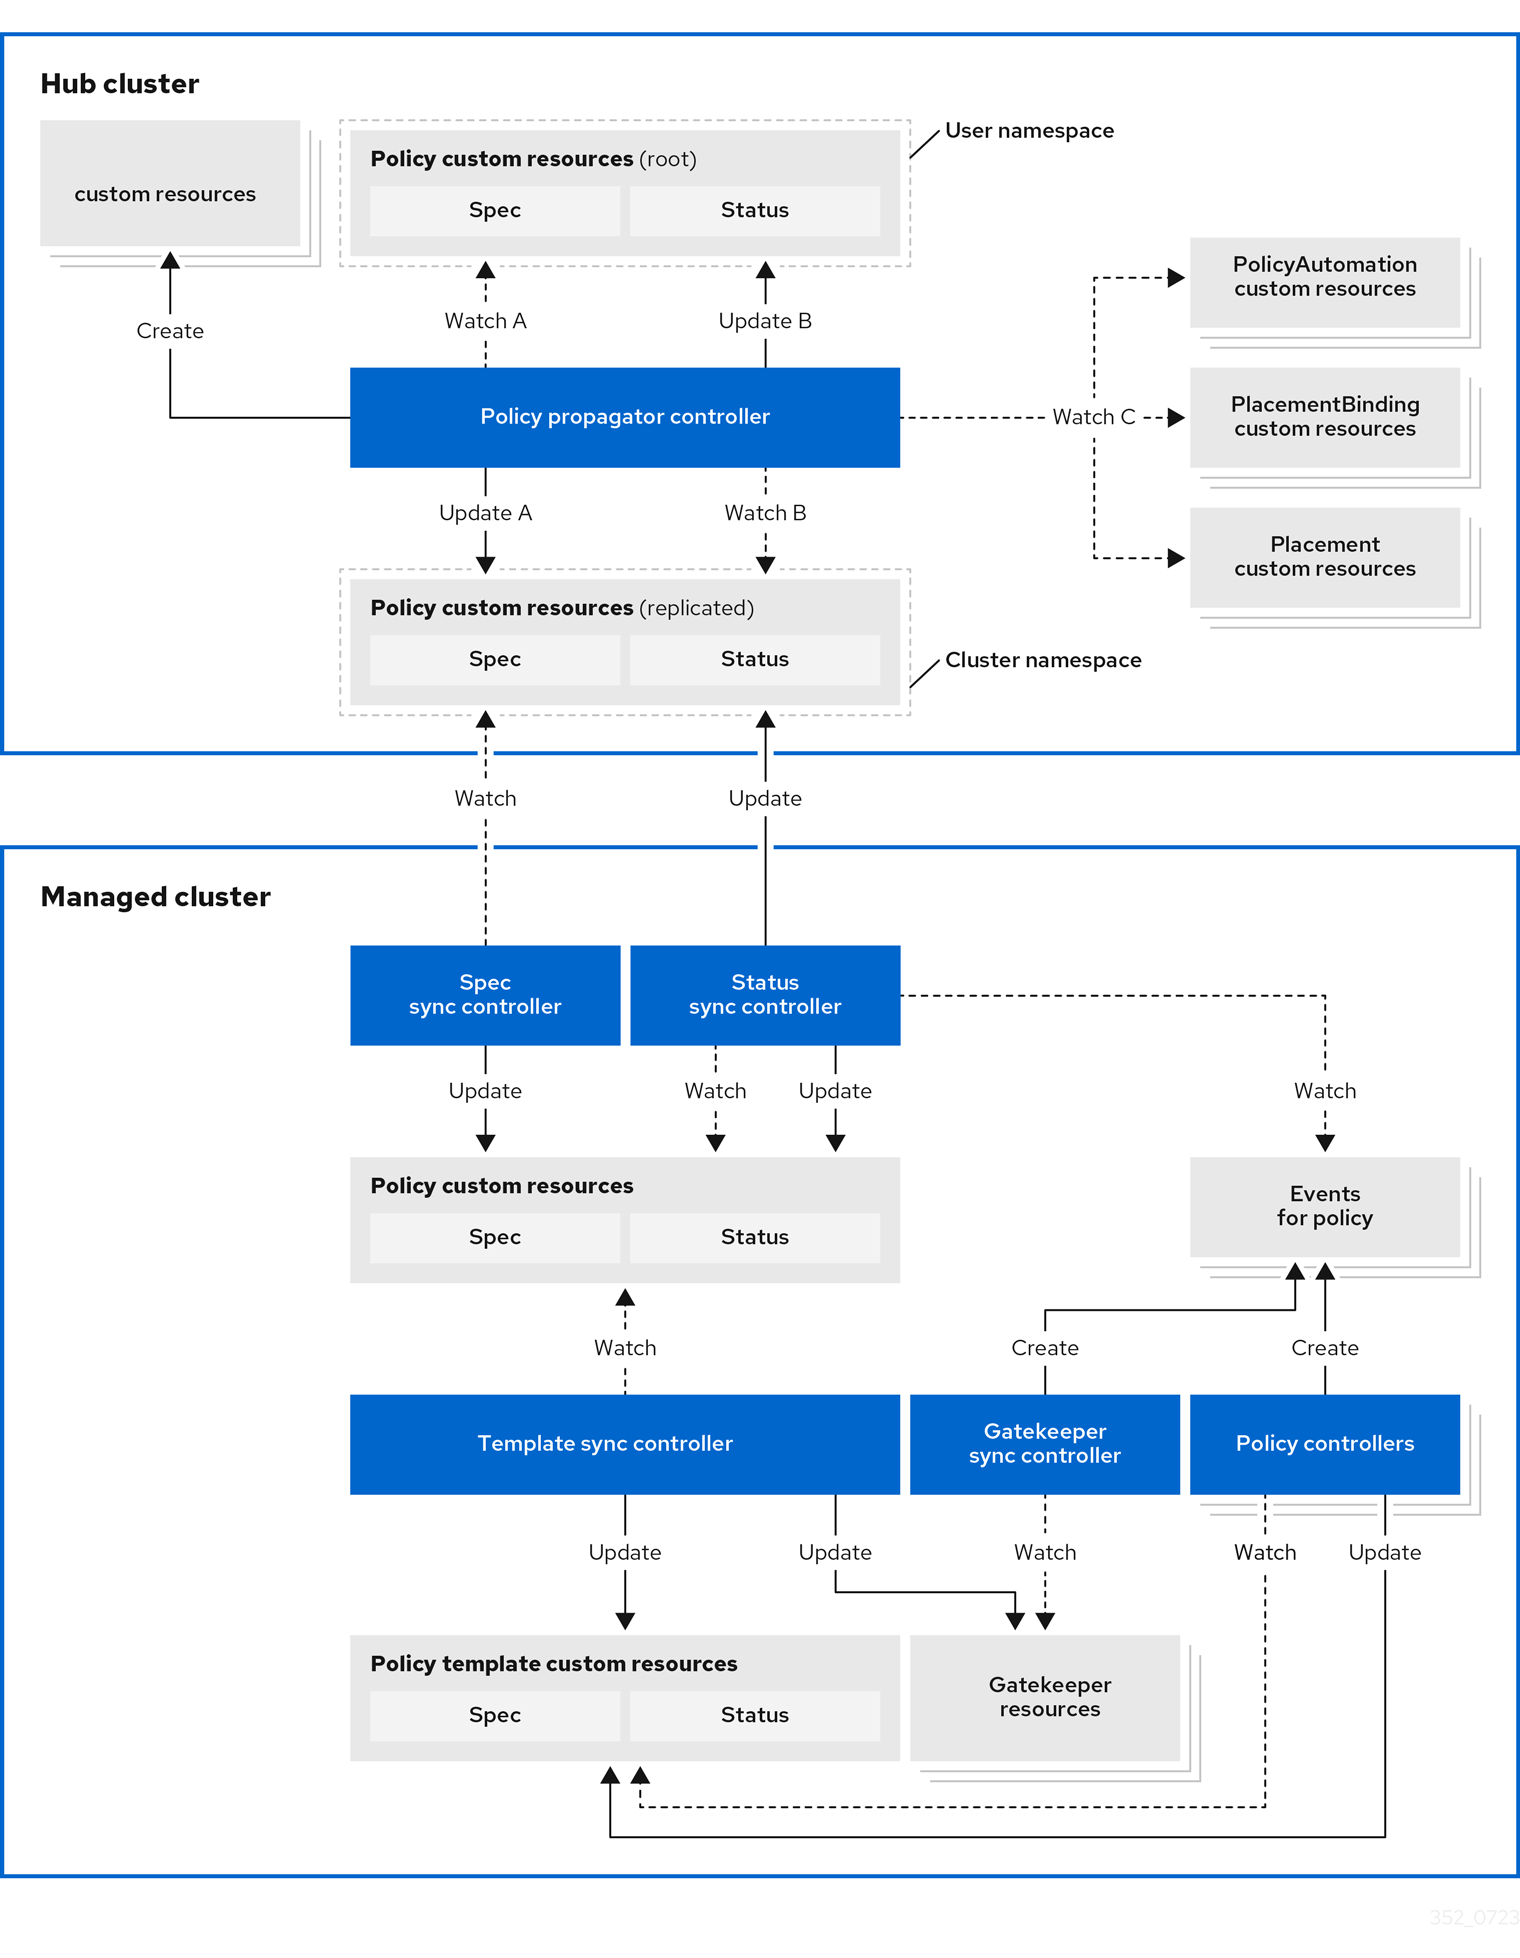
The governance policy framework distributes policies to managed clusters and collects results to send back to the hub cluster.
Prerequisite
You must meet the following prerequisites to install the policy framework:
-
Ensure the
open-cluster-managementcluster manager is installed. See Start the control plane for more information. -
Ensure the
open-cluster-managementklusterlet is installed. See Register a cluster for more information. -
If you are using
PlacementRuleswith your policies, ensure theopen-cluster-managementapplication is installed . See Application management for more information. If you are using the defaultPlacementAPI, you can skip the Application management installation, but you do need to install thePlacementRuleCRD with this command:kubectl apply -f https://raw.githubusercontent.com/open-cluster-management-io/multicloud-operators-subscription/main/deploy/hub-common/apps.open-cluster-management.io_placementrules_crd.yaml
Install the governance-policy-framework hub components
Install via Clusteradm CLI
Ensure clusteradm CLI is installed and is at least v0.3.0. Download and extract the
clusteradm binary. For more details see the
clusteradm GitHub page.
-
Deploy the policy framework controllers to the hub cluster:
# The context name of the clusters in your kubeconfig # If the clusters are created by KinD, then the context name will the follow the pattern "kind-<cluster name>". export CTX_HUB_CLUSTER=<your hub cluster context> # export CTX_HUB_CLUSTER=kind-hub export CTX_MANAGED_CLUSTER=<your managed cluster context> # export CTX_MANAGED_CLUSTER=kind-cluster1 # Set the deployment namespace export HUB_NAMESPACE="open-cluster-management" # Deploy the policy framework hub controllers clusteradm install hub-addon --names governance-policy-framework --context ${CTX_HUB_CLUSTER} -
Ensure the pods are running on the hub with the following command:
$ kubectl get pods -n ${HUB_NAMESPACE} NAME READY STATUS RESTARTS AGE governance-policy-addon-controller-bc78cbcb4-529c2 1/1 Running 0 94s governance-policy-propagator-8c77f7f5f-kthvh 1/1 Running 0 94s- See more about the governance-policy-framework components:
Deploy the synchronization components to the managed cluster(s)
Deploy via Clusteradm CLI
-
To deploy the synchronization components to a self-managed hub cluster:
clusteradm addon enable --names governance-policy-framework --clusters <managed_hub_cluster_name> --annotate addon.open-cluster-management.io/on-multicluster-hub=true --context ${CTX_HUB_CLUSTER}To deploy the synchronization components to a managed cluster:
clusteradm addon enable --names governance-policy-framework --clusters <cluster_name> --context ${CTX_HUB_CLUSTER} -
Verify that the governance-policy-framework-addon controller pod is running on the managed cluster with the following command:
$ kubectl get pods -n open-cluster-management-agent-addon
NAME                                                     READY   STATUS    RESTARTS   AGE
governance-policy-framework-addon-57579b7c-652zj         1/1     Running   0          87s
What is next
Install the policy controllers to the managed clusters.
2.3.1.2 - Policy API concepts
Overview
The policy framework has the following API concepts:
- Policy Templates are the policies that perform a desired check or action on a managed cluster. For
example,
ConfigurationPolicy
objects are embedded in
Policyobjects under thepolicy-templatesarray. - A
Policyis a grouping mechanism for Policy Templates and is the smallest deployable unit on the hub cluster. Embedded Policy Templates are distributed to applicable managed clusters and acted upon by the appropriate policy controller. - A
PolicySetis a grouping mechanism ofPolicyobjects. Compliance of all groupedPolicyobjects is summarized in thePolicySet. APolicySetis a deployable unit and its distribution is controlled by a Placement. - A
PlacementBindingbinds a Placement to aPolicyorPolicySet.
Additional resources:
- View the following resources to learn more about the Policy Addon:
Policy
A Policy is a grouping mechanism for Policy Templates and is the smallest deployable unit on the hub cluster.
Embedded Policy Templates are distributed to applicable managed clusters and acted upon by the appropriate
policy controller. The compliance state and status of a Policy
represents all embedded Policy Templates in the Policy. The distribution of Policy objects is controlled by a
Placement.
View a simple example of a Policy that embeds a ConfigurationPolicy policy template to manage a namespace called
“prod”.
apiVersion: policy.open-cluster-management.io/v1
kind: Policy
metadata:
  name: policy-namespace
  namespace: policies
  annotations:
    policy.open-cluster-management.io/standards: NIST SP 800-53
    policy.open-cluster-management.io/categories: CM Configuration Management
    policy.open-cluster-management.io/controls: CM-2 Baseline Configuration
spec:
  remediationAction: enforce
  disabled: false
  policy-templates:
    - objectDefinition:
        apiVersion: policy.open-cluster-management.io/v1
        kind: ConfigurationPolicy
        metadata:
          name: policy-namespace-example
        spec:
          remediationAction: inform
          severity: low
          object-templates:
            - complianceType: musthave
              objectDefinition:
                kind: Namespace # must have namespace 'prod'
                apiVersion: v1
                metadata:
                  name: prod
The annotations are standard annotations for informational purposes and can be used by user interfaces, custom report
scripts, or components that integrate with OCM.
The optional spec.remediationAction field dictates whether the policy controller should inform or enforce when
violations are found and overrides the remediationAction field on each policy template. When set to inform, the
Policy will become noncompliant if the underlying policy templates detect that the desired state is not met. When set
to enforce, the policy controller applies the desired state when necessary and feasible.
The policy-templates array contains an array of Policy Templates. Here a
single ConfigurationPolicy called policy-namespace-example defines a Namespace manifest to compare with objects on
the cluster. It has the remediationAction set to inform but it is overridden by the optional global
spec.remediationAction. The severity is for informational purposes similar to the annotations.
Inside of the embedded ConfigurationPolicy, the object-templates section describes the prod Namespace object
that the ConfigurationPolicy applies to. The action that the ConfigurationPolicy will take is determined by the
complianceType. In this case, it is set to musthave which means the prod Namespace object will be created if it
doesn’t exist. Other compliance types include mustnothave and mustonlyhave. mustnothave would delete the prod
Namespace object. mustonlyhave would ensure the prod Namespace object only exists with the fields defined in the
ConfigurationPolicy. See the
ConfigurationPolicy page for more information
or see the templating in configuration policies topic for advanced templating
use cases with ConfigurationPolicy.
When the Policy is bound to a Placement using a PlacementBinding, the
Policy status will report on each cluster that matches the bound Placement:
status:
  compliant: Compliant
  placement:
    - placement: placement-hub-cluster
      placementBinding: binding-policy-namespace
  status:
    - clustername: local-cluster
      clusternamespace: local-cluster
      compliant: Compliant
To fully explore the Policy API, run the following command:
kubectl get crd policies.policy.open-cluster-management.io -o yaml
To fully explore the ConfigurationPolicy API, run the following command:
kubectl get crd configurationpolicies.policy.open-cluster-management.io -o yaml
PlacementBinding
A PlacementBinding binds a Placement to a Policy or PolicySet.
Below is an example of a PlacementBinding that binds the policy-namespace Policy to the placement-hub-cluster
Placement.
apiVersion: policy.open-cluster-management.io/v1
kind: PlacementBinding
metadata:
  name: binding-policy-namespace
  namespace: policies
placementRef:
  apiGroup: cluster.open-cluster-management.io
  kind: Placement
  name: placement-hub-cluster
subjects:
  - apiGroup: policy.open-cluster-management.io
    kind: Policy
    name: policy-namespace
Once the Policy is bound, it will be distributed to and acted upon by the managed clusters that match the Placement.
PolicySet
A PolicySet is a grouping mechanism of Policy objects. Compliance of all grouped Policy objects is
summarized in the PolicySet. A PolicySet is a deployable unit and its distribution is controlled by a
Placement when bound through a PlacementBinding.
This enables a workflow where subject matter experts write Policy objects and then an IT administrator creates a
PolicySet that groups the previously written Policy objects and binds the PolicySet to a Placement that deploys
the PolicySet.
An example of a PolicySet is shown below.
apiVersion: policy.open-cluster-management.io/v1beta1
kind: PolicySet
metadata:
  name: ocm-hardening
  namespace: policies
spec:
  description: Apply standard best practices for hardening your Open Cluster Management installation.
  policies:
    - policy-check-backups
    - policy-managedclusteraddon-available
    - policy-subscriptions
Managed cluster policy controllers
The Policy on the hub delivers the policies defined in spec.policy-templates to the managed clusters via
the policy framework controllers. Once on the managed cluster, these Policy Templates are acted upon by the associated
controller on the managed cluster. The policy framework supports delivering the Policy Template kinds listed here:
-
Configuration policy
The
ConfigurationPolicyis provided by OCM and defines Kubernetes manifests to compare with objects that currently exist on the cluster. The action that theConfigurationPolicywill take is determined by itscomplianceType. Compliance types includemusthave,mustnothave, andmustonlyhave.musthavemeans the object should have the listed keys and values as a subset of the larger object.mustnothavemeans an object matching the listed keys and values should not exist.mustonlyhaveensures objects only exist with the keys and values exactly as defined. See the page on Configuration Policy for more information. -
Open Policy Agent Gatekeeper
Gatekeeper is a validating webhook with auditing capabilities that can enforce custom resource definition-based policies that are run with the Open Policy Agent (OPA). Gatekeeper
ConstraintTemplatesand constraints can be provided in an OCMPolicyto sync to managed clusters that have Gatekeeper installed on them. See the page on Gatekeeper integration for more information.
Templating in configuration policies
Configuration policies support the inclusion of Golang text templates in the object definitions. These templates are resolved at runtime either on the hub cluster or the target managed cluster using configurations related to that cluster. This gives you the ability to define configuration policies with dynamic content and to inform or enforce Kubernetes resources that are customized to the target cluster.
The template syntax must follow the Golang template language specification, and the resource definition generated from the resolved template must be a valid YAML. (See the Golang documentation about package templates for more information.) Any errors in template validation appear as policy violations. When you use a custom template function, the values are replaced at runtime.
Template functions, such as resource-specific and generic lookup template functions, are available for referencing
Kubernetes resources on the hub cluster (using the {{hub ... hub}} delimiters), or managed cluster (using the
{{ ... }} delimiters). See the Hub cluster templates section for more details. The
resource-specific functions are used for convenience and makes content of the resources more accessible. If you use the
generic function, lookup, which is more advanced, it is best to be familiar with the YAML structure of the resource
that is being looked up. In addition to these functions, utility functions like base64encode, base64decode,
indent, autoindent, toInt, and toBool are also available.
To conform templates with YAML syntax, templates must be set in the policy resource as strings using quotes or a block
character (| or >). This causes the resolved template value to also be a string. To override this, consider using
toInt or toBool as the final function in the template to initiate further processing that forces the value to be
interpreted as an integer or boolean respectively.
To bypass template processing you can either:
- Override a single template by wrapping the template in additional braces. For example, the template
{{ template content }}would become{{ '{{ template content }}' }}. - Override all templates in a
ConfigurationPolicyby adding thepolicy.open-cluster-management.io/disable-templates: "true"annotation in theConfigurationPolicysection of yourPolicy. Template processing will be bypassed for thatConfigurationPolicy.
Hub cluster templating in configuration policies
Hub cluster templates are used to define configuration policies that are dynamically customized to the target cluster. This reduces the need to create separate policies for each target cluster or hardcode configuration values in the policy definitions.
Hub cluster templates are based on Golang text template specifications, and the {{hub … hub}} delimiter indicates a
hub cluster template in a configuration policy.
A configuration policy definition can contain both hub cluster and managed cluster templates. Hub cluster templates are processed first on the hub cluster, then the policy definition with resolved hub cluster templates is propagated to the target clusters. On the managed cluster, the Configuration Policy controller processes any managed cluster templates in the policy definition and then enforces or verifies the fully resolved object definition.
In OCM versions 0.9.x and older, policies are processed on the hub cluster only upon creation or after an update. Therefore, hub cluster templates are only resolved to the data in the referenced resources upon policy creation or update. Any changes to the referenced resources are not automatically synced to the policies.
A special annotation, policy.open-cluster-management.io/trigger-update can be used to indicate changes to the data
referenced by the templates. Any change to the special annotation value initiates template processing, and the latest
contents of the referenced resource are read and updated in the policy definition that is the propagator for processing
on managed clusters. A typical way to use this annotation is to increment the value by one each time.
Templating value encryption
The encryption algorithm uses AES-CBC with 256-bit keys. Each encryption key is unique per managed cluster and is automatically rotated every 30 days. This ensures that your decrypted value is never stored in the policy on the managed cluster.
To force an immediate encryption key rotation, delete the policy.open-cluster-management.io/last-rotated annotation on
the policy-encryption-key Secret in the managed cluster namespace on the hub cluster. Policies are then reprocessed to
use the new encryption key.
Templating functions
| Function | Description | Sample |
|---|---|---|
fromSecret |
Returns the value of the given data key in the secret. | PASSWORD: '{{ fromSecret "default" "localsecret" "PASSWORD" }}' |
fromConfigmap |
Returns the value of the given data key in the ConfigMap. | log-file: '{{ fromConfigMap "default" "logs-config" "log-file" }}' |
fromClusterClaim |
Returns the value of spec.value in the ClusterClaim resource. |
platform: '{{ fromClusterClaim "platform.open-cluster-management.io" }}' |
lookup |
Returns the Kubernetes resource as a JSON compatible map. Note that if the requested resource does not exist, an empty map is returned. | metrics-url: |http://{{ (lookup "v1" "Service" "default" "metrics").spec.clusterIP }}:8080 |
base64enc |
Returns a base64 encoded value of the input string. |
USER_NAME: '{{ fromConfigMap "default" "myconfigmap" "admin-user" | base64enc }}' |
base64dec |
Returns a base64 decoded value of the input string. |
app-name: |"{{ ( lookup "v1" "Secret" "testns" "mytestsecret") .data.appname ) | base64dec }}" |
indent |
Returns the input string indented by the given number of spaces. | Ca-cert: |{{ ( index ( lookup "v1" "Secret" "default" "mycert-tls" ).data "ca.pem" ) | base64dec | indent 4 }} |
autoindent |
Acts like the indent function but automatically determines the number of leading spaces needed based on the number of spaces before the template. |
Ca-cert: |{{ ( index ( lookup "v1" "Secret" "default" "mycert-tls" ).data "ca.pem" ) | base64dec | autoindent }} |
toInt |
Returns the integer value of the string and ensures that the value is interpreted as an integer in the YAML. | vlanid: |{{ (fromConfigMap "site-config" "site1" "vlan") | toInt }} |
toBool |
Returns the boolean value of the input string and ensures that the value is interpreted as a boolean in the YAML. | enabled: |{{ (fromConfigMap "site-config" "site1" "enabled") | toBool }} |
protect |
Encrypts the input string. It is decrypted when the policy is evaluated. On the replicated policy in the managed cluster namespace, the resulting value resembles the following: $ocm_encrypted:<encrypted-value> |
enabled: |{{hub "(lookup "route.openshift.io/v1" "Route" "openshift-authentication" "oauth-openshift").spec.host | protect hub}} |
Additionally, OCM supports the following template functions that are included from the sprig open source project:
catcontainsdefaultemptyfromJsonhasPrefixhasSuffixjoinlistlowermustFromJsonquotereplacesemversemverComparesplitsplitnternarytrimuntiluntilStepupper
See the Sprig documentation for more details.
2.3.1.3 - Configuration Policy
The ConfigurationPolicy defines Kubernetes manifests to compare with objects that currently exist on the cluster. The
Configuration policy controller is provided by Open Cluster Management and runs on managed clusters.
View the Policy API concepts page to learn more
about the ConfigurationPolicy API.
Prerequisites
You must meet the following prerequisites to install the configuration policy controller:
-
Ensure Golang is installed, if you are planning to install from the source.
-
Ensure the
open-cluster-managementpolicy framework is installed. See Policy Framework for more information.
Installing the configuration policy controller
Deploy via Clusteradm CLI
Ensure clusteradm CLI is installed and is newer than v0.3.0. Download and extract the
clusteradm binary. For more details see the
clusteradm GitHub page.
-
Deploy the configuration policy controller to the managed clusters (this command is the same for a self-managed hub):
# Deploy the configuration policy controller clusteradm addon enable addon --names config-policy-controller --clusters <cluster_name> --context ${CTX_HUB_CLUSTER} -
Ensure the pod is running on the managed cluster with the following command:
$ kubectl get pods -n open-cluster-management-agent-addon
NAME                                               READY   STATUS    RESTARTS   AGE
config-policy-controller-7f8fb64d8c-pmfx4          1/1     Running   0          44s
Sample configuration policy
After a successful deployment, test the policy framework and configuration policy controller with a sample policy.
For more information on how to use a ConfigurationPolicy, read the
Policy API concept section.
-
Run the following command to create a policy on the hub that uses
Placement:# Configure kubectl to point to the hub cluster kubectl config use-context ${CTX_HUB_CLUSTER} # Apply the example policy and placement kubectl apply -n default -f https://raw.githubusercontent.com/open-cluster-management-io/policy-collection/main/community/CM-Configuration-Management/policy-pod-placement.yaml -
Update the
Placementto distribute the policy to the managed cluster with the following command (thisclusterSelectorwill deploy the policy to all managed clusters):kubectl patch -n default placement.cluster.open-cluster-management.io/placement-policy-pod --type=merge -p "{\"spec\":{\"predicates\":[{\"requiredClusterSelector\":{\"labelSelector\":{\"matchExpressions\":[]}}}]}}" -
Make sure the
defaultnamespace has aManagedClusterSetBindingfor aManagedClusterSetwith at least one managed cluster resource in theManagedClusterSet. See Bind ManagedClusterSet to a namespace for more information on this. -
To confirm that the managed cluster is selected by the
Placement, run the following command:$ kubectl get -n default placementdecision.cluster.open-cluster-management.io/placement-policy-pod-decision-1 -o yaml ... status: decisions: - clusterName: <managed cluster name> reason: "" ... -
Enforce the policy to make the configuration policy automatically correct any misconfigurations on the managed cluster:
$ kubectl patch -n default policy.policy.open-cluster-management.io/policy-pod --type=merge -p "{\"spec\":{\"remediationAction\": \"enforce\"}}" policy.policy.open-cluster-management.io/policy-pod patched -
After a few seconds, your policy is propagated to the managed cluster. To confirm, run the following command:
$ kubectl config use-context ${CTX_MANAGED_CLUSTER} $ kubectl get policy -A NAMESPACE NAME REMEDIATION ACTION COMPLIANCE STATE AGE cluster1 default.policy-pod enforce Compliant 4m32s -
The missing pod is created by the policy on the managed cluster. To confirm, run the following command on the managed cluster:
$ kubectl get pod -n default
NAME               READY   STATUS    RESTARTS   AGE
sample-nginx-pod   1/1     Running   0          23s
2.3.1.4 - Open Policy Agent Gatekeeper
Gatekeeper is a validating webhook with auditing capabilities that can enforce custom resource definition-based policies that are run with the Open Policy Agent (OPA). Gatekeeper constraints can be used to evaluate Kubernetes resource compliance. You can leverage OPA as the policy engine, and use Rego as the policy language.
Installing Gatekeeper
See the Gatekeeper documentation to install the desired version of Gatekeeper to the managed cluster.
Sample Gatekeeper policy
Gatekeeper policies are written using constraint templates and constraints. View the following YAML examples that use
Gatekeeper constraints in an OCM Policy:
-
ConstraintTemplatesand constraints: Use the Gatekeeper integration feature by using OCM policies for multicluster distribution of Gatekeeper constraints and Gatekeeper audit results aggregation on the hub cluster. The following example defines a GatekeeperConstraintTemplateand constraint (K8sRequiredLabels) to ensure the “gatekeeper” label is set on all namespaces:apiVersion: policy.open-cluster-management.io/v1 kind: Policy metadata: name: require-gatekeeper-labels-on-ns spec: remediationAction: inform # (1) disabled: false policy-templates: - objectDefinition: apiVersion: templates.gatekeeper.sh/v1beta1 kind: ConstraintTemplate metadata: name: k8srequiredlabels spec: crd: spec: names: kind: K8sRequiredLabels validation: openAPIV3Schema: properties: labels: type: array items: string targets: - target: admission.k8s.gatekeeper.sh rego: | package k8srequiredlabels violation[{"msg": msg, "details": {"missing_labels": missing}}] { provided := {label | input.review.object.metadata.labels[label]} required := {label | label := input.parameters.labels[_]} missing := required - provided count(missing) > 0 msg := sprintf("you must provide labels: %v", [missing]) } - objectDefinition: apiVersion: constraints.gatekeeper.sh/v1beta1 kind: K8sRequiredLabels metadata: name: ns-must-have-gk spec: enforcementAction: dryrun match: kinds: - apiGroups: [""] kinds: ["Namespace"] parameters: labels: ["gatekeeper"]- Since the remediationAction is set to “inform”, the
enforcementActionfield of the Gatekeeper constraint is overridden to “warn”. This means that Gatekeeper detects and warns you about creating or updating a namespace that is missing the “gatekeeper” label. If the policyremediationActionis set to “enforce”, the Gatekeeper constraintenforcementActionfield is overridden to “deny”. In this context, this configuration prevents any user from creating or updating a namespace that is missing the gatekeeper label.
With the previous policy, you might receive the following policy status message:
warn - you must provide labels: {“gatekeeper”} (on Namespace default); warn - you must provide labels: {“gatekeeper”} (on Namespace gatekeeper-system).
Once a policy containing Gatekeeper constraints or
ConstraintTemplatesis deleted, the constraints andConstraintTemplatesare also deleted from the managed cluster.Notes:
- The Gatekeeper audit functionality runs every minute by default. Audit results are sent back to the hub cluster to be viewed in the OCM policy status of the managed cluster.
- Since the remediationAction is set to “inform”, the
-
Auditing Gatekeeper events: The following example uses an OCM configuration policy within an OCM policy to check for Kubernetes API requests denied by the Gatekeeper admission webhook:
apiVersion: policy.open-cluster-management.io/v1
kind: Policy
metadata:
  name: policy-gatekeeper-admission
spec:
  remediationAction: inform
  disabled: false
  policy-templates:
    - objectDefinition:
      apiVersion: policy.open-cluster-management.io/v1
      kind: ConfigurationPolicy
      metadata:
        name: policy-gatekeeper-admission
      spec:
        remediationAction: inform # will be overridden by remediationAction in parent policy
        severity: low
        object-templates:
          - complianceType: mustnothave
            objectDefinition:
              apiVersion: v1
              kind: Event
              metadata:
                namespace: gatekeeper-system # set it to the actual namespace where gatekeeper is running if different
                annotations:
                  constraint_action: deny
                  constraint_kind: K8sRequiredLabels
                  constraint_name: ns-must-have-gk
                  event_type: violation
2.3.2 - Application lifecycle management
After the setup of Open Cluster Management (OCM) hub and managed clusters, you could install the OCM built-in application management add-on. The OCM application management add-on leverages the Argo CD to provide declarative GitOps based application lifecycle management across multiple Kubernetes clusters.
Architecture
Traditional Argo CD resource delivery primarily uses a push model, where resources are deployed from a centralized Argo CD instance to remote or managed clusters.

With the OCM Argo CD add-on, users can leverage a pull based resource delivery model, where managed clusters pull and apply application configurations.

For more details, visit the Argo CD Pull Integration GitHub page.
Prerequisite
You must meet the following prerequisites to install the application lifecycle management add-on:
-
Ensure kubectl are installed.
-
Ensure the OCM cluster manager is installed. See Start the control plane for more information.
-
Ensure the OCM klusterlet is installed. See Register a cluster for more information.
-
Ensure
clusteradmCLI tool is installed. Download and extract the clusteradm binary. For more details see the clusteradm GitHub page.
Installation
Install Argo CD on the Hub cluster:
kubectl create namespace argocd
kubectl apply -n argocd -f https://raw.githubusercontent.com/argoproj/argo-cd/stable/manifests/install.yaml
See Argo CD website for more details.
Install the OCM Argo CD add-on on the Hub cluster:
clusteradm install hub-addon --names argocd
If your hub controller starts successfully, you should see:
$ kubectl -n argocd get deploy argocd-pull-integration
NAME                      READY   UP-TO-DATE   AVAILABLE   AGE
argocd-pull-integration   1/1     1            1           55s
Enable the add-on for your choice of Managed clusters:
clusteradm addon enable --names argocd --clusters cluster1,cluster2
Replace cluster1 and cluster2 with your Managed cluster names.
If your add-on starts successfully, you should see:
$ kubectl -n cluster1 get managedclusteraddon argocd
NAME     AVAILABLE   DEGRADED   PROGRESSING
argocd   True                   False
On the Hub cluster, apply the example guestbook-app-set manifest:
kubectl apply -f https://raw.githubusercontent.com/open-cluster-management-io/ocm/refs/heads/main/solutions/deploy-argocd-apps-pull/example/guestbook-app-set.yaml
Note: The Application template inside the ApplicationSet must contain the following content:
labels:
  apps.open-cluster-management.io/pull-to-ocm-managed-cluster: 'true'
annotations:
  argocd.argoproj.io/skip-reconcile: 'true'
  apps.open-cluster-management.io/ocm-managed-cluster: '{{name}}'
The label allows the pull model controller to select the Application for processing.
The skip-reconcile annotation is to prevent the Application from reconciling on the Hub cluster.
The ocm-managed-cluster annotation is for the ApplicationSet to generate multiple Application based on each cluster generator targets.
When this guestbook ApplicationSet reconciles, it will generate an Application for the registered Managed clusters. For example:
$ kubectl -n argocd get appset
NAME            AGE
guestbook-app   84s
$ kubectl -n argocd get app
NAME                     SYNC STATUS   HEALTH STATUS
cluster1-guestbook-app
cluster2-guestbook-app
On the Hub cluster, the pull controller will wrap the Application with a ManifestWork. For example:
$ kubectl -n cluster1 get manifestwork
NAME                          AGE
cluster1-guestbook-app-d0e5   2m41s
On a Managed cluster, you should see that the Application is pulled down successfully. For example:
$ kubectl -n argocd get app
NAME                     SYNC STATUS   HEALTH STATUS
cluster1-guestbook-app   Synced        Healthy
$ kubectl -n guestbook get deploy
NAME           READY   UP-TO-DATE   AVAILABLE   AGE
guestbook-ui   1/1     1            1           7m36s
On the Hub cluster, the status controller will sync the dormant Application with the ManifestWork status feedback. For example:
$ kubectl -n argocd get app
NAME                     SYNC STATUS   HEALTH STATUS
cluster1-guestbook-app   Synced        Healthy
cluster2-guestbook-app   Synced        Healthy
2.3.3 - Cluster proxy
Cluster proxy is an OCM addon providing L4 network connectivity from hub cluster to the managed clusters without any additional requirement to the managed cluster’s network infrastructure by leveraging the Kubernetes official SIG sub-project apiserver-network-proxy.
Background
The original architecture of OCM allows a cluster from anywhere to be registered and managed by OCM’s control plane (i.e. the hub cluster) as long as a klusterlet agent can reach hub cluster’s endpoint. So the minimal requirement for the managed cluster’s network infrastructure in OCM is “klusterlet -> hub” connectivity. However, there are still some cases where the components in the hub cluster hope to proactively dail/request the services in the managed clusters which will need the “hub -> klusterlet” connectivity on the other hand. In addition to that, the cases can be even more complex when each of the managed clusters are not in the same network.
Cluster proxy is aiming at seamlessly delivering the outbound L4 requests to the services in the managed cluster’s network without any assumptions upon the infrastructure as long as the clusters are successfully registered. Basically the connectivity provided by cluster proxy is working over the secured reserve proxy tunnels established by the apiserver-network-proxy.
About apiserver-network-proxy
Apiserver-network-proxy is the underlying technique of a Kubernetes' feature called konnectivity egress-selector which is majorly for setting up a TCP-level proxy for kube-apiserver to get access to the node/cluster network. Here are a few terms we need to clarify before we elaborate on how the cluster proxy resolve multi-cluster control plane network connectivity for us:
- Proxy Tunnel: A Grpc long connection that multiplexes and transmits TCP-level traffic from the proxy servers to the proxy agents. Note that there will be only one tunnel instance between each pair of server and agent.
- Proxy Server: An mTLS Grpc server opened for establishing tunnels which is the traffic ingress of proxy tunnel.
- Proxy Agent: A mTLS Grpc agent that maintains the tunnel between the server and is also the egress of the proxy tunnel.
- Konnectivity Client: The SDK library for talking through the tunnel.
Applicable to any Golang client of which the
Dialeris overridable. Note that for non-golang clients, the proxy server also supports HTTP-Connect based proxying as alternative.
Architecture
Cluster proxy runs inside OCM’s hub cluster as an addon manager which is developed based on the Addon-Framework. The addon manager of cluster proxy will be responsible for:
- Managing the installation of proxy servers in the hub cluster.
- Managing the installation of proxy agents in the managed cluster.
- Collecting healthiness and the other stats consistently in the hub cluster.
The following picture shows the overall architecture of cluster proxy:
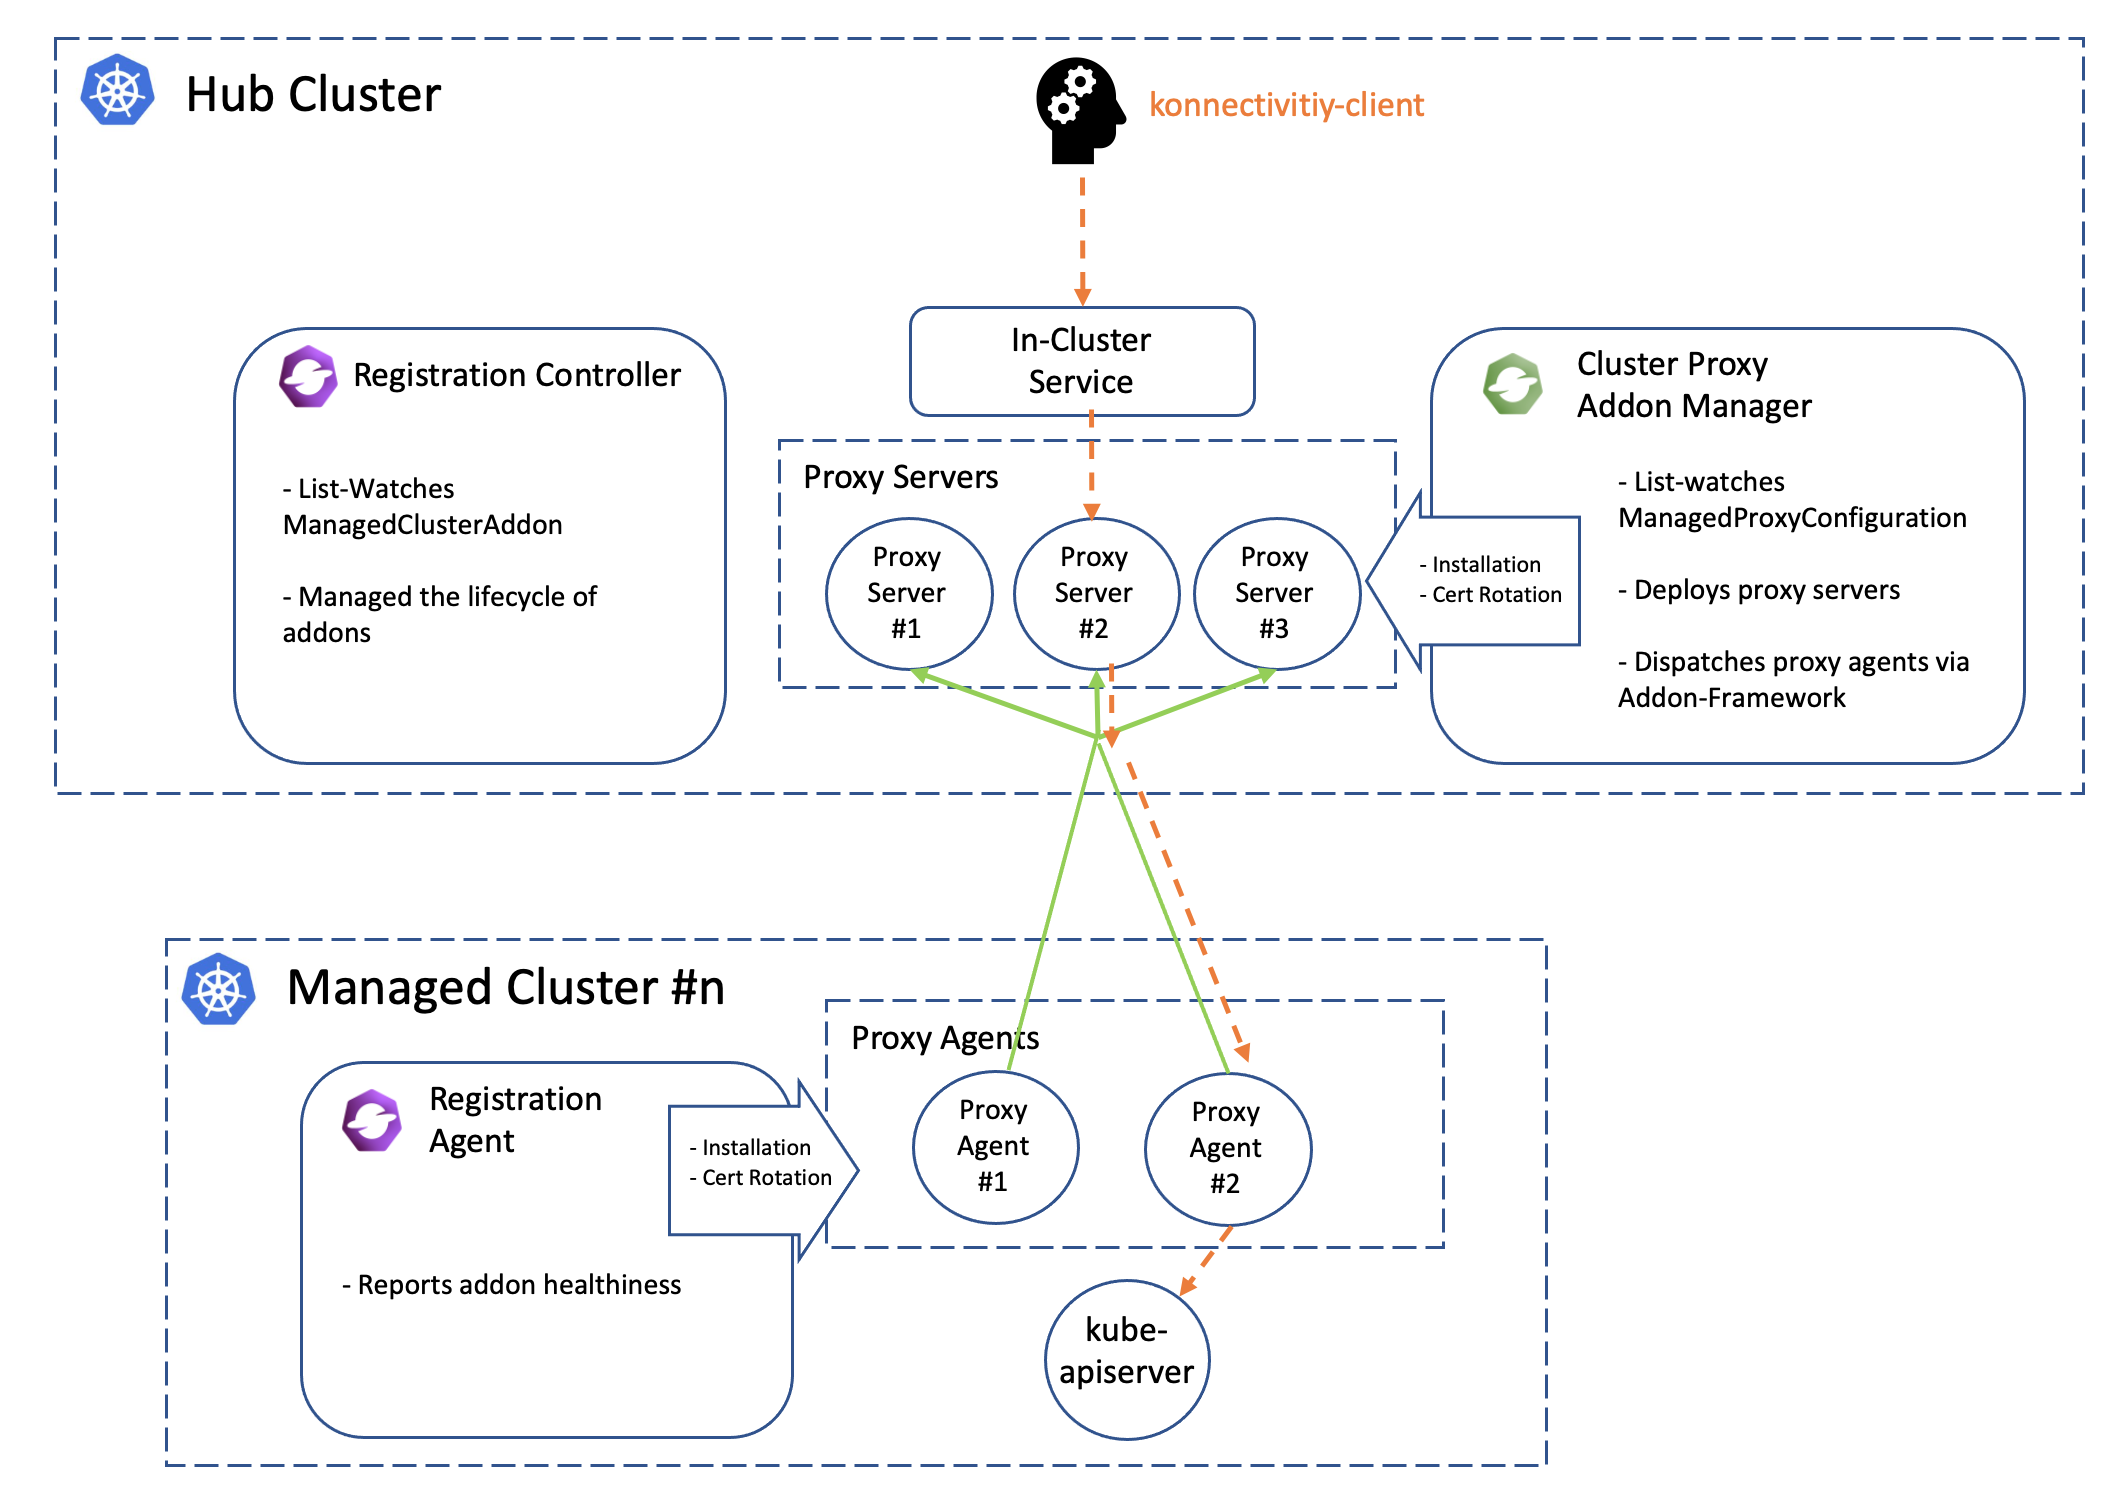
Note that the green lines in the picture above is the active proxy tunnels between proxy servers and agents, and HA setup is natively supported by apiserver-network-proxy both for the servers and the agents. The orange dash line started by the konnectivity client is the path of how the traffic flows from the hub cluster to arbitrary managed clusters. Meanwhile the core components including registration and work will help us manage the lifecycle of all the components distributed in the multiple managed clusters, so the hub admin won’t need to directly operate the managed clusters to install or configure the proxy agents no more.
Prerequisite
You must meet the following prerequisites to install the cluster-proxy:
-
Ensure your
open-cluster-managementrelease is greater thanv0.5.0. -
Ensure
kubectlis installed. -
Ensure
helmis installed.
Installation
To install the cluster proxy addon to the OCM control plane, run:
$ helm repo add ocm https://open-cluster-management.io/helm-charts
$ helm repo update
$ helm search repo ocm
NAME                              	CHART VERSION	APP VERSION	DESCRIPTION
ocm/cluster-proxy                 	v0.1.1       	1.0.0      	A Helm chart for Cluster-Proxy
...
Then run the following helm command to install the cluster-proxy addon:
$ helm install -n open-cluster-management-addon --create-namespace \
    cluster-proxy ocm/cluster-proxy
Note: If you’re using a non-Kind cluster, for example, an Openshift cluster,
you need to configure the ManagedProxyConfiguration by setting proxyServer.entrypointAddress
in the values.yaml to the address of the proxy server.
To do this at install time, you can run the following command:
$ helm install -n open-cluster-management-addon --create-namespace \
    cluster-proxy ocm/cluster-proxy \
    --set "proxyServer.entrypointAddress=<address of the proxy server>"
After the installation, you can check the deployment status of the cluster-proxy addon by running the following command:
$ kubectl -n open-cluster-management-addon get deploy
NAME                                   READY   UP-TO-DATE   AVAILABLE   AGE
cluster-proxy                          3/3     3            3           24h
cluster-proxy-addon-manager            1/1     1            1           24h
...
Then the addon manager of cluster-proxy will be created into the hub cluster
in the form of a deployment named cluster-proxy-addon-manager. As is also
shown above, the proxy servers will also be created as deployment resource
called cluster-proxy.
By default, the addon manager will be automatically discovering the addition or removal the managed clusters and installs the proxy agents into them on the fly. To check out the healthiness status of the proxy agents, we can run:
$  kubectl get managedclusteraddon -A
NAMESPACE     NAME                     AVAILABLE   DEGRADED   PROGRESSING
<cluster#1>   cluster-proxy            True
<cluster#2>   cluster-proxy            True
The proxy agent distributed in the managed cluster will be periodically renewing the lease lock of the addon instance.
Usage
Command-line tools
Using the clusteradm to check the status of the cluster-proxy addon:
$ clusteradm proxy health
CLUSTER NAME    INSTALLED    AVAILABLE    PROBED HEALTH    LATENCY
<cluster#1>     True         True         True             67.595144ms
<cluster#2>     True         True         True             85.418368ms
Example code
An example client in the cluster proxy repo shows us how to dynamically talk to the kube-apiserver of a managed cluster from the hub cluster by simply prescribing the name of the target cluster. Here’s also a TL;DR code snippet:
// 1. instantiate a dialing tunnel instance.
// NOTE: recommended to be a singleton in your golang program.
tunnel, err := konnectivity.CreateSingleUseGrpcTunnel(
    context.TODO(),
    <your proxy server endpoint>,
    grpc.WithTransportCredentials(grpccredentials.NewTLS(<your proxy server TLS config>)),
)
if err != nil {
    panic(err)
}
...
// 2. Overriding the Dialer to tunnel. Dialer is a common abstraction
// in Golang SDK.
cfg.Dial = tunnel.DialContext
Another example will be cluster-gateway which is an aggregated apiserver optionally working over cluster-proxy for routing traffic to the managed clusters dynamically in HTTPs protocol.
Note that by default the client credential for konnectivity client will be persisted as secrets resources under the namespace where the addon-manager is running. With that being said, to mount the secret to the systems in the other namespaces, the users are expected to copy the secret on their own manually.
More insights
Troubleshooting
The installation of proxy servers and agents are prescribed by the custom resource called “managedproxyconfiguration”. We can check it out by the following commands:
$ kubectl get managedproxyconfiguration cluster-proxy -o yaml
apiVersion: proxy.open-cluster-management.io/v1alpha1
kind: ManagedProxyConfiguration
metadata: ...
spec:
  proxyAgent:
    image: <expected image of the proxy agents>
    replicas: <expected replicas of proxy agents>
  proxyServer:
    entrypoint:
      loadBalancerService:
        name: proxy-agent-entrypoint
      type: LoadBalancerService # Or "Hostname" to set a fixed address
                                # for establishing proxy tunnels.
    image: <expected image of the proxy servers>
    inClusterServiceName: proxy-entrypoint
    namespace: <target namespace to install proxy server>
    replicas: <expected replicas of proxy servers>
  authentication: # Customize authentication between proxy server/agent
status:
  conditions: ...
Related materials
See the original design proposal for reference.
2.3.4 - Managed service account
Managed Service Account is an OCM addon enabling a hub cluster admin to manage service account across multiple clusters on ease. By controlling the creation and removal of the service account, the addon agent will project and rotate the corresponding token back to the hub cluster which is very useful for the Kube API client from the hub cluster to request against the managed clusters.
Background
Normally there are two major approaches for a Kube API client to authenticate and access a Kubernetes cluster:
- Valid X.509 certificate-key pair
- Service account bearer token
The service account token will be automatically persisted as a secret resource inside the hosting Kubernetes clusters upon creation, which is commonly used for the “in-cluster” client. However, in terms of OCM, the hub cluster is completely an external system to the managed clusters, so we will need a local agent in each managed cluster to reflect the tokens consistently to the hub cluster so that the Kube API client from hub cluster can “push” the requests directly against the managed cluster. By delegating the multi-cluster service account management to this addon, we can:
- Project the service account token from the managed clusters to the hub cluster with custom API audience.
- Rotate the service account tokens dynamically.
- Homogenize the client identities so that we can easily write a static RBAC policy that applies to multiple managed clusters.
Prerequisite
You must meet the following prerequisites to install the managed service account:
-
Ensure your
open-cluster-managementrelease is greater thanv0.5.0. -
Ensure
kubectlis installed. -
Ensure
helmis installed.
Installation
To install the managed service account addon to the OCM control plane, run:
$ helm repo add ocm https://open-cluster-management.io/helm-charts
$ helm repo update
$ helm search repo ocm
NAME                              	CHART VERSION	APP VERSION	DESCRIPTION
ocm/managed-serviceaccount          <...>           1.0.0       A Helm chart for Managed ServiceAccount Addon
...
Then run the following helm command to continue the installation:
$ helm install -n open-cluster-management-addon --create-namespace \
    managed-serviceaccount  ocm/managed-serviceaccount
$ kubectl -n open-cluster-management-addon get pod
NAME                                                    READY   STATUS    RESTARTS   AGE
managed-serviceaccount-addon-manager-5m9c95b7d8-xsb94   1/1     Running   1          4d4h
...
By default, the addon manager will be automatically discovering the addition or removal the managed clusters and installs the managed serviceaccount agents into them on the fly. To check out the healthiness status of the managed serviceaccount agents, we can run:
$ kubectl get managedclusteraddon -A
NAMESPACE         NAME                     AVAILABLE   DEGRADED   PROGRESSING
<cluster name>    managed-serviceaccount   True
Usage
To exercise the new ManagedServiceAccount API introduced by this addon, we
can start by applying the following sample resource:
$ export CLUSTER_NAME=<cluster name>
$ kubectl create -f - <<EOF
apiVersion: authentication.open-cluster-management.io/v1alpha1
kind: ManagedServiceAccount
metadata:
  name: my-sample
  namespace: ${CLUSTER_NAME}
spec:
  rotation: {}
EOF
Then the addon agent in each of the managed cluster is responsible for
executing and refreshing the status of the ManagedServiceAccount, e.g.:
$ kubectl describe ManagedServiceAccount -n cluster1
...
  status:
    conditions:
    - lastTransitionTime: "2021-12-09T09:08:15Z"
      message: ""
      reason: TokenReported
      status: "True"
      type: TokenReported
    - lastTransitionTime: "2021-12-09T09:08:15Z"
      message: ""
      reason: SecretCreated
      status: "True"
      type: SecretCreated
    expirationTimestamp: "2022-12-04T09:08:15Z"
    tokenSecretRef:
      lastRefreshTimestamp: "2021-12-09T09:08:15Z"
      name: my-sample
The service account will be created in the managed cluster (assume the name is cluster1):
$ kubectl get sa my-sample -n open-cluster-management-managed-serviceaccount --context kind-cluster1
NAME        SECRETS   AGE
my-sample   1         9m57s
The corresponding secret will also be created in the hub cluster, which is visible via:
$ kubectl -n <your cluster> get secret my-sample
NAME        TYPE     DATA   AGE
my-sample   Opaque   2      2m23s
Related materials
Repo: https://github.com/open-cluster-management-io/managed-serviceaccount
See the design proposal at: https://github.com/open-cluster-management-io/enhancements/tree/main/enhancements/sig-architecture/19-projected-serviceaccount-token
2.3.5 - Multicluster Control Plane
What is Multicluster Control Plane
The multicluster control plane is a lightweight Open Cluster Manager (OCM) control plane that is easy to install and has a small footprint. It can be running anywhere with or without a Kubernetes environment to serve the OCM control plane capabilities.
Why use Multicluster Control Plane
-
Some Kubernetes environments do not have CSR (e.g., EKS) so that the standard OCM control plane cannot be installed. The multicluster control plane can be able to install in these environments and expose the OCM control plane API via loadbalancer.
-
Some users may want to run multiple OCM control planes to isolate the data. The typical case is that the user wants to run one OCM control plane for production and another OCM control plane for development. The multicluster control plane is able to be installed in different namespaces in a single cluster. Each multicluster control plane is running independently and serving the OCM control plane capabilities.
-
Some users may want to run the OCM control plane without a Kubernetes environment. The multicluster control plane can run in a standalone mode, for example, running in a VM. Expose the control plane API to the outside so the managed clusters can register to it.
How to use Multicluster Control Plane
Start the standalone multicluster control plane
You need build multicluster-controlplane in your local host. Follow the below steps to build the binary and start the multicluster control plane.
git clone https://github.com/open-cluster-management-io/multicluster-controlplane.git
cd multicluster-controlplane
make run
Once the control plane is running, you can access the control plane by using kubectl --kubeconfig=./_output/controlplane/.ocm/cert/kube-aggregator.kubeconfig.
You can customize the control plane configurations by creating a config file and using the environment variable CONFIG_DIR to specify your config file directory. Please check the repository documentation for details.
Install via clusteradm
Install clusteradm CLI tool
It’s recommended to run the following command to download and install the
latest release of the clusteradm command-line tool:
curl -L https://raw.githubusercontent.com/open-cluster-management-io/clusteradm/main/install.sh | bash
Install multicluster control plane
You can use clusteradm init to deploy the multicluster control plane in your Kubernetes environment.
- Set the environment variable KUBECONFIG to your cluster kubeconfig path. For instance, create a new KinD cluster and deploy multicluster control plane in it.
export KUBECONFIG=/tmp/kind-controlplane.kubeconfig
kind create cluster --name multicluster-controlplane
export mc_cp_node_ip=$(kubectl get nodes -o=jsonpath='{.items[0].status.addresses[?(@.type=="InternalIP")].address}')
- Run following command to deploy a control plane
clusteradm init --singleton=true --set route.enabled=false --set nodeport.enabled=true --set nodeport.port=30443 --set apiserver.externalHostname=$mc_cp_node_ip --set apiserver.externalPort=30443 --singleton-name multicluster-controlplane
Refer to the repository documentation for how to customize the control plane configurations.
- Get the control plane kubeconfig by running the following command:
kubectl -n multicluster-controlplane get secrets multicluster-controlplane-kubeconfig -ojsonpath='{.data.kubeconfig}' | base64 -d > /tmp/multicluster-controlplane.kubeconfig
Join a cluster to the multicluster control plane
You can use clusteradm to join a cluster. For instance, take the KinD cluster as an example, run the following command to join the cluster to the control plane:
kind create cluster --name cluster1 --kubeconfig /tmp/kind-cluster1.kubeconfig
clusteradm --kubeconfig=/tmp/multicluster-controlplane.kubeconfig get token --use-bootstrap-token
clusteradm --singleton=true --kubeconfig /tmp/kind-cluster1.kubeconfig join --hub-token <controlplane token> --hub-apiserver https://$mc_cp_node_ip:30443/ --cluster-name cluster1
clusteradm --kubeconfig=/tmp/multicluster-controlplane.kubeconfig accept --clusters cluster1
Verify the cluster join
Run this command to verify the cluster join:
kubectl --kubeconfig=/tmp/multicluster-controlplane.kubeconfig get managedcluster
NAME       HUB ACCEPTED   MANAGED CLUSTER URLS                  JOINED   AVAILABLE   AGE
cluster1   true           https://cluster1-control-plane:6443   True     True        5m25s
You should see the managedcluster joins to the multicluster control plane. Congratulations!
2.4 - Administration
A few general guide about operating the open-cluster-management’s control plane and the managed clusters.
2.4.1 - Monitoring OCM using Prometheus-Operator
In this page, we provide a way to monitor your OCM environment using Prometheus-Operator.
Before you get started
You must have a OCM environment setuped. You can also follow our recommended quick start guide to set up a playgroud OCM environment.
And then please install the Prometheus-Operator in your hub cluster. You can also run the following commands copied from the official doc:
git clone https://github.com/prometheus-operator/kube-prometheus.git
cd kube-prometheus

# Create the namespace and CRDs, and then wait for them to be availble before creating the remaining resources
kubectl create -f manifests/setup

# Wait until the "servicemonitors" CRD is created. The message "No resources found" means success in this context.
until kubectl get servicemonitors --all-namespaces ; do date; sleep 1; echo ""; done

kubectl create -f manifests/
Monitoring the control-plane resource usage.
You can use kubectl proxy to open prometheus UI in your browser on localhost:9090:
kubectl --namespace monitoring port-forward svc/prometheus-k8s 9090
The following queries are to monitor the control-plane pods’ cpu usage, memory usage and apirequestcount for critical CRs:
rate(container_cpu_usage_seconds_total{namespace=~"open-cluster-management.*"}[3m])
container_memory_working_set_bytes{namespace=~"open-cluster-management.*"}
rate(apiserver_request_total{resource=~"managedclusters|managedclusteraddons|managedclustersetbindings|managedclustersets|addonplacementscores|placementdecisions|placements|manifestworks|manifestworkreplicasets"}[1m])
Visualized with Grafana
We provide a intial grafana dashboard for you to visualize the metrics. But you can also customize your own dashboard.
First, use the following command to proxy grafana service:
kubectl --namespace monitoring port-forward svc/grafana 3000
Next, open the grafana UI in your browser on localhost:3000.
Click the “Import Dashboard” and run the following command to copy a sample dashboard and paste it to the grafana:
curl https://raw.githubusercontent.com/open-cluster-management-io/open-cluster-management-io.github.io/main/content/en/getting-started/administration/assets/grafana-sample.json | pbcopy
Then, you will get a sample grafana dashboard that you can fine-tune further:
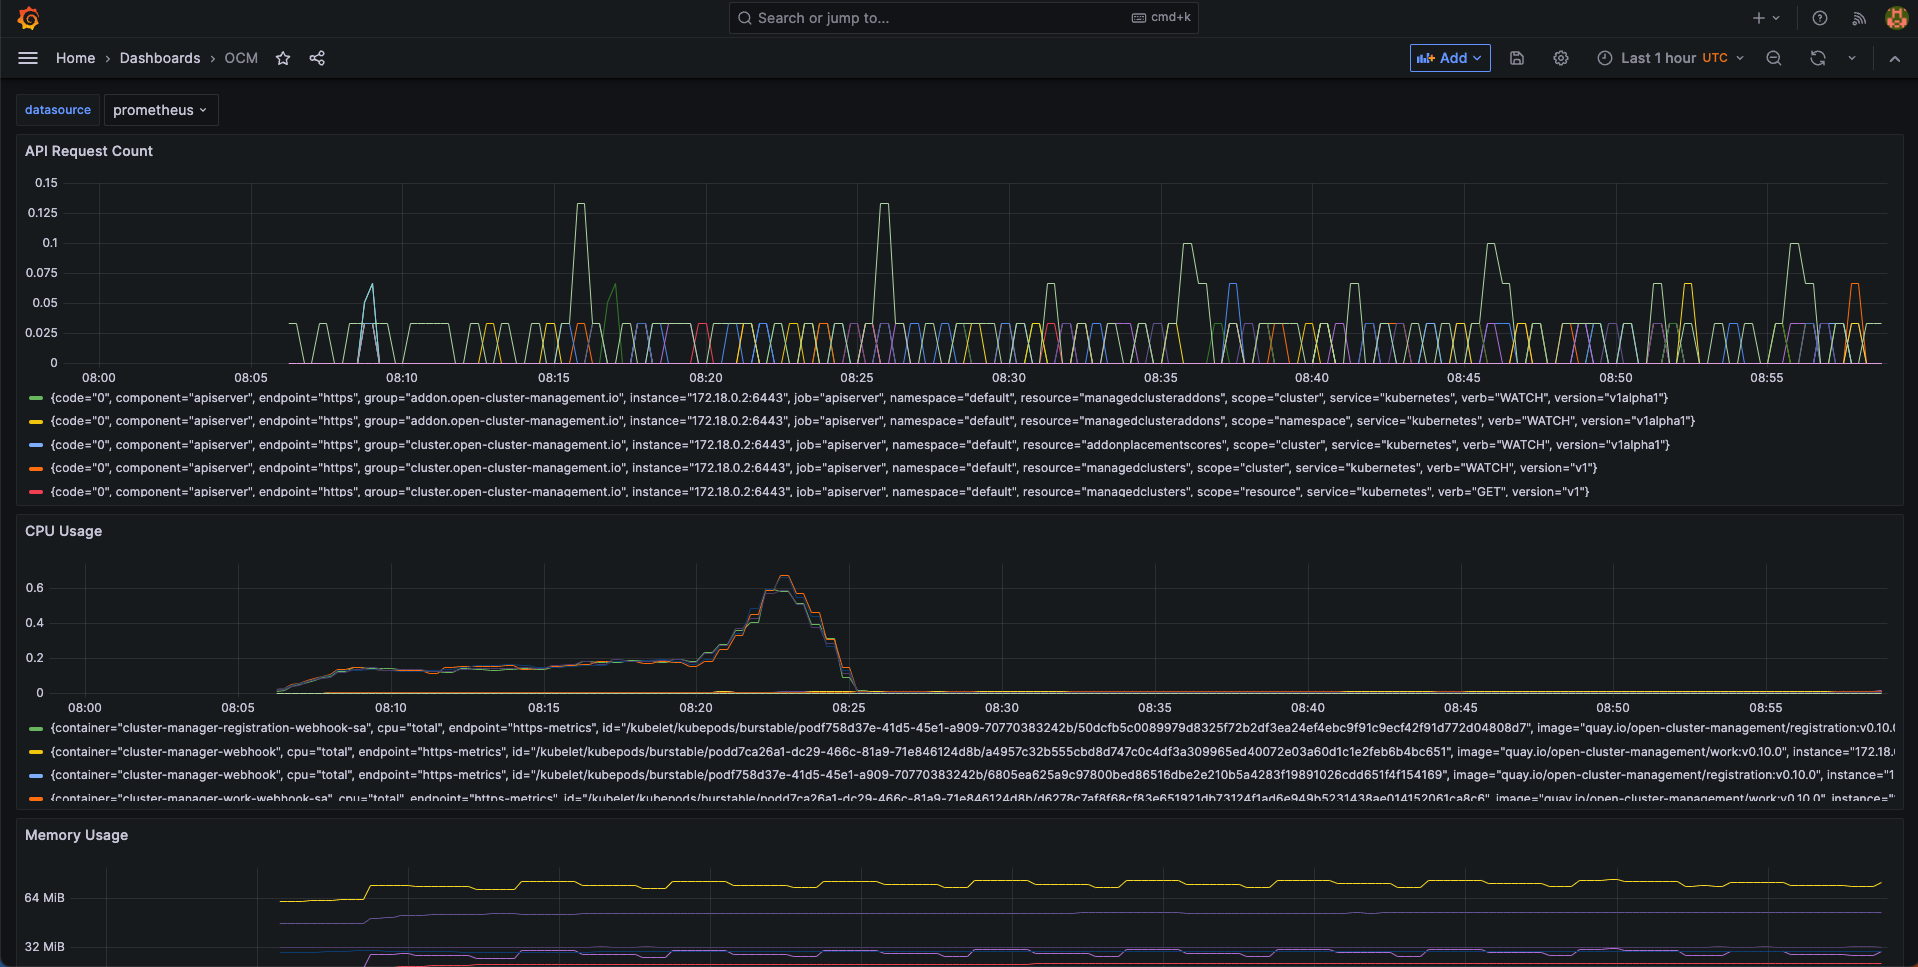
2.4.2 - Upgrading your OCM environment
This page provides the suggested steps to upgrade your OCM environment including both the hub cluster and the managed clusters. Overall the major steps you should follow are:
- Read the release notes to confirm the latest OCM release version. (Note that some add-ons’ version might be different from OCM’s overall release version.)
- Upgrade your command line tools
clusteradm
Before you begin
You must have an existing OCM environment and there’s supposed to be registration-operator running in your clusters. The registration-operators is supposed to be installed if you’re previously following our recommended quick start guide to set up your OCM. The operator is responsible for helping you upgrade the other components on ease.
Upgrade command-line tool
In order to retrieve the latest version of OCM’s command-line tool clusteradm,
run the following one-liner command:
$ curl -L https://raw.githubusercontent.com/open-cluster-management-io/clusteradm/main/install.sh | bash
Then you’re supposed to see the following outputs:
Getting the latest clusteradm CLI...
Your system is darwin_amd64

clusteradm CLI is detected:
Reinstalling clusteradm CLI - /usr/local/bin/clusteradm...

Installing v0.1.0 OCM clusteradm CLI...
Downloading https://github.com/open-cluster-management-io/clusteradm/releases/download/v0.1.0/clusteradm_darwin_amd64.tar.gz ...
clusteradm installed into /usr/local/bin successfully.

To get started with clusteradm, please visit https://open-cluster-management.io/getting-started/
Also, your can confirm the installed cli version by running:
$ clusteradm version
client		    version	:v0.1.0
server release	version	: ...
Upgrade OCM Components via Command-line tool
Hub Cluster
For example, to upgrade OCM components in the hub cluster, run the following command:
$ clusteradm upgrade clustermanager --bundle-version=0.7.0
Then clusteradm will make sure everything in the hub cluster is upgraded to
the expected version. To check the latest status after the upgrade, continue to
run the following command:
$ clusteradm get hub-info
Managed Clusters
To upgrade the OCM components in the managed clusters, switch the client context
e.g. overriding KUBECONFIG environment variable, then simply run the following
command:
$ clusteradm upgrade klusterlet --bundle-version=0.7.0
To check the status after the upgrade, continue running this command against the managed cluster:
$ clusteradm get klusterlet-info
Upgrade OCM Components via Manual Edit
Hub Cluster
Upgrading the registration-operator
Navigate into the namespace where you installed registration-operator (named “open-cluster-management” by default) and edit the image version of its deployment resource:
$ kubectl -n open-cluster-management edit deployment cluster-manager
Then update the image tag version to your target release version, which is exactly the OCM’s overall release version.
--- image: quay.io/open-cluster-management/registration-operator:<old release>
+++ image: quay.io/open-cluster-management/registration-operator:<new release>
Upgrading the core components
After the upgrading of registration-operator is done, it’s about time to surge
the working modules of OCM. Go on and edit the clustermanager custom resource
to prescribe the registration-operator to perform the automated upgrading:
$ kubectl edit clustermanager cluster-manager
In the content of clustermanager resource, you’re supposed to see a few
images listed in its spec:
apiVersion: operator.open-cluster-management.io/v1
kind: ClusterManager
metadata: ...
spec:
  registrationImagePullSpec: quay.io/open-cluster-management/registration:<target release>
  workImagePullSpec: quay.io/open-cluster-management/work:<target release>
  # NOTE: Placement release versioning differs from the OCM root version, please refer to the release note.
  placementImagePullSpec: quay.io/open-cluster-management/placement:<target release>
Replacing the old release version to the latest and commit the changes will
trigger the process of background upgrading. Note that the status of upgrade
can be actively tracked via the status of clustermanager, so if anything goes
wrong during the upgrade it should also be reflected in that status.
Managed Clusters
Upgrading the registration-operator
Similar to the process of upgrading hub’s registration-operator, the only difference you’re supposed to notice when upgrading the managed cluster is the name of deployment. Note that before running the following command, you are expected to switch the context to access the managed clusters not the hub.
$ kubectl -n open-cluster-management edit deployment klusterlet
Then repeatedly, update the image tag version to your target release version and commit the changes will upgrade the registration-operator.
Upgrading the agent components
After the registration-operator is upgraded, move on and edit the corresponding
klusterlet custom resource to trigger the upgrading process in your managed
cluster:
$ kubectl edit klusterlet klusterlet
In the spec of klusterlet, what is expected to be updated is also its image
list:
apiVersion: operator.open-cluster-management.io/v1
kind: Klusterlet
metadata: ...
spec:
  ...
  registrationImagePullSpec: quay.io/open-cluster-management/registration:<target release>
  workImagePullSpec: quay.io/open-cluster-management/work:<target release>
After committing the updates, actively checking the status of the klusterlet
to confirm whether everything is correctly upgraded. And repeat the above steps
to each of the managed clusters to perform a cluster-wise progressive upgrade.
Confirm the upgrade
Getting the overall status of the managed cluster will help you to detect the availability in case any of the managed clusters are running into failure:
$ kubectl get managedclusters
And the upgrading is all set if all the steps above is succeeded.
3 - Developer Guides
3.1 - Add-on Developer Guide
This page is a developer guide about how to build an OCM add-on using addon-framework.
Supported version
The OCM v1.0.0 requires addon-framework v0.9.3 and above versions.
And notice there’s breaking changes in automatic installation in addon-framework version v0.10.0.
Overview
Add-on is an extension which can work with multiple clusters based on the foundation components in open-cluster-management. Add-ons are Open Cluster Management-based extensions that can be used to work with multiple clusters. Add-ons can support different configurations for different managed clusters, and can also be used to read data from the hub cluster. For example, you might use the managed-serviceaccount add-on to collect the tokens from managed cluster back to the hub cluster, use the cluster-proxy addon to establish a reverse proxy tunnels from the managed cluster to the hub cluster, etc.
A typical add-on should consist of two kinds of components:
Add-on agent: The components running in the managed clusters which can be any kubernetes resources, for example it might be a container with permissions to access the hub cluster, an Operator, or an instance of Operator, etc.
Add-on manager: A kubernetes controller in the hub cluster that generates and applies the add-on agent manifests to the managed clusters via the ManifestWork API. The manager also can optionally manage the lifecycle of add-on.
There are 2 API resources for add-on in the OCM hub cluster:
ClusterManagementAddOn: This is a cluster-scoped resource which allows the user to discover which add-on is available
for the cluster manager and also provides metadata information about the add-on such as display name and description information.
The name of the ClusterManagementAddOn resource will be used for the namespace-scoped ManagedClusterAddOn resource.
ManagedClusterAddOn: This is a namespace-scoped resource which is used to trigger the add-on agent to be installed
on the managed cluster, and should be created in the ManagedCluster namespace of the hub cluster.
ManagedClusterAddOn also holds the current state of an add-on.
There is a library named addon-framework which provides some simple user interfaces for developers to build their add-on managers easily.
We have some available add-ons in the OCM community:
- cluster-proxy
- managed-serviceaccount
- argocd-pull-integration
- config-policy-controller
- governance-policy-framework
Write your first add-on
Let’s implement a simple add-on manager using addon-framework, which deploys a busybox deployment in the managed cluster. You can find the example in here.
Implement the addon manager
First, create your Go project, and the project should contain a main.go file and a folder manifests. The folder name
can be customized, the example uses manifests as the folder name. main.go contains the Go code of the addon manager.
manifests contains the addon agent’s manifest files to be deployed on the managed cluster.
The main.go file is like this:
package main

import (
  "context"
  "embed"
  "os"
  restclient "k8s.io/client-go/rest"
  "k8s.io/klog/v2"
  "open-cluster-management.io/addon-framework/pkg/addonfactory"
  "open-cluster-management.io/addon-framework/pkg/addonmanager"
)

//go:embed manifests
var FS embed.FS

const (
  addonName = "busybox-addon"
)

func main() {
  kubeConfig, err := restclient.InClusterConfig()
  if err != nil {
     os.Exit(1)
  }
  addonMgr, err := addonmanager.New(kubeConfig)
  if err != nil {
     klog.Errorf("unable to setup addon manager: %v", err)
     os.Exit(1)
  }

  agentAddon, err := addonfactory.NewAgentAddonFactory(addonName, FS, "manifests").BuildTemplateAgentAddon()
  if err != nil {
     klog.Errorf("failed to build agent addon %v", err)
     os.Exit(1)
  }

  err = addonMgr.AddAgent(agentAddon)
  if err != nil {
     klog.Errorf("failed to add addon agent: %v", err)
     os.Exit(1)
  }

  ctx := context.Background()
  go addonMgr.Start(ctx)

  <-ctx.Done()
}
You need to define an embed.FS to embed the files in manifests folder.
And then you need to build an agentAddon using the agentAddonFactory, and tell the agentAddonFactory the name of
the add-on and the agent manifests.
Finally, you just add the agentAddon to the addonManager and start the addonManager.
With above code, the addon manager is implemented. Next is to implement the addon agent part. In this example, the add-on agent manifest to be deployed on managed cluster is a busybox deployment.
Create file deployment.yaml in manifests folder, the deployment.yaml is like this:
kind: Deployment
apiVersion: apps/v1
metadata:
 name: busybox
 namespace: open-cluster-management-agent-addon
spec:
 replicas: 1
 selector:
   matchLabels:
     addon: busybox
 template:
   metadata:
     labels:
       addon: busybox
   spec:
     containers:
       - name: busybox
         image: busybox
         imagePullPolicy: IfNotPresent
         args:
           - "sleep"
           - "3600"
Then you can follow next section to deploy the add-on manager on your hub cluster. The add-on manager will watch the ManagedClusterAddOn, and deploy the add-on agent manifests to the targeted managed cluster via ManifestWork.
Deploy the add-on manager on your hub cluster
Now you can build your add-on manager as an image and deploy it on the hub cluster.
Following below steps to build the image for the example. This image contains several example addon managers, including the busybox example.
git clone https://github.com/open-cluster-management-io/addon-framework.git
cd addon-framework
make images
In addition to the deployment definition, there are also some additional resources to be deployed on the hub cluster. An example of the deployment manifests for the add-on manager is here. Following below steps to deploy the add-on manager.
make deploy-busybox
With the add-on manager deployed, you can see the busybox-addon-controller running in namespace open-cluster-management on the hub cluster.
$ oc get pods -n open-cluster-management
NAME                                       READY   STATUS    RESTARTS   AGE
busybox-addon-controller-d977665d5-x28qc   1/1     Running   0          27m
RBAC of the addon manager
There are some minimum required permissions for the addon manager controller to run on the hub cluster. It needs to:
- get/list/watch/update the
ManagedCluster. - get/list/watch/create/update/patch/delete the
ManagedClusterAddOnandManifestWork. - get/list/watch the
ClusterManagementAddOn.
ClusterManagementAddOn
From a user’s perspective, to install the addon to the hub cluster the hub admin should register a globally-unique
ClusterManagementAddOn resource as a singleton placeholder in the hub cluster. For instance, the ClusterManagementAddOn
for the busybox-addon:
apiVersion: addon.open-cluster-management.io/v1alpha1
kind: ClusterManagementAddOn
metadata:
 name: busybox-addon
spec:
 addOnMeta:
   displayName: Busybox Addon
   description: "busybox-addon is an example addon to deploy busybox pod on the managed cluster"
Enable the add-on for a managed cluster.
Now your addon-manager is running on the hub cluster.
To deploy the busybox add-on agent to a certain managed cluster, you need to create a ManagedClusterAddOn in the
managed cluster namespace of hub cluster.
apiVersion: addon.open-cluster-management.io/v1alpha1
kind: ManagedClusterAddOn
metadata:
 name: busybox-addon
 namespace: cluster1
spec:
 installNamespace: open-cluster-management-agent-addon
You can set any existing namespace in the managed cluster as the installNamespace here, and the add-on manager will
deploy the add-on agent manifests in this namespace of the managed cluster.
Note:
open-cluster-management-agent-addonis our default namespace to install the add-on agent manifests in the managed cluster.
You can also use the clusteradm command to enable the busybox-addon for the managed cluster.
$ clusteradm addon enable --names busybox-addon --namespace open-cluster-management-agent-addon --clusters cluster1
After enabling the add-on for the managed cluster, you can find a ManifestWork named addon-busybox-addon-deploy is
deploying on the managed cluster namespace of the hub cluster.
$ kubectl get manifestworks.work.open-cluster-management.io -n cluster1
NAME                         AGE
addon-busybox-addon-deploy   2m
And the busybox deployment is deployed on the managed cluster too.
$ kubectl get deployment -n open-cluster-management-agent-addon
NAME                      READY   UP-TO-DATE   AVAILABLE   AGE
busybox                   1/1     1            1           2m
Disable the add-on for a managed cluster
You can delete the ManagedClusterAddOn CR in the managed cluster namespace of the hub cluster to disable the add-on for
the managed cluster.The created ManifestWork will be deleted and the add-on agent manifests will be removed from the
managed cluster too.
You also can use the clusteradm command to disable the add-on for a managed cluster.
$ clusteradm addon disable --names busybox-addon --clusters cluster1
You can also use the clusteradm command to disable the add-ons for all managed clusters.
$ clusteradm addon disable --names busybox-addon --all-clusters true
If you delete the ClusterManagementAddOn on the hub cluster, the ManagedClusterAddOn CRs in all managed cluster
namespaces will be deleted too.
What’s the next
However, this add-on just ensures a pod to run on the managed cluster, and you cannot see the status of the addon, and there are not any functionality to manage the clusters. The addon-framework also provides other configurations for add-on developers.
$ kubectl get managedclusteraddons.addon.open-cluster-management.io -n cluster1
NAME                AVAILABLE   DEGRADED   PROGRESSING
busybox-addon      Unknown
Next, you need to configure the addon.
Add-on agent configurations
Monitor addon healthiness
In the busybox example above, we found the AVAILABLE status of the ManagedClusterAddOn is always Unknown.
That’s because the add-on manager did not monitor the status of the add-on agent from the hub cluster.
We support 3 kinds of health prober types to monitor the healthiness of add-on agents.
-
Lease
The add-on agent maintains a
Leasein its installation namespace with its status, the registration agent will check thisLeaseto maintain theAVAILABLEstatus of theManagedClusterAddOn.The addon-framework provides a leaseUpdater interface which can make it easier.
leaseUpdater := lease.NewLeaseUpdater(spokeKubeClient, addonName, installNamespace) go leaseUpdater.Start(context.Background())Leaseis the default prober type for add-on, there is nothing to configure for the add-on manager. -
Work
Workhealth prober indicates the healthiness of the add-on is equal to the overall dispatching status of the corresponding ManifestWork resources. It’s applicable to those add-ons that don’t have a container agent in the managed clusters or don’t expect to addLeasefor the agent container. The add-on manager will check if the work isAvailableon the managed clusters. In addition, the user can define aHealthCheckprober function to check more detailed status based on status feedback from theManifestWork.It is required to define a
HealthProberinstance first. Here is an example to check if theavailableReplicasof add-on agent deployment is more than 1. If yes, it will set theAVAILABLEstatus ofManagedClusterAddOntotrue. Otherwise, theAVAILABLEstatus ofManagedClusterAddOnwill be false.healthProber := utils.NewDeploymentProber(types.NamespacedName{Name: "workprober-addon-agent", Namespace: "open-cluster-management-agent-addon"})And then you can configure the
HealthProberto the agentAddon.agentAddon, err := addonfactory.NewAgentAddonFactory(addonName, FS, "manifests"). WithAgentHealthProber(healthProber). BuildTemplateAgentAddon() -
DeploymentAvailability
DeploymentAvailabilityhealth prober indicates the healthiness of the add-on is connected to the availability of the corresponding agent deployment resources on the managed cluster. It’s applicable to those add-ons that runningDeploymenttype workload on the managed cluster. The add-on manager will check if thereadyReplicasof the add-on agent deployment is more than 1 to set the addon Status.Set the type of
healthProbertoDeploymentAvailabilityto enable this prober.healthProber := &agent.HealthProber{ Type: agent.HealthProberTypeDeploymentAvailability, } -
WorkloadAvailability
WorkloadAvailabilityhealth prober indicates the healthiness of the add-on is connected to the availability of the corresponding agent workload resources(onlyDeploymentandDaemonSetare supported for now) on the managed cluster. It’s applicable to those add-ons that runningDeploymentand/orDeamonSetworkloads on the managed cluster. The add-on manager will check ifreadyReplicas > 1for eachDeploymentandNumberReady == DesiredNumberScheduledfor eachDaemonSetof the add-on agent to set the addon Status.Set the type of
healthProbertoWorkloadAvailabilityto enable this prober.healthProber := &agent.HealthProber{ Type: agent.HealthProberTypeWorkloadAvailability, } -
None
If you want to check and maintain the
AVAILABLEstatus ofManagedClusterAddOnby yourself, set the type ofhealthProbertoNone.healthProber := &agent.HealthProber{ Type: agent.HealthProberTypeNone, }
Automatic installation
NOTE:
- The automatic installation is no longer supported since addon-framework v0.10.0. Please use the
InstallStrategyin Managing the add-on agent lifecycle by addon-manager section instead. - The automatic installation is still avaliable in addon-framework version v0.9.3, which is also the minimal supported addon-framework version in OCM v1.0.0. Using the previous version will have install conficts.
In the busybox add-on example, you need to create a ManagedClusterAddOn CR to enable the add-on manually.
The addon-framework also provides a configuration called InstallStrategy to support installing addon automatically.
Currently, the addon-framework supports InstallAllStrategy and InstallByLabelStrategy strategies.
InstallAllStrategy will create ManagedClusterAddOn for all managed cluster namespaces automatically.
installStrategy := agent.InstallAllStrategy("open-cluster-management-agent-addon")
InstallByLabelStrategy will create ManagedClusterAddOn for the selected managed cluster namespaces automatically.
installStrategy := &agent.InstallStrategy{
	Type:             agent.InstallByLabel,
    InstallNamespace: "open-cluster-management-agent-addon",
    LabelSelector:    &metav1.LabelSelector{...},
}
Configure the InstallStrategy to the agentAddon:
agentAddon, err := addonfactory.NewAgentAddonFactory(addonName, FS, "manifests").
                    WithInstallStrategy(installStrategy).
                    BuildTemplateAgentAddon()
Addtionally, if you are using addon-framework v0.9.3 or higher, need to grant a patch permission on ClusterManagementAddon to your addon manager.
kind: ClusterRole
  apiVersion: rbac.authorization.k8s.io/v1
  metadata:
    name: helloworld-addon
  rules:
...
    - apiGroups: ["addon.open-cluster-management.io"]
      resources: ["clustermanagementaddons"]
      verbs: ["get", "list", "watch", "patch"]
The below annotation will be added automatically to claim the ManagedClusterAddon lifecycle is managed by the addon itself.
apiVersion: addon.open-cluster-management.io/v1alpha1
kind: ClusterManagementAddOn
metadata:
  annotations:
    addon.open-cluster-management.io/lifecycle: "self"
  name: helloworld
spec:
  installStrategy:
    type: Manual
Register your add-on
In most cases, the add-ons have requirements to access the hub cluster or other central service endpoint with TLS authentication. For example, an add-on agent needs to get a resource in its cluster namespace of the hub cluster, or the add-on agent needs to access the exposed service on the hub cluster.
The addon-framework supports a solution that the addon can access the kube-apiserver with a kube style API or
other endpoints on the hub cluster with client certificate authentication after it is registered using CSR.
The addon-framework provides an interface to help add-on manager to save the add-on configuration information to
its corresponding ManagedClusterAddOns.
On the managed cluster, the registration agent watches ManagedClusterAddOns on the hub cluster.
The registration agent follows next steps to register an add-on:
- The registration agent creates a
CSRrequest with its own hub kubeConfig to register the add-on to the hub cluster. - On the hub cluster, the add-on manager approves the
CSRrequest. The addon-framework also provides an interface which the add-on manager can implement it to approve itsCSRautomatically. - After the
CSRrequest is approved on the hub cluster, the registration agent gets the certificate from theCSRrequest and saves the client certificate to a secret in the add-on agent install namespace. If theSignerNameiskubernetes.io/kube-apiserver-client, the secret name will be{addon name}-hub-kubeconfig. Otherwise, the secret name will be{addon name}-{signer name}-client-cert. - The add-on agent can mount the secret to get the client certificate to connect with the hub cluster or the custom service endpoint.
- When the certificate of managed cluster addon is about to expire, the registration agent will send a request to rotate the certificate on the hub cluster, the addon manager will approve the certificate rotation request.
Now we build another add-on that is going to sync configmap from the hub cluster to the managed cluster. The add-on code can be found here .
Specifically, since the addon agent needs to read configmap from the hub, we need to define the registration option for this addon.
func NewRegistrationOption(kubeConfig *rest.Config, addonName, agentName string) *agent.RegistrationOption {
    return &agent.RegistrationOption{
        CSRConfigurations: agent.KubeClientSignerConfigurations(addonName, agentName),
        CSRApproveCheck:   utils.DefaultCSRApprover(agentName),
        PermissionConfig:  rbac.AddonRBAC(kubeConfig),
    }
}
CSRConfigurations returns a list of CSR configuration for the addd-on agent in a managed cluster. The CSR will
be created from the managed cluster for add-on agent with each CSRConfiguration.
func KubeClientSignerConfigurations(addonName, agentName string) func(cluster *clusterv1.ManagedCluster) []addonapiv1alpha1.RegistrationConfig {
	return func(cluster *clusterv1.ManagedCluster) []addonapiv1alpha1.RegistrationConfig {
        return []addonapiv1alpha1.RegistrationConfig{
            {
                SignerName: certificatesv1.KubeAPIServerClientSignerName,
                Subject: addonapiv1alpha1.Subject{
                    User:   DefaultUser(cluster.Name, addonName, agentName),
                    Groups: DefaultGroups(cluster.Name, addonName),
                },
            },
        }
	}
}
The original Kubernetes CSR API only supports three built-in signers:
- kubernetes.io/kube-apiserver-client
- kubernetes.io/kube-apiserver-client-kubelet
- kubernetes.io/kubelet-serving
However, in some cases, we need to sign additional custom certificates for the add-on agents which are not used for connecting any kube-apiserver.
The add-on manager can be serving as a custom CSR signer controller based on the addon-framework’s extensibility by implementing the signing logic.
The addon-framework will also keep rotating the certificates automatically for the add-on after successfully signing the certificates.
CSRApproveCheck checks whether the add-on agent registration should be approved by the add-on manager.
The utils.DefaultCSRApprover is implemented to auto-approve all the CSRs. A better CSR check is recommended to include:
- The validity of the requester’s requesting identity.
- The other request payload such as key-usages.
If the function is not set, the registration and certificate renewal of the add-on agent needs to be approved manually on the hub cluster.
PermissionConfig defines a function for an add-on to set up RBAC permissions on the hub cluster after the CSR is approved.
In this example, it will create a role in the managed cluster namespace with get/list/watch configmaps permissions,
and bind the role to the group defined in CSRConfigurations.
Configure the registrationOption to the agentAddon.
agentAddon, err := addonfactory.NewAgentAddonFactory(helloworld.AddonName, helloworld.FS, "manifests/templates").
                    WithGetValuesFuncs(helloworld.GetValues, addonfactory.GetValuesFromAddonAnnotation).
                    WithAgentRegistrationOption(registrationOption).
                    WithInstallStrategy(addonagent.InstallAllStrategy(agent.HelloworldAgentInstallationNamespace)).
                    BuildTemplateAgentAddon()
After deploying the example add-on, you can find the registration configuration in the ManagedClusterAddOn status.
apiVersion: addon.open-cluster-management.io/v1alpha1
kind: ManagedClusterAddOn
metadata:
  name: helloworld
  namespace: cluster1
  ownerReferences:
  - apiVersion: addon.open-cluster-management.io/v1alpha1
    blockOwnerDeletion: true
    controller: true
    kind: ClusterManagementAddOn
    name: helloworld
spec:
  installNamespace: default
status:
  registrations:
  - signerName: kubernetes.io/kube-apiserver-client
    subject:
      groups:
      - system:open-cluster-management:cluster:cluster1:addon:helloworld
      - system:open-cluster-management:addon:helloworld
      - system:authenticated
      user: system:open-cluster-management:cluster:cluster1:addon:helloworld:agent:2rn8d
In this example, the addon requires a CSR access hub kube-api (with singer name kubernetes.io/kube-apiserver-client).
After the CSR is created on the hub cluster, the add-on manager will check the signer, group and subject of the CSRs
to verify whether the CSR is valid. If all fields are valid, the add-on manager will approve the CSR.
apiVersion: certificates.k8s.io/v1
kind: CertificateSigningRequest
metadata:
  labels:
    open-cluster-management.io/addon-name: helloworld
    open-cluster-management.io/cluster-name: cluster1
  name: addon-cluster1-helloworld-lb7cb
spec:
  groups:
  - system:open-cluster-management:cluster1
  - system:open-cluster-management:managed-clusters
  - system:authenticated
  request: xxx
  signerName: kubernetes.io/kube-apiserver-client
  usages:
  - digital signature
  - key encipherment
  - client auth
  username: system:open-cluster-management:cluster1:9bkfw
After the CSR is approved, the add-on controller creates the Role and Rolebinding in the cluster namespace.
$ kubectl get role -n cluster1
NAME                                       CREATED AT
open-cluster-management:helloworld:agent   2022-07-10T10:08:37Z
$ kubectl get rolebinding -n cluster1
NAME                                                           ROLE                                                              AGE
open-cluster-management:helloworld:agent                       Role/open-cluster-management:helloworld:agent                     13m
The Rolebinding binds the Role to the Group system:open-cluster-management:cluster:cluster1:addon:helloworld.
apiVersion: rbac.authorization.k8s.io/v1
kind: RoleBinding
metadata:
  name: open-cluster-management:helloworld:agent
  namespace: cluster1
roleRef:
  apiGroup: rbac.authorization.k8s.io
  kind: Role
  name: open-cluster-management:helloworld:agent
subjects:
- apiGroup: rbac.authorization.k8s.io
  kind: Group
  name: system:open-cluster-management:cluster:cluster1:addon:helloworld
The registration agent will create a kubeConfig secret named <add-on name>-hub-kubeconfig in the addonInstallNamesapce.
The addon agent can mount the secret to get the hub kubeConfig to connect with the hub cluster to get/list/watch the Configmaps.
$ kubectl get secret -n default
NAME                              TYPE                                  DATA   AGE
helloworld-hub-kubeconfig         Opaque                                3      9m52s
Add your add-on agent supported configurations
For some cases, you want to specify the configurations for your add-on agent, for example, you may want to use a configuration to configure your add-on agent image or use a configuration to configure your add-on agent node Selector and tolerations to make the agent to run on specific nodes.
The addon-framework supports re-rendering the add-on agent deployment when the add-on agent configurations are changed.
You can choose the AddOnDeploymentConfig API as the configuration for your add-on agent, it supports setting customized variables and node placement for your add-on agent deployment, and meanwhile you can also choose your own configuration.
You can do the following steps to reference your configurations in your add-on APIs with add-on framework
-
Add the supported configuration types in your add-on
ClusterManagementAddOn, we support to add multiple different configuration types in theClusterManagementAddOn, for exampleapiVersion: addon.open-cluster-management.io/v1alpha1 kind: ClusterManagementAddOn metadata: name: helloworldhelm spec: # the add-on supported configurations supportedConfigs: - group: addon.open-cluster-management.io resource: addondeploymentconfigs - resource: configmapsIn this example, the
helloworldhelmadd-on supports usingAddOnDeploymentConfigandConfigMapas its configuration, and you can specify one default configuration for one configuration type, for exampleapiVersion: addon.open-cluster-management.io/v1alpha1 kind: ClusterManagementAddOn metadata: name: helloworldhelm spec: # the add-on supported configurations supportedConfigs: - group: addon.open-cluster-management.io resource: addondeploymentconfigs # the default config for helloworldhelm defaultConfig: name: deploy-config namespace: open-cluster-management - resource: configmapsThus, all helloworldhelm add-ons on each managed cluster have one same default configuration
open-cluster-management/deploy-config -
Register the supported configuration types when building one
AgentAddonwithAgentAddonFactory -
Implement a
GetValuesFuncto transform the configuration to addon-frameworkValuesobject and add theGetValuesFuncto theAgentAddonFactory, for exampleagentAddon, err := addonfactory.NewAgentAddonFactory("helloworldhelm", helloworld_helm.FS, "manifests/charts/helloworld"). // register the supported configuration types WithConfigGVRs( schema.GroupVersionResource{Version: "v1", Resource: "configmaps"}, schema.GroupVersionResource{Group: "addon.open-cluster-management.io", Version: "v1alpha1", Resource: "addondeploymentconfigs"}, ). WithGetValuesFuncs( // get the AddOnDeloymentConfig object and transform it to Values object addonfactory.GetAddOnDeloymentConfigValues( addonfactory.NewAddOnDeloymentConfigGetter(addonClient), addonfactory.ToAddOnNodePlacementValues, ), // get the ConfigMap object and transform it to Values object helloworld_helm.GetImageValues(kubeClient), ).WithAgentRegistrationOption(registrationOption). BuildHelmAgentAddon()In this example, we register the
ConfigMapandAddOnDeploymentConfigas thehelloworldhelmadd-on configuration. We use add-on framework help functionGetAddOnDeloymentConfigValuesto transform theAddOnDeploymentConfig, and we implemented theGetImageValuesfunction to transform theConfigMap, you can find more details for add-on frameworkValuesfrom the Values definition part. -
Add the
get,listandwatchpermissions to an add-onclusterrole, for example, the clusterrole ofhelloworldhelmshould have the following permissions
kind: ClusterRole
apiVersion: rbac.authorization.k8s.io/v1
metadata:
  name: helloworldhelm-addon
rules:
  - apiGroups: [""]
    resources: ["configmaps"]
    verbs: ["get", "list", "watch"]
  - apiGroups: ["addon.open-cluster-management.io"]
    resources: ["addondeploymentconfigs"]
    verbs: ["get", "list", "watch"]
To configure add-on, the add-on user need reference their configuration objects in ManagedClusterAddOn, for example
apiVersion: addon.open-cluster-management.io/v1alpha1
kind: ManagedClusterAddOn
metadata:
  name: helloworldhelm
  namespace: cluster1
spec:
  installNamespace: open-cluster-management-agent-addon
  configs:
  - group: addon.open-cluster-management.io
    resource: addondeploymentconfigs
    name: deploy-config
    namespace: cluster1
  - resource: configmaps
    name: image-config
    namespace: cluster1
In this example, the add-on user reference the configuration cluster1/deploy-config and cluster1/image-config for helloworldhelm on cluster1. When the configuration references are added to an add-on, the add-on framework will show them in the status of ManagedClusterAddOn and render the add-on once, during the rendering process, the add-on framework will callback the GetValuesFuncs to transform the add-on configuraton object to add-on framework Values object and use Values object to render the add-on agent deployment resources. If the add-on configuration objects are updated, the add-on framework will render the add-on again.
Build an addon using helm charts or raw manifests.
Building steps
The addon-framework supports helm charts or raw manifests as the add-on agent manifests. The building steps are the same:
-
Copy the helm chart or raw manifests files into the add-on manager project. And define an
embed.FSto embed the files into your Go program.The example using helm chart is helloworld_helm addon, and the example using raw manifests is helloworld addon.
-
Build different
agentAddonsusing theagentAddonFactoryinstance withBuildHelmAgentAddonorBuildTemplateAgentAddon.For helm chart building:
agentAddon, err := addonfactory.NewAgentAddonFactory(helloworld_helm.AddonName, helloworld_helm.FS, "manifests/charts/helloworld").
                    WithGetValuesFuncs(helloworld_helm.GetValues, addonfactory.GetValuesFromAddonAnnotation).
                    WithAgentRegistrationOption(registrationOption).
                    BuildHelmAgentAddon()
For raw manifests building:
agentAddon, err := addonfactory.NewAgentAddonFactory(helloworld.AddonName, helloworld.FS, "manifests/templates"). WithGetValuesFuncs(helloworld.GetValues, addonfactory.GetValuesFromAddonAnnotation). WithAgentRegistrationOption(registrationOption). WithInstallStrategy(addonagent.InstallAllStrategy(agent.HelloworldAgentInstallationNamespace)). BuildTemplateAgentAddon() -
Add the agentAddon to the addon manager.
-
Start the addon manager.
Values definition
The addon-framework supports 3 add-on built-in values and 3 helm chart built-in values for helm chart add-on manifests.
Value.clusterNameValue.addonInstallNamespaceValue.hubKubeConfigSecret(used when the add-on is needed to register to the hub cluster)Capabilities.KubeVersionis theManagedCluster.Status.Version.Kubernetes.Release.Nameis the add-on name.Release.Namespaceis theaddonInstallNamespace.
The addon-framework supports 3 add-on built-in values in the config of templates for the raw manifests add-on.
ClusterNameAddonInstallNamespaceHubKubeConfigSecret(used when the AddOn is needed to register to the hub cluster)
In the list of GetValuesFuncs, the values from the big index Func will override the one from low index Func.
The built-in values will override the values obtained from the list of GetValuesFuncs.
The Variable names in Values should begin with lowercase. So the best practice is to define a json struct for the values,
and convert it to Values using the JsonStructToValues.
Values from annotation of ManagedClusterAddOn
The addon-framework supports a helper GetValuesFunc named GetValuesFromAddonAnnotation which can get values from
the annotations of ManagedClusterAddOn.
The key of the Helm Chart values in annotation is addon.open-cluster-management.io/values,
and the value should be a valid json string which has key-value format.
Hosted mode
The addon-framework supports add-on in Hosted mode, that the agent manifests will be deployed outside the managed cluster.
We can choose to run add-on in Hosted mode or Default mode if the managed cluster is imported to the hub in Hosted mode.
By default, the add-on agent will run on the managed cluster(Default mode).
We can add an annotation addon.open-cluster-management.io/hosting-cluster-name for the ManagedClusterAddon,
so that the add-on agent will be deployed on the certain hosting cluster(Hosted mode),
the value of the annotation is the hosting cluster which should:
- be a managed cluster of the hub as well.
- be the same cluster where the managed cluster
klusterlet(registration-agent & work-agent) runs.
We defined a label addon.open-cluster-management.io/hosted-manifest-location to indicate which cluster the add-on
agent manifests should be deployed.
- No matter what the value is, all manifests will be deployed on the managed cluster in Default mode.
- When the label does not exist or the value is
managed: the manifest will be deployed on the managed cluster in Hosted mode. - When the value is
hosting: the manifest will be deployed on the hosting cluster in Hosted mode. - When the value is
none: the manifest will not be deployed in Hosted mode.
More details you can find in the design, and we have an example in here.
Pre-delete hook
The addon-framework provides a hook manifest before delete the add-on.
The hook manifest supports Jobs or Pods to do some cleanup work before the add-on agent is deleted on the managed cluster.
You need only add the label open-cluster-management.io/addon-pre-delete to the Jobs or Podsin the add-on manifests.
The Jobs or Pods will not be applied until the ManagedClusterAddOn is deleted.
And the Jobs or Pods will be applied on the managed cluster by applying the manifestWork named addon-<addon name>-pre-delete
when the ManagedClusterAddOn is under deleting.
After the Jobs are Completed or Pods are in the Succeeded phase, all the deployed ManifestWorks will be deleted.
You can find the example from here.
What happened under the scene
This architecture graph shows how the coordination between add-on manager and add-on agent works.
- The registration agent creates a
CSRrequest with its own hub kubeConfig to register the add-on to the hub cluster. - On the hub cluster, the add-on manager approves the
CSRrequest. - After the
CSRrequest is approved on the hub cluster, the registration agent gets the certificate from theCSRrequest to establish the hub kubeConfig and save the hub kubeConfig to a secret in the managed cluster addon namespace. - The add-on manager is watching the
ManagedClusterAddOnfor all managed cluster namespaces. And will create an add-on deployManifestWorkin the managed cluster namespace once theManagedClusterAddOnis created in this managed cluster namespace. - The work agent will apply the manifests in the
ManifestWorkon the managed cluster. - The add-on agent will mount the secret created by the registration agent to get the hub kubeConfig to connect with the hub cluster.
Managing the add-on agent lifecycle by addon-manager
The add-on agent lifecycle can now be managed by the general
addon-manager starting from OCM v0.11.0. This is achieved through enhancements
to the ClusterManagementAddOn and ManagedClusterAddOn APIs.
- Install strategy
With the install strategy defined in the ClusterManagementAddOn API, users can
configure which clusters the related ManagedClusterAddon should be enabled by
referencing the Placement. For example, enabling the helloworld add-on on
clusters labeled with aws.
apiVersion: addon.open-cluster-management.io/v1alpha1
kind: ClusterManagementAddOn
metadata:
  name: helloworld
  annotations:
    addon.open-cluster-management.io/lifecycle: "addon-manager"
spec:
  addOnMeta:
    displayName: helloworld
  installStrategy:
    type: Placements
    placements:
    - name: placement-aws
      namespace: default
apiVersion: cluster.open-cluster-management.io/v1beta1
kind: Placement
metadata:
  name: placement-aws
  namespace: default
spec:
  predicates:
    - requiredClusterSelector:
        claimSelector:
          matchExpressions:
            - key: platform.open-cluster-management.io
              operator: In
              values:
                - aws
- Rollout strategy
With the rollout strategy defined in the ClusterManagementAddOn API, users can
control the upgrade behavior of the add-on when there are changes in the supported configurations.
For example, if the add-on user updates the “deploy-config” and wants to apply the change to the add-ons to a “canary” decision group first. If all the add-on upgrade successfully, then upgrade the rest of clusters progressively per cluster at a rate of 25%. The rollout strategy can be defined as follows:
apiVersion: addon.open-cluster-management.io/v1alpha1
kind: ClusterManagementAddOn
metadata:
  name: helloworld
  annotations:
    addon.open-cluster-management.io/lifecycle: "addon-manager"
spec:
  addOnMeta:
    displayName: helloworld
  installStrategy:
    type: Placements
    placements:
    - name: placement-aws
      namespace: default
      configs:
      - group: addon.open-cluster-management.io
        resource: addondeploymentconfigs
        name: deploy-config
        namespace: open-cluster-management
      rolloutStrategy:
        type: Progressive
        progressive:
          mandatoryDecisionGroups:
          - groupName: "canary"
          maxConcurrency: 25%
Add-on developers can use addon-framework v0.9.3 and the above versions to support the scenarios mentioned above.
- Modify the
go.modfile to use the latest addon-framework and API versions.
open-cluster-management.io/addon-framework v0.9.3 // // or latest
open-cluster-management.io/api v0.13.0 // or latest
-
Remove the
WithInstallStrategy()function described in the automatic installation section since it conflicts with the install strategy defined in theClusterManagementAddOnAPI level. -
Claim that the addon is managed by the general
addon-managerby adding the annotationaddon.open-cluster-management.io/lifecycle: "addon-manager"explicitly in theClusterManagementAddOn.
Skip this step for OCM v0.14.0 and later version. The annotation is automatically added by the general addon manager.
apiVersion: addon.open-cluster-management.io/v1alpha1
kind: ClusterManagementAddOn
metadata:
  name: helloworld
  annotations:
    addon.open-cluster-management.io/lifecycle: "addon-manager"
...
-
Define the
installStrategyandrolloutStrategyin theClusterManagementAddOnas shown in the example above. Note that the rollout strategy is triggered by changes in configurations, so if the addon does not have supported cofingurations, the rollout strategy will not take effect. -
If you do not want the automatic addon installation, set the install strategy type to
Manual.
apiVersion: addon.open-cluster-management.io/v1alpha1
kind: ClusterManagementAddOn
metadata:
  annotations:
    addon.open-cluster-management.io/lifecycle: "addon-manager"
  name: helloworld
spec:
  installStrategy:
    type: Manual
Build an addon with addon template
Using the addon-framework to develop an addon requires developers to implement the interface defined in the addon-framework via code and deploy a dedicated addon manager deployment on the hub cluster. But if the addon you are trying to develop:
- not going to support hosted mode
- the crucial agent workloads that need to be deployed to the managed cluster are
Deploymentsand/orDaemonSets - no other customized API is needed to configure the addon besides the
AddOnDeploymentConfig - no need to run anything on the hub cluster other than managing the addon agent
you can have a try with the new API AddOnTemplate introduced from OCM v0.12.0 to build the addon, which can get rid
of coding, and only need to define some yaml files to build an addon.
Using AddOnTemplate to build an addon, the AddonManagement feature gate must not be disabled in
ClusterManager.spec.addOnManagerConfiguration and Klusterlet.spec.registrationConfiguration
Enhancement proposal: Add-on Template
Note: The DaemonSet type workload is supported in the addon template(injecting environment variables, injecting
volumes, health probe for daemonsets) from OCM v0.14.0.
Steps to build an addon with addon template
-
Create an
AddOnTemplateobject to define the addon: TheAddOnTemplateAPI provides two parts of information to build an addon:manifests: what resources will be deployed to the managed clusterregistration: how to register the addon to the hub cluster
For example, the following yaml file defines the
hello-templateaddon, which will:- deploy a
Deployment, aServiceAccount, and aClusterRoleBindingto the managed cluster - register the addon to the hub cluster, and make the addon agent(Deployment hello-template-agent):
- have the permission to access resources defined in the
cm-adminclusterRole in thenamespace on the hub cluster(KubeClient type registration, CurrentCluster) - have the permission to access resources defined in the
cm-readerRole in theopen-cluster-managementnamespace on the hub cluster(KubeClient type registration, SingleNamespace) - have the credential to access the customized endpoint(CustomSigner type registration)
- have the permission to access resources defined in the
apiVersion: addon.open-cluster-management.io/v1alpha1 kind: AddOnTemplate metadata: name: hello-template spec: addonName: hello-template agentSpec: # required workload: manifests: - kind: Deployment apiVersion: apps/v1 metadata: name: hello-template-agent namespace: open-cluster-management-agent-addon labels: app: hello-template-agent spec: replicas: 1 selector: matchLabels: app: hello-template-agent template: metadata: labels: app: hello-template-agent spec: serviceAccountName: hello-template-agent-sa containers: - name: helloworld-agent image: quay.io/open-cluster-management/addon-examples:latest imagePullPolicy: IfNotPresent args: - "/helloworld" - "agent" - "--cluster-name={{CLUSTER_NAME}}" - "--addon-namespace=open-cluster-management-agent-addon" - "--addon-name=hello-template" - "--hub-kubeconfig={{HUB_KUBECONFIG}}" - "--v={{LOG_LEVEL}}" - kind: ServiceAccount apiVersion: v1 metadata: name: hello-template-agent-sa namespace: open-cluster-management-agent-addon - kind: ClusterRoleBinding apiVersion: rbac.authorization.k8s.io/v1 metadata: name: hello-template-agent roleRef: apiGroup: rbac.authorization.k8s.io kind: ClusterRole name: cluster-admin subjects: - kind: ServiceAccount name: hello-template-agent-sa namespace: open-cluster-management-agent-addon registration: # optional # kubeClient or custom signer, if kubeClient, user and group is in a certain format. # user is "system:open-cluster-management:cluster:{clusterName}:addon:{addonName}:agent:{agentName}" # group is ["system:open-cluster-management:cluster:{clusterName}:addon:{addonName}", # "system:open-cluster-management:addon:{addonName}", "system:authenticated"] - type: KubeClient kubeClient: hubPermissions: - type: CurrentCluster currentCluster: clusterRoleName: cm-admin # should be created by user - type: SingleNamespace singleNamespace: namespace: open-cluster-management roleRef: apiGroup: rbac.authorization.k8s.io kind: Role # should be created by user; the addon manager will grant the permission to the agent, so if the # role/clusterRole contains some permissions that the addon manager doesn't have, user needs to grant # the permission to the addon-manager (service account open-cluster-management-hub/addon-manager-controller-sa), # otherwise the addon manager will fail to grant the permission to the agent name: cm-reader - type: CustomSigner # addon-manager only generates the credential for the agent to authenticate to the hub cluster, not responsible # for the authroization which should be taken care of by the user customSigner: signerName: example.com/signer-test subject: user: user-test groups: - group-test organizationUnit: - organization-test signingCA: # type is "kubernetes.io/tls"; namespace is optional, "open-cluster-management-hub" will be used if # namespace is not set; user needs to grant the permission to the addon-manager (service account # open-cluster-management-hub/addon-manager-controller-sa) to access the secret name: ca-secret namespace: test-namespaceNotes:
- The permission related resources(i.e.
RoleBindingClusterRoleBinding) for the addon agent access the local managed cluster defined in theaddonTemplate.agentSpec.workload.manifestswill be created on the managed cluster by the work-agent, but the work-agent may not have permission to create these resources, users should refer to permission-setting-for-work-agent to grant the work-agnet permissions to address the permission issue on the managed cluster side. - Permissions for the addon agent access the hub cluster defined in
addonTemplate.registration[*].kubeClient.hubPermissions, users should ensure:-
the referenced clusterrole/role(
.hubPermissions.currentCluster.clusterRoleName.hubPermissions.singleNamespace.roleRef.name,cm-adminandcm-readerin the above example) exists on the hub cluster -
the addon-manager has permission to create rolebinding to bind these (cluster)role for the addon-agent. For example: users can create a clusterrolebinding to grant the permission to the addon-manager (service account
open-cluster-management-hub/addon-manager-controller-sa) to address the permission issue on the hub cluster side. For the above example, if the addon-manager doesn’t have the permission to create theRoleBindingto bind thecm-adminrole, users can grant the permission to the addon-manager by creating aClusterRoleBindinglike below:apiVersion: rbac.authorization.k8s.io/v1 kind: ClusterRoleBinding metadata: name: addon-manager-cm-admin roleRef: apiGroup: rbac.authorization.k8s.io kind: ClusterRole name: cm-admin subjects: - kind: ServiceAccount name: addon-manager-controller-sa namespace: open-cluster-management-hub
-
-
Create a
ClusterManagementAddOnto declare this is template type addon which should be managed by the addon-manager:apiVersion: addon.open-cluster-management.io/v1alpha1 kind: ClusterManagementAddOn metadata: name: hello-template annotations: addon.open-cluster-management.io/lifecycle: "addon-manager" spec: addOnMeta: description: hello-template is a addon built with addon template displayName: hello-template supportedConfigs: # declare it is a template type addon - group: addon.open-cluster-management.io resource: addontemplates defaultConfig: name: hello-template -
Create a
ManagedClusterAddOnto enable the addon oncluster1apiVersion: addon.open-cluster-management.io/v1alpha1 kind: ManagedClusterAddOn metadata: name: hello-template namespace: cluster1 spec: installNamespace: open-cluster-management-agent-addon
Use variables in the addon template
Users can use variables in the addonTemplate.agentSpec.workload.manifests field in the form of {{VARIABLE_NAME}}.
It is similar to go template syntax, but not identical, and only string values are supported.
There are two types of variables:
-
Built-in variables: These are provided by the system.
CLUSTER_NAME: The name of the managed cluster (e.g.,cluster1). This variable cannot be overridden.HUB_KUBECONFIG: The path of the kubeconfig file to access the hub cluster. The default value is/managed/hub-kubeconfig/kubeconfig. This variable can be overridden by a user-defined variable.LOG_LEVEL: The log level for the addon agent. The default value is0. This variable can be overridden by a user-defined variable.
-
Custom variables: These are defined in the
customizedVariablesfield of anAddOnDeploymentConfigresource.
For example, to use a custom variable, first define it in an AddOnDeploymentConfig:
apiVersion: addon.open-cluster-management.io/v1alpha1
kind: AddOnDeploymentConfig
metadata:
  name: my-addon-config
spec:
  customizedVariables:
  - name: MY_CUSTOM_VARIABLE
    value: "my-custom-value"
Then, reference this AddOnDeploymentConfig in your ClusterManagementAddOn and use the variable in your AddOnTemplate:
apiVersion: addon.open-cluster-management.io/v1alpha1
kind: ClusterManagementAddOn
metadata:
  name: my-addon
spec:
  supportedConfigs:
  - group: addon.open-cluster-management.io
    resource: addondeploymentconfigs
    defaultConfig:
      name: my-addon-config
...
apiVersion: addon.open-cluster-management.io/v1alpha1
kind: AddOnTemplate
metadata:
  name: my-addon-template
spec:
  ...
  agentSpec:
    workload:
      manifests:
      - kind: Deployment
        ...
        spec:
          ...
          containers:
          - name: my-addon-agent
            args:
            - "--my-arg={{MY_CUSTOM_VARIABLE}}"
            - "--v={{LOG_LEVEL}}"
In this example, the {{MY_CUSTOM_VARIABLE}} in the AddOnTemplate will be replaced with my-custom-value from the AddOnDeploymentConfig. The {{LOG_LEVEL}} will be replaced by the default value 0 unless it is overridden in the AddOnDeploymentConfig.
Using kubeconfig/certificates in the addon agent Deployment
The addon manager will inject volumes into the addon agent deployments and daemonsets based on the
addonTemplate.spec.registration field.
-
If there is a
KubeClienttype registration, the hub kubeconfig will be injected to the deployments defined in the addon template, so users can use the hub kubeconfig located at/managed/hub-kubeconfig/kubeconfigto access the hub... spec: containers: - name: addon-agent ... volumeMounts: - mountPath: /managed/hub-kubeconfig name: hub-kubeconfig volumes: - name: hub-kubeconfig secret: defaultMode: 420 secretName: <addon-name>-hub-kubeconfig ... -
If there is a
CustomSignertype registration, the secret signed via the custom signer defined in theCustomSignerRegistrationConfigwill be injected to the deployments and daemonsets defined in the addon template, so users can use the certificate located at/managed/<signer-name>/tls.crtand/managed/<signer-name>/tls.key... spec: containers: - name: addon-agent ... volumeMounts: - mountPath: /managed/<signer-name> # if the signer name contains "/", it will be replaced by "-" name: cert-<signer-name> volumes: - name: cert-<signer-name> # if the signer name contains "/", it will be replaced by "-" secret: defaultMode: 420 secretName: <addon-name>-<signer-name>-client-cert # if the signer name contains "/", it will be replaced by "-"
Health probe of the template type addon
Since we only support the Deployment and DaemonSet resource as the crucial agent runtime workload, the addon-manager
will check if the deployment and daemonsets are available, if not, the addon will be considered as unhealthy.
Support proxy configuration for the template type addon
From OCM v0.16.0, the template type addon can be configured to use the proxy by setting the
addonDeploymentConfig.spec.proxyConfig:
apiVersion: addon.open-cluster-management.io/v1alpha1
kind: AddOnDeploymentConfig
metadata:
  name: proxy-deploy-config
  namespace: open-cluster-management-hub
spec:
  proxyConfig:
    httpProxy: "http://test.com"
    httpsProxy: "https://test.com"
    noProxy: "api.ocm-hub.com,172.30.0.1" # Example: hub cluster api server and the local managed cluster api server
    caBundle: dGVzdC1idW5kbGUK
The proxy configuration httpProxy, httpsProxy, and noProxy will be injected as environments
HTTP_PROXY, http_proxy, HTTPS_PROXY, https_proxy, NO_PROXY, no_proxy(both uppercase and lowercase) to
the addon agent deployments and daemonsets.
If the caBundle is set, the addon-manager will create a configmap containing the ca bundle data in the addon install
namespace, and mount the configmap to the addon agent deployments and daemonsets, and then set an environment
CA_BUNDLE_FILE_PATH to the file path of the mounted ca bundle. If the addon needs to support the caBundle for the
proxyConfig, the addon developer should get the ca bundle from the environment variable CA_BUNDLE_FILE_PATH
to make the agent work with the proxy.
3.2 - VScode Extension
The OCM VScode Extension is a UI tool for OCM related Kubernetes resources. The extension has been built upon Visual Studio Code and offers additional OCM administrative and monitoring features in order to improve operational efficiency and accelerate development within engineering teams. The OCM VScode Extension provides tons of useful features, including easy to generate OCM related Kubernetes resources, automated local OCM environment creation and a simple and convenient monitoring view for cluster resources. Having an effective UI tool for managing your cluster is key to a healthy environment. With the right user interface, you can administer changes to the cluster, track resources, and troubleshoot issues more efficiently, without having to use numerous additional CLI tools.
Prerequisite
You must meet the following prerequisites to install the VScode Extension:
- Ensure your
Visual Studio Coderelease is at leastv1.71.0.
Some VScode Extension features require a few additional prerequisites:
-
To Manage Existing Resources ensure
kubectlis installed. -
To Create Local Environment ensure
kind,kubectlandclusteradmare all installed. -
To load Resources Snippets or create a Bootstrap Project no additional prerequisites are needed
Installation
Install Latest version
In your VScode instance, go to the Extensions Marketplace (by clicking on the Extensions icon in the composite bar on the left hand side or simply typing Ctrl+Shift+X).
Search for OCM Extension and click install.
Install specific version
To download a specific version of VScode Extention visit the releases page, expand the Assets section of the target version, and download the version for your operating system.
In your VScode instance, go to the Extensions Marketplace (by clicking on the Extensions icon in the composite bar on the left hand side or simply typing Ctrl+Shift+X).
Click the … at the top right corner of the palette, select the Install from VSIX… action, and browes for the specific VSIX file you downloaded.
Select a VSIX file and hit install.
Usage
Resources Snippets
The VScode Extension allows users to load Custom Resource (CR) snippets from the command palette.
The resources available as snipperts are:
- Subscription
- Placement
- Channel
- ManagedClusterSet
- ManagedClusterSetBinding
Subscription snippets are available specifically tailored to either Git, Helm or ObjectBucket.
To exercise this feature you must take the following steps:
- Create a new yaml file in a desired path
- Open the file and press Ctrl+Shift+P on your keyboard
- In the search container at the top of your screen choose Snippets: Insert Snippet
- Choose a desired snippet from list
Bootstrap Project
Another Valuable feature of the VScode Extension is to create a Bootstrap project for the various channel types.
The Bootstrap project is basically a collection of snippets, customized to fit one of three channel types - Git, Helm or ObjectBucket, that form a project template for you to build upon.
To exercise this feature you must take the following steps:
- Press Ctrl+Shift+P on your keyboard
- In the search container at the top of your screen choose OCM: Create an application-manager project
- Choose a desired channel type
- Type in a project name and hit enter

Create Local Environment
The Create Local Environment feature allows you to create a quick OCM multi-cluster control plane on a local kind environment with only a click of a button.
The feature does it all for you:
- Verifies the existence of the required tools.
- Creates as many kind clusters as you need (customizable).
- Initializes the hub cluster by installing a Cluster Manager using clusteradm, and kubectl.
- Installs a Klusterlet agent on the managed clusters and sends join requests to the hub cluster using clusteradm, and kubectl.
- Accepts the join requests from the hub cluster using clusteradm, and kubectl.
To exercise this feature you must take the following steps:
- Click on the OCM icon in the composite bar on the left hand side to open the VScode Extension control pane
- Locate the Create Local Environment button in the Developers Tools section and give it a click
- Notice that at the top of your screen an action container will prompt you to choose between default or custom configuration
- After configuration was specified, a progress bar at the botom right of your screen will provide feadback on the build process
Manage Existing Resources
The Manage Existing Resources feature provides a wide and detailed overview of all the resources residing in any one cluster.
To exercise this feature you must take the following steps:
- Access the Cluster Details tab either by: * Pressing Ctrl+Shift+P on your keyboard and choosing OCM-View: Cluster Details in the search container at the top of your screen * Clicking on the OCM icon in the composite bar on the left hand side to open the VScode Extension control pane, locating the Connected Clusters section and selecting any cluster in the list
- Inside the Cluster Details tab, use the dropdown to select any cluster from the list of availabe clusters in order to view the resources within it
Related materials
Visit the VScode Extension on Github.
4 - User Scenarios
4.1 - Deploy Kubernetes resources to the managed clusters
After bootstrapping an OCM environment of at least one managed clusters, now
it’s time to begin your first journey of deploying Kubernetes resources into
your managed clusters with OCM’s ManifestWork API.
Prerequisites
Before we get start with the following tutorial, let’s clarify a few terms we’re going to use in the context.
-
Cluster namespace: After a managed cluster is successfully registered into the hub. The hub registration controller will be automatically provisioning a
cluster namespacededicated for the cluster of which the name will be same as the managed cluster. Thecluster namespaceis used for storing any custom resources/configurations that effectively belongs to the managed cluster. -
ManifestWork: A custom resource in the hub cluster that groups a list of kubernetes resources together and meant for dispatching them into the managed cluster if the
ManifestWorkis created in a validcluster namespace, see details in this page.
Deploy the resource to a target cluster
Now you can deploy a set of kubernetes resources defined in files to any clusters managed by the hub cluster.
Connect to your hub cluster and you have 2 options to create a ManifestWork:
-
Use
clusteradmcommandclusteradm create work my-first-work -f <kubernetes yaml file or directory> --clusters <cluster name>where kubernetes yaml file should be kubernetes definitions, a sample:
apiVersion: v1 kind: ServiceAccount metadata: namespace: default name: my-sa --- apiVersion: apps/v1 kind: Deployment metadata: namespace: default name: nginx-deployment labels: app: nginx spec: replicas: 3 selector: matchLabels: app: nginx template: metadata: labels: app: nginx spec: serviceAccountName: my-sa containers: - name: nginx image: nginx:1.14.2 ports: - containerPort: 80 -
Use
kubectlto create theManifestWorkkubectl apply -f <kubernetes yaml file or directory>where kubernetes yaml file should be kubernetes definitions wrapped by
ManifestWork, a sample:apiVersion: work.open-cluster-management.io/v1 kind: ManifestWork metadata: namespace: cluster1 name: my-first-work spec: workload: manifests: - apiVersion: v1 kind: ServiceAccount metadata: namespace: default name: my-sa - apiVersion: apps/v1 kind: Deployment metadata: namespace: default name: nginx-deployment labels: app: nginx spec: replicas: 3 selector: matchLabels: app: nginx template: metadata: labels: app: nginx spec: serviceAccountName: my-sa containers: - name: nginx image: nginx:1.14.2 ports: - containerPort: 80
The above command should create a ManifestWork in cluster namespace of your hub cluster. To see the detailed status of this ManifestWork, you can run:
clusteradm get works my-first-work --cluster <cluster name>
If you have some change on the manifest files, you can apply the change to the targeted cluster by running:
clusteradm create work my-first-work -f <kubernetes yaml file or directory> --clusters <cluster name> --overwrite
To remove the resources deployed on the targeted cluster, run:
kubectl delete manifestwork my-first-work -n <cluster name>
What happens behind the scene
Say we would like to deploy a nginx together with a service account into “cluster1”.
A ManifestWork can be defined as follows:
apiVersion: work.open-cluster-management.io/v1
kind: ManifestWork
metadata:
  namespace: cluster1
  name: my-first-work
spec:
  workload:
    manifests:
      - apiVersion: v1
        kind: ServiceAccount
        metadata:
          namespace: default
          name: my-sa
      - apiVersion: apps/v1
        kind: Deployment
        metadata:
          namespace: default
          name: nginx-deployment
          labels:
            app: nginx
        spec:
          replicas: 3
          selector:
            matchLabels:
              app: nginx
          template:
            metadata:
              labels:
                app: nginx
            spec:
              serviceAccountName: my-sa
              containers:
                - name: nginx
                  image: nginx:1.14.2
                  ports:
                    - containerPort: 80
In this example:
-
A
ManifestWorknamed “my-first-work” will be created into a “cluster namespace” named “cluster1”.$ kubectl get manifestwork -A --context kind-hub NAMESPACE NAME AGE cluster1 my-first-work 2m59s -
The resources in the
ManifestWorkincluding a service-account, a deployment will be created to the cluster “cluster1”.$ kubectl get deployment --context kind-cluster1 NAME READY UP-TO-DATE AVAILABLE AGE nginx-deployment 3/3 3 3 4m10s $ kubectl get sa my-sa --context kind-cluster1 NAME SECRETS AGE my-sa 1 4m23s -
In the status of
ManifestWorkwe can check out the aggregated status indicating whether the prescribed resources are successfully deployed by the conditions in the field.status.conditions[*]:Applied: Whether all the resources from the spec are successfully applied since the last observed generation ofManifestWork.Available: Whether all the resources from the spec are existing in the target managed cluster.
-
Beside the aggregated status, the
ManifestWorkis also tracking the per-resource status under.status.resourceStatus[*]where we can discriminate different resource types via the.status.resourceStatus[*].resourceMetafield. e.g.:
resourceStatus:
manifests:
- conditions:
- lastTransitionTime: "2021-11-25T10:17:43Z"
message: Apply manifest complete
reason: AppliedManifestComplete
status: "True"
type: Applied
- lastTransitionTime: "2021-11-25T10:17:43Z"
message: Resource is available
reason: ResourceAvailable
status: "True"
type: Available
resourceMeta:
group: apps
kind: Deployment
name: nginx-deployment
namespace: default
ordinal: 1
resource: deployments
version: v1
...
If possible, you can also switch the context of your kubeconfig to “cluster1”
to check out the new resources delivered by ManifestWork:
$ kubectl --context kind-cluster1 get pod
NAME READY STATUS RESTARTS AGE
nginx-deployment-556c5468f7-d5h2m 1/1 Running 0 33m
nginx-deployment-556c5468f7-gf574 1/1 Running 0 33m
nginx-deployment-556c5468f7-hhmjf 1/1 Running 0 33m
Updating the ManifestWork
Any updates applied to the ManifestWork are expected to take effect
immediately as long as the work agent deployed in the managed cluster
are healthy and actively in touch with the hub cluster.
The work agent will be dynamically computing a hash
from the prescribed resources, and a corresponding AppliedManifestWork
of which the name contains the hash value will be persisted to the managed
cluster and replacing the previously persisted AppliedManifestWork
connected to the same ManifestWork after the latest resources are applied.
$ kubectl --context kind-cluster1 get appliedmanifestwork
NAME AGE
ed59251487ad4e4465fa2990b36a1cc398b83e63b59fa16b83591f5afdc3dd6d-my-first-work 59m
Note that if the work agent was disconnected from the hub control plane for
a period of time and missed the new updates upon ManifestWork. The work
agent will be catching up the latest state of ManifestWork as soon as it
re-connects.
Deleting the ManifestWork
The local resources deployed in the managed cluster should be cleaned up upon
receiving the deletion event from the corresponding ManifestWork. The resource
ManifestWork in the hub cluster will be protected by the finalizer named:
- “cluster.open-cluster-management.io/manifest-work-cleanup”
It will be removed if the corresponding AppliedManifestWork is gracefully
removed from the managed cluster. Meanwhile, the AppliedManifestWork resource
is also protected by another finalizer named:
- “cluster.open-cluster-management.io/applied-manifest-work-cleanup”
This finalizer is supposed to be detached after the deployed local resources
are completely removed from the manged cluster. With that being said, if any
deployed local resources are holding at the “Terminating” due to graceful
deletion. Both of its ManifestWork and AppliedManifestWork should stay
undeleted.
Troubleshoot
In case of run into any unexpected failures, you can make sure your environment by checking the following conditions:
-
The CRD
ManifestWorkis installed in the hub cluster:$ kubectl get crd manifestworks.work.open-cluster-management.io -
The CRD
AppliedManifestWorkis installed in the managed cluster:$ kubectl get crd appliedmanifestworks.work.open-cluster-management.io -
The work agent is successfully running in the managed cluster:
$ kubectl -n open-cluster-management-agent get pod NAME READY STATUS RESTARTS AGE klusterlet-registration-agent-598fd79988-jxx7n 1/1 Running 0 20d klusterlet-work-agent-7d47f4b5c5-dnkqw 1/1 Running 0 20d
4.2 - Distribute workload with placement selected managed clusters
The Placement API is used to dynamically select a set of ManagedCluster in
one or multiple ManagedClusterSets so that the workloads can be deployed to
these clusters.
If you define a valid Placement, the placement controller generates a
corresponding PlacementDecision with the selected clusters listed in the
status. As an end-user, you can parse the selected clusters and then operate on
the target clusters. You can also integrate a high-level workload orchestrator
with the PlacementDecision to leverage its scheduling capabilities.
For example, with OCM addon policy
installed, a Policy that includes a Placement mapping can distribute the
Policy to the managed clusters.
For details see this example.
Some popular open source projects also integrate with the Placement API. For
example Argo CD, it can leverage the
generated PlacementDecision to drive the assignment of Argo CD Applications to a
desired set of clusters, details see this example.
And KubeVela, as an implementation of
the open application model, also will take advantage of the Placement API for
workload scheduling.
And in this article, we want to show you how to use clusteradm to deploy
ManifestWork to Placement selected clusters.
Prerequisites
Before starting with the following steps, suggest you understand the content below.
-
Placement: The
PlacementAPI is used to dynamically select a set ofManagedClusterin one or multipleManagedClusterSetsso that higher-level users can either replicate Kubernetes resources to the member clusters or run their advanced workload i.e. multi-cluster scheduling. -
ManifestWork: A custom resource in the hub cluster that groups a list of Kubernetes resources together and is meant for dispatching them into the managed cluster if the
ManifestWorkis created in a validcluster namespace.
Deploy manifestwork to placement selected managed clusters
In deploy Kubernetes resources to the managed clusters,
it shows you how to use clusteradm to create a ManifestWork and deploy it
onto a specific managed clusters. As Placement can dynamically select a set of
ManagedCluster, the next steps will show you how clusteradm leverages
placement scheduling ability and dynamically deploy ManifestWork to a set of
managed clusters.
-
Following setup dev environment by kind to prepare an environment.
curl -sSL https://raw.githubusercontent.com/open-cluster-management-io/OCM/main/solutions/setup-dev-environment/local-up.sh | bash -
Confirm there are 2
ManagedClusterand a defaultManagedClusterSetcreated.$ clusteradm get clusters NAME ACCEPTED AVAILABLE CLUSTERSET CPU MEMORY KUBERNETES VERSION cluster1 true True default 24 49265496Ki v1.23.4 cluster2 true True default 24 49265496Ki v1.23.4 $ clusteradm get clustersets NAME BOUND NAMESPACES STATUS default 2 ManagedClusters selected -
Bind the default
ManagedClusterSetto defaultNamespace.clusteradm clusterset bind default --namespace default$ clusteradm get clustersets NAME BOUND NAMESPACES STATUS default default 2 ManagedClusters selectedNote: click here to see more details about how to operate
ManagedClusterSetusingclusteradm. -
Create a
Placementplacement1 to select the two clusters in defaultManagedClusterSet.cat << EOF | kubectl apply -f - apiVersion: cluster.open-cluster-management.io/v1beta1 kind: Placement metadata: name: placement1 namespace: default spec: numberOfClusters: 2 clusterSets: - default EOF -
Use
clusteradmcommand to createManifestWorkmy-first-work withPlacementplacement1.clusteradm create work my-first-work -f work.yaml --placement default/placement1The
work.yamlcontains kubernetes resource definitions, for sample:apiVersion: v1 kind: ServiceAccount metadata: namespace: default name: my-sa --- apiVersion: apps/v1 kind: Deployment metadata: namespace: default name: nginx-deployment labels: app: nginx spec: replicas: 3 selector: matchLabels: app: nginx template: metadata: labels: app: nginx spec: serviceAccountName: my-sa containers: - name: nginx image: nginx:1.14.2 ports: - containerPort: 80 -
Check the
ManifestWork, it should be distributed to both cluster1 and cluster2.$ kubectl get manifestwork -A NAMESPACE NAME AGE cluster1 my-first-work 28s cluster2 my-first-work 28s -
Update the
Placementplacement1 to select only one managed cluster.kubectl patch placement placement1 --patch '{"spec": {"clusterSets": ["default"],"numberOfClusters": 1}}' --type=merge -
As the placement decision changes, running below command to reschedule
ManifestWorkmy-first-work to the newly selected cluster.clusteradm create work my-first-work -f work.yaml --placement default/placement1 --overwrite -
Check the
ManifestWorkagain, now it’s only deployed to cluster1.$ kubectl get manifestwork -A NAMESPACE NAME AGE cluster1 my-first-work 18m
What happens behind the scene
The main idea is that clusteradm parse the selected clusters generated by
Placement, and fill in that as ManifestWork namespace. Then create the
ManifestWork and it would be distributed to a set of clusters.
Let’s see more details.
-
Placementplacement1 generates aPlacementDecisionplacement1-decision-1.$ kubectl get placementdecision -n default -l cluster.open-cluster-management.io/placement=placement1 -oyaml apiVersion: v1 items: - apiVersion: cluster.open-cluster-management.io/v1beta1 kind: PlacementDecision metadata: creationTimestamp: "2022-07-06T15:03:12Z" generation: 1 labels: cluster.open-cluster-management.io/placement: placement1 name: placement1-decision-1 namespace: default ownerReferences: - apiVersion: cluster.open-cluster-management.io/v1beta1 blockOwnerDeletion: true controller: true kind: Placement name: placement1 uid: aa339f57-0eb7-4260-8d4d-f30c1379fd35 resourceVersion: "47679" uid: 9f948619-1647-429d-894d-81e11dd8bcf1 status: decisions: - clusterName: cluster1 reason: "" - clusterName: cluster2 reason: "" kind: List metadata: resourceVersion: "" selfLink: "" -
clusteradmget thePlacementDecisiongenerated byPlacementplacement1 with labelcluster.open-cluster-management.io/placement: placement1, reference code. Then parse the clusterName cluster1 and cluster2, fill in that asManifestWorknamespace, reference code. Then installsManifestWorkto namespace cluster1 and cluster2, which will finally be distributed to the two clusters.$ kubectl get manifestwork -A NAMESPACE NAME AGE cluster1 my-first-work 28s cluster2 my-first-work 28s
4.3 - Extend the multicluster scheduling capabilities with placement
The Placement API is used to dynamically select a set of ManagedCluster in one or multiple ManagedClusterSets so that the workloads can be deployed to these clusters. You can use placement to filter clusters by label or claim selector, also placement provides some default prioritizers which can be used to sort and select the most suitable clusters.
One of the default prioritizers are ResourceAllocatableCPU and ResourceAllocatableMemory. They provide the capability to sort clusters based on the allocatable CPU and memory. However, when considering the resource based scheduling, there’s a gap that the cluster’s “AllocatableCPU” and “AllocatableMemory” are static values that won’t change even if “the cluster is running out of resources”. And in some cases, the prioritizer needs more extra data to calculate the score of the managed cluster. For example, there is a requirement to schedule based on resource monitoring data from the cluster. For this reason, we need a more extensible way to support scheduling based on customized scores.
What is Placement extensible scheduling?
OCM placement introduces an API AddOnPlacementScore to support scheduling based on customized scores. This API supports storing the customized scores and being used by placement. Details of the API’s definition refer to types_addonplacementscore.go. An example of AddOnPlacementScore is as below.
apiVersion: cluster.open-cluster-management.io/v1alpha1
kind: AddOnPlacementScore
metadata:
name: default
namespace: cluster1
status:
conditions:
- lastTransitionTime: "2021-10-28T08:31:39Z"
message: AddOnPlacementScore updated successfully
reason: AddOnPlacementScoreUpdated
status: "True"
type: AddOnPlacementScoreUpdated
validUntil: "2021-10-29T18:31:39Z"
scores:
- name: "cpuAvailable"
value: 66
- name: "memAvailable"
value: 55
conditions. Conditions contain the different condition statuses for thisAddOnPlacementScore.validUntil. ValidUntil defines the valid time of the scores. After this time, the scores are considered to be invalid by placement. nil means never expire. The controller owning this resource should keep the scores up-to-date.scores. Scores contain a list of score names and values of this managed cluster. In the above example, the API contains a list of customized scores: cpuAvailable and memAvailable.
All the customized scores information is stored in status, as we don’t expect end users to update it.
- As a score provider, a 3rd party controller could run on either hub or managed cluster, to maintain the lifecycle of
AddOnPlacementScoreand update the score into thestatus. - As an end user, you need to know the resource name “default” and customized score name “cpuAvailable"and “memAvailable” , so you can specify the name in placement yaml to select clusters. For example, the below placement wants to select the top 3 clusters with the highest cpuAvailable score.
apiVersion: cluster.open-cluster-management.io/v1beta1 kind: Placement metadata: name: placement namespace: ns1 spec: numberOfClusters: 3 prioritizerPolicy: mode: Exact configurations: - scoreCoordinate: type: AddOn addOn: resourceName: default scoreName: cpuAvailable weight: 1 - In placement, if the end-user defines the scoreCoordinate type as AddOn, the placement controller will get the
AddOnPlacementScoreresource with the name “default” in each cluster’s namespace, read score “cpuAvailable” in the score list, and use that score to sort clusters.
You can refer to the enhancements to learn more details about the design. In the design, how to maintain the lifecycle (create/update/delete) of the AddOnPlacementScore CRs is not covered, as we expect the customized score provider itself to manage it. In this article, we will use an example to show you how to implement a 3rd part controller to update your own scores and extend the multiple clusters scheduling capability with your own scores.
How to implement a customized score provider
The example code is in GitHub repo resource-usage-collect-addon. It provides the score of the cluster’s available CPU and available memory, which can reflect the cluster’s real-time resource utilization. It is developed with OCM addon-framework and can be installed as an addon plugin to update customized scores into AddOnPlacementScore. (This article won’t talk many details about addon-framework, referring to Add-on Developer Guide to learn how to develop an addon.)
The resource-usage-collect addon follows the hub-agent architecture as below.
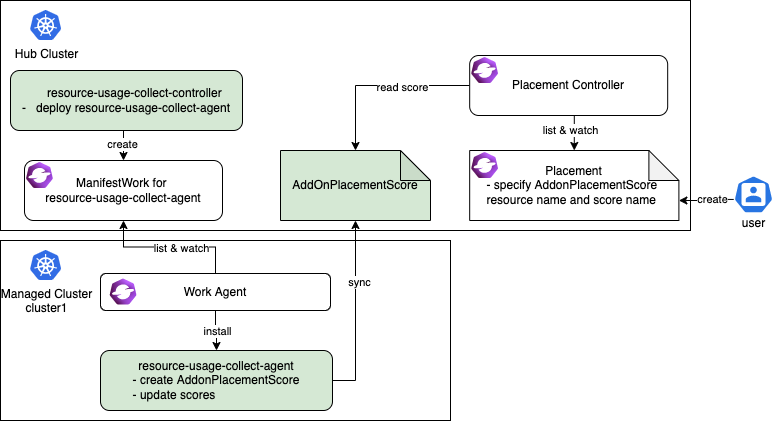
The resource-usage-collect addon contains a controller and an agent.
- On the hub cluster, the resource-usage-collect-controller is running. It is responsible for creating the
ManifestWorkfor resource-usage-collect-agent in each cluster namespace. - On each managed cluster, the work agent watches the
ManifestWorkand installs the resource-usage-collect-agent on each cluster. The resource-usage-collect-agent is the core part of this addon, it creates theAddonPlacementScorefor each cluster on the Hub cluster, and refreshes thescoresandvalidUntilevery 60 seconds.
When the AddonPlacementScore is ready, the end user can specify the customized core in a placement to select clusters.
The working flow and logic of resource-usage-collect addon are quite easy to understand. Now let’s follow the below steps to get started!
Prepare an OCM environment with 2 ManagedClusters.
- Following setup dev environment by kind to prepare an environment.
curl -sSL https://raw.githubusercontent.com/open-cluster-management-io/OCM/main/solutions/setup-dev-environment/local-up.sh | bash
- Confirm there are 2
ManagedClusterand a defaultManagedClusterSetcreated.
$ clusteradm get clusters
NAME ACCEPTED AVAILABLE CLUSTERSET CPU MEMORY KUBERNETES VERSION
cluster1 true True default 24 49265496Ki v1.23.4
cluster2 true True default 24 49265496Ki v1.23.4
$ clusteradm get clustersets
NAME BOUND NAMESPACES STATUS
default 2 ManagedClusters selected
- Bind the default
ManagedClusterSetto defaultNamespace.
clusteradm clusterset bind default --namespace default
$ clusteradm get clustersets
NAME BOUND NAMESPACES STATUS
default default 2 ManagedClusters selected
Install the resource-usage-collect addon.
- Git clone the source code.
git clone git@github.com:open-cluster-management-io/addon-contrib.git
cd addon-contrib/resource-usage-collect-addon
- Prepare the image.
# Set image name, this is an optional step.
export IMAGE_NAME=quay.io/haoqing/resource-usage-collect-addon:latest
# Build image
make images
If your are using kind, load image into kind cluster.
kind load docker-image $IMAGE_NAME --name <cluster_name> # kind load docker-image $IMAGE_NAME --name hub
- Deploy the resource-usage-collect addon.
make deploy
- Verify the installation.
On the hub cluster, verify the resource-usage-collect-controller pod is running.
$ kubectl get pods -n open-cluster-management | grep resource-usage-collect-controller
resource-usage-collect-controller-55c58bbc5-t45dh 1/1 Running 0 71s
On the hub cluster, verify the AddonPlacementScore is generated for each managed cluster.
$ kubectl get addonplacementscore -A
NAMESPACE NAME AGE
cluster1 resource-usage-score 3m23s
cluster2 resource-usage-score 3m24s
The AddonPlacementScore status should contain a list of scores as below.
$ kubectl get addonplacementscore -n cluster1 resource-usage-score -oyaml
apiVersion: cluster.open-cluster-management.io/v1alpha1
kind: AddOnPlacementScore
metadata:
creationTimestamp: "2022-08-08T06:46:04Z"
generation: 1
name: resource-usage-score
namespace: cluster1
resourceVersion: "3907"
uid: 6c4280e4-38be-4d45-9c73-c18c84799781
status:
scores:
- name: cpuAvailable
value: 12
- name: memAvailable
value: 4
If AddonPlacementScore is not created or there are no scores in the status, go into the managed cluster, and check if the resource-usage-collect-agent pod is running well.
$ kubectl get pods -n default | grep resource-usage-collect-agent
resource-usage-collect-agent-5b85cbf848-g5kqm 1/1 Running 0 2m
Select clusters with the customized scores.
If everything is running well, now you can try to create placement and select clusters with the customized scores.
- Create a placement to select 1 cluster with the highest cpuAvailable score.
cat << EOF | kubectl apply -f -
apiVersion: cluster.open-cluster-management.io/v1beta1
kind: Placement
metadata:
name: placement1
namespace: default
spec:
numberOfClusters: 1
clusterSets:
- default
prioritizerPolicy:
mode: Exact
configurations:
- scoreCoordinate:
type: AddOn
addOn:
resourceName: resource-usage-score
scoreName: cpuAvailable
weight: 1
EOF
- Verify the placement decision.
$ kubectl describe placementdecision -n default | grep Status -A 3
Status:
Decisions:
Cluster Name: cluster1
Reason:
Cluster1 is selected by PlacementDecision.
Running below command to get the customized score in AddonPlacementScore and the cluster score set by Placement.
You can see that the “cpuAvailable” score is 12 in AddonPlacementScore, and this value is also the cluster score in Placement events, this indicates that placement is using the customized score to select clusters.
$ kubectl get addonplacementscore -A -o=jsonpath='{range .items[*]}{.metadata.namespace}{"\t"}{.status.scores}{"\n"}{end}'
cluster1 [{"name":"cpuAvailable","value":12},{"name":"memAvailable","value":4}]
cluster2 [{"name":"cpuAvailable","value":12},{"name":"memAvailable","value":4}]
$ kubectl describe placement -n default placement1 | grep Events -A 10
Events:
Type Reason Age From Message
---- ------ ---- ---- -------
Normal DecisionCreate 50s placementController Decision placement1-decision-1 is created with placement placement1 in namespace default
Normal DecisionUpdate 50s placementController Decision placement1-decision-1 is updated with placement placement1 in namespace default
Normal ScoreUpdate 50s placementController cluster1:12 cluster2:12
Now you know how to install the resource-usage-collect addon and consume the customized score to select clusters. Next, let’s take a deeper look into some key points when you consider implementing a customized score provider.
1. Where to run the customized score provider
The customized score provider could run on either hub or managed cluster. Combined with user stories, you should be able to distinguish whether the controller should be placed in a hub or a managed cluster.
In our example, the customized score provider is developed with addon-famework, it follows the hub-agent architecture. The resource-usage-collect-agent is the real score provider, it is installed on each managed cluster, it gets the available CPU and memory of the managed cluster, calculates a score, and updates it into AddonPlacementScore. The resource-usage-collect-controller just takes care of installing the agent.
In other cases, for example, if you want to use the metrics from Thanos to calculate a score for each cluster, then the customized score provider only needs to be placed on the hub, as Thanos has all the metrics collected from each managed cluster.
2. How to maintain the AddOnPlacementScore CR lifecycle
In our example, the code to maintain the AddOnPlacementScore CR is in pkg/addon/agent/agent.go.
-
When should the score be created?
The
AddOnPlacementScoreCR can be created with the existence of a ManagedCluster, or on demand for the purpose of reducing objects on the hub.In our example, the addon creates an
AddOnPlacementScorefor each Managed Cluster if it does not exist, and a score will be calculated when creating the CR for the first time. -
When should the score be updated?
We recommend that you set
ValidUntilwhen updating the score so that the placement controller can know if the score is still valid in case it failed to update for a long time.The score could be updated when your monitoring data changes, or at least you need to update it before it expires.
In our example, in addition to recalculate and update the score every 60 seconds, the update will also be triggered when the node or pod resource in the managed cluster changes.
3. How to calculate the score
The code to calculate the score is in pkg/addon/agent/calculate.go. A valid score must be in the range -100 to 100, you need to normalize the scores before updating it into AddOnPlacementScore.
When normalizing the score, you might meet the below cases.
-
The score provider knows the max and min value of the customized scores.
In this case, it is easy to achieve smooth mapping by formula. Suppose the actual value is X, and X is in the interval [min, max], then
score = 200 * (x - min) / (max - min) - 100. -
The score provider doesn’t know the max and min value of the customized scores.
In this case, you need to set a maximum and minimum value by yourself, as without a max and min value, is unachievable to map a single value X to the range [-100, 100].
Then when the X is greater than this maximum value, the cluster can be considered healthy enough to deploy applications, and the score can be set as 100. And if X is less than the minimum value, the score can be set as -100.
if X >= max score = 100 if X <= min score = -100
In our example, the resource-usage-collect-agent running on each managed cluster doesn’t have a whole picture view to know the max/min value of CPU/memory usage of all the clusters, so we manually set the max value as MAXCPUCOUNT and MAXMEMCOUNT in code, min value is set as 0. The score calculation formula can be simplified: score = x / max * 100.
Summary
In this article, we introduced what is the placement extensible scheduling and used an example to show how to implement a customized score provider. Also, this article list 3 key points the developer needs to consider when implementing a 3rd party score provider. Hope after reading this article, you can have a clear view of how placement extensible scheduling can help you extend the multicluster scheduling capabilities.
Feel free to raise your question in the Open-cluster-management-io GitHub community or contact us using Slack.
4.4 - Extending managed clusters with custom attributes
Under some cases we need a convenient way to extend OCM’s Managed Cluster data model so that our own custom multi-cluster system can easily work over the OCM’s native cluster api otherwise we will have to maintain an additional Kubernetes’ CustomResourceDefinition in the project. OCM definitely supports developers to decorate the cluster api with minimal effort, and in the following content we will walk through that briefly.
The original cluster model in OCM “Managed Cluster” is designed to be a
neat and light-weight placeholder resource of which the spec doesn’t
require any additional information other than “whether the cluster is
accepted or not” i.e. .spec.hubAcceptsClient, and all the other fields
in the spec are totally optional, e.g. .spec.managedClusterClientConfigs
is only required until we install some addons that replying on that
information.
Overall in OCM we can decorate the original cluster model with custom attributes in the following approaches:
Label: The common label primitive in terms of a Kubernetes resource.Cluster Claim: A custom resource available inside the managed cluster which will be consistently reported to the hub cluster.
Labeling managed cluster
Any kubernetes resource can be attached with labels in the metadata in the form of:
metadata:
labels:
<domain name>/<label name>: <label string value>
...
However, there’re some restrictions to the label value such as the content length, and legal charset etc, so it’s not convenient to put some structuralized or comprehensive data in the label value.
Additionally, due to the fact that the finest granularity of authorization mechanism in Kubernetes is “resource”, so it’s also not convenient for us to protect these extended labels from unexpected modification unless intercepting the writes the “Managed Cluster” with an admission webhook which brings additional costs in cluster administration and operation. So generally it’s recommended to put those immutable or static attributes (that doesn’t frequently change over time) such as:
- data-center information
- network infrastructure information
- geography attributes like cluster’s region
- …
Last but not least, it’s generally not recommended to grant permission to the managed cluster to update non-status fields on the “Managed Cluster” so these custom attributes in labels should only be manipulated by hub cluster admins/operators. If you are looking for a way to make the local agents in the managed clusters to be capable of reporting attributes in a “bottom-up” pattern, go ahead read the “Cluster Claim” section below.
Decorating managed cluster with cluster claim
The cluster claim is a cluster-scoped custom resource working from the managed clusters and proactively projecting custom attributes towards the hub cluster’s “Managed Cluster” model. Note that the hub cluster is not supposed to make any direct modification upon the projected claims on the “ManagedCluster”, i.e. read-only to the hub cluster.
A sample of cluster claim will be like:
apiVersion: cluster.open-cluster-management.io/v1alpha1
kind: ClusterClaim
metadata:
name: id.open-cluster-management.io
spec:
value: 95f91f25-d7a2-4fc3-9237-2ef633d8451c
After applying the cluster claim above to any managed cluster, the value of the claims will be instantly reflected in the cluster model. e.g.:
apiVersion: cluster.open-cluster-management.io/v1
kind: ManagedCluster
metadata: ...
spec: ...
status:
clusterClaims:
- name: id.open-cluster-management.io
value: 95f91f25-d7a2-4fc3-9237-2ef633d8451c
And any future updates upon the claim will also be reported from the registration agent to the hub cluster.
The claims are useful if we want the hub cluster to perform different actions or behaviors reactively based on the feedback of reported values. They’re typically applicable to describe the information that changes in the managed cluster frequently. e.g.:
- aggregated resource information (node counts, pod counts)
- cluster resource watermark/budget
- any cluster-scoped knowledge of the managed cluster…
Next
After extending your “Managed Cluster” with customized attributes, now we can try the advanced cluster selection using the placement policies, which is provided ny another module of OCM helpful for building your own advanced multi-cluster systems.
4.5 - Integration with Argo CD
Argo CD is a declarative, GitOps continuous delivery tool, which allows developers to define and control deployment of Kubernetes application resources from within their existing Git workflow. By integrating Open Cluster Management (OCM) with Argo CD, it enables both automation and greater flexibility managing Argo CD Applications across a large number of OCM managed clusters.
In this article, we want to show you how to integrate Argo CD with OCM and deploy application to OCM managed clusters by leveraging the Placement API, which supports multi-cluster scheduling.
Before starting with the following steps, we suggest you understand the content below:
- Argo CD ApplicationSet. It adds Application automation and seeks to improve multi-cluster support and cluster multitenant support within Argo CD.
- OCM Placement API. It is used to dynamically select a set of ManagedClusters in one or multiple ManagedClusterSets so that the workloads can be deployed to these clusters.
The first half of the KubeCon NA 2022 - OCM Multicluster App & Config Management also covers the integration with ArgoCD.
How it works
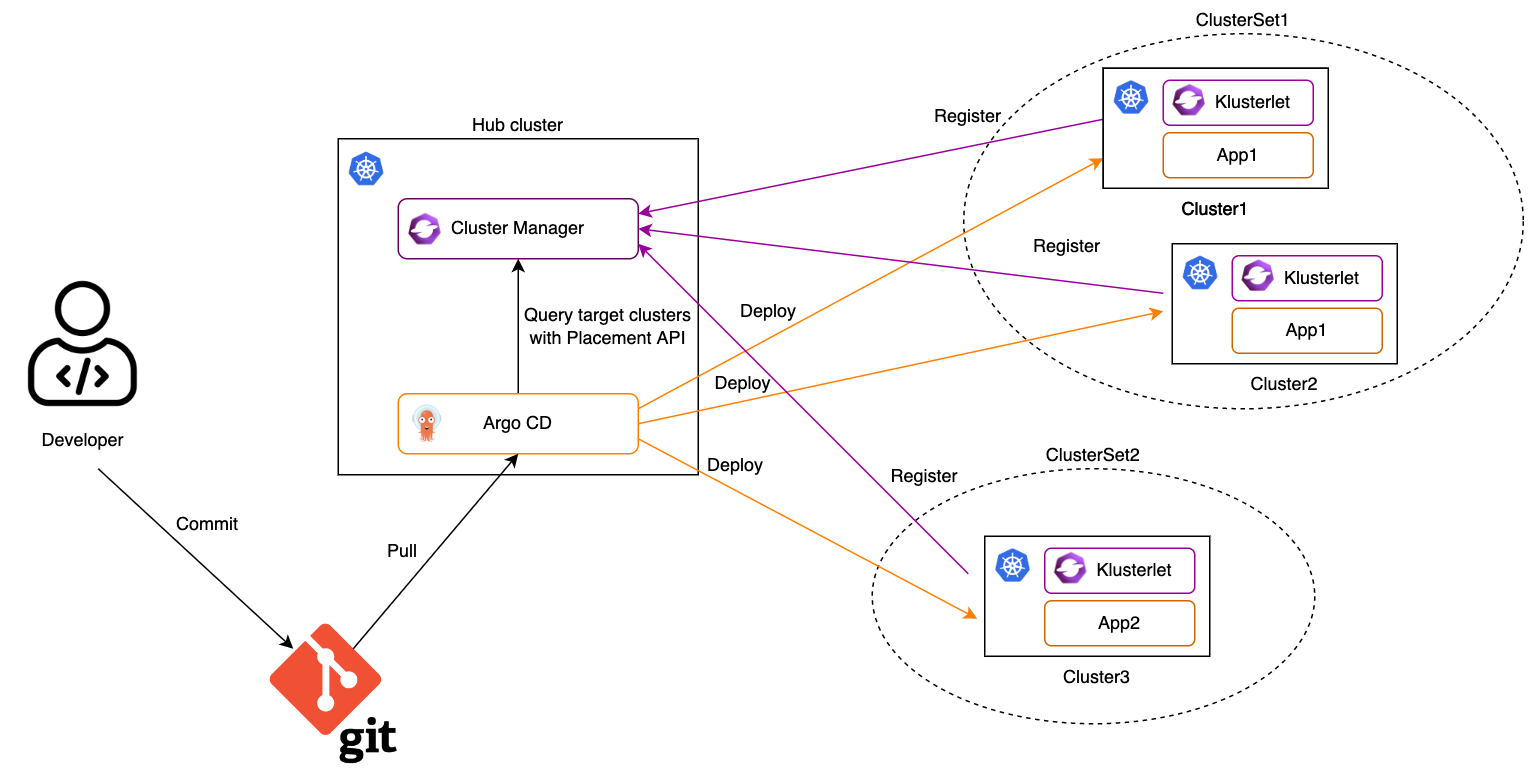
1. Import Kubernetes clusters to the OCM hub as managed clusters and organize them with managed clustersets.
2. Register the OCM managed clusters to ArgoCD.
The OCM managed clusters can be registered to Argo CD one by one manually by using Argo CD CLI. It may take time to finish it if there are a large number of clusters. In order to make the cluster registration easier, consider to use multicloud-integrations to automate the procedure.
3. Create a configuration of Cluster Decision Resource generator by using OCM Placement API.
cat << EOF | kubectl apply -f -
apiVersion: v1
kind: ConfigMap
metadata:
name: ocm-placement-generator
namespace: argocd
data:
apiVersion: cluster.open-cluster-management.io/v1beta1
kind: placementdecisions
statusListKey: decisions
matchKey: clusterName
EOF
With reference to this generator, an ApplicationSet can target the application to the clusters listed in the status of a set of PlacementDecision, which belong to a certain Placement.
4. Grant Argo CD permissions to access OCM resources.
cat << EOF | kubectl apply -f -
apiVersion: rbac.authorization.k8s.io/v1
kind: Role
metadata:
name: ocm-placement-consumer
namespace: argocd
rules:
- apiGroups: ["cluster.open-cluster-management.io"]
resources: ["placementdecisions"]
verbs: ["get", "list"]
---
apiVersion: rbac.authorization.k8s.io/v1
kind: RoleBinding
metadata:
name: ocm-placement-consumer:argocd
namespace: argocd
roleRef:
apiGroup: rbac.authorization.k8s.io
kind: Role
name: ocm-placement-consumer
subjects:
- kind: ServiceAccount
namespace: argocd
name: argocd-applicationset-controller
EOF
5. Bind at least one managed clusterset to the argocd namespace.
For example, in order to bind the global managed clusterset to the argocd namespace, the user must have an RBAC rule to create on the virtual subresource of managedclustersets/bind of the global managed clusterset.
clusteradm clusterset bind global --namespace argocd
The above command will create a ManagedClusterSetBinding resource in the argocd namespace. Normally, it should not be included by an application in the git repo because applying it to a Kubernetes cluster needs additional permissions.
6. Create a placement in the argocd namespace to select some managed clusters.
cat << EOF | kubectl apply -f -
apiVersion: cluster.open-cluster-management.io/v1beta1
kind: Placement
metadata:
name: guestbook-app-placement
namespace: argocd
spec:
numberOfClusters: 10
EOF
7. Create an ApplicationSet in the argocd namespace.
The ApplicationSet has references to the Cluster Decision Resource generator previously created and placement. This will help Argo CD to determine where the application should be deployed. The managed clusters selected by the referenced placement may be changed dynamically. By setting requeueAfterSeconds of the generator in the ApplicationSet spec, the Argo CD will check the cluster decisions of the referenced placement periodically and ensure the application is deployed to the correct managed clusters.
cat << EOF | kubectl apply -f -
apiVersion: argoproj.io/v1alpha1
kind: ApplicationSet
metadata:
name: guestbook-app
namespace: argocd
spec:
generators:
- clusterDecisionResource:
configMapRef: ocm-placement-generator
labelSelector:
matchLabels:
cluster.open-cluster-management.io/placement: guestbook-app-placement
requeueAfterSeconds: 30
template:
metadata:
name: '{{clusterName}}-guestbook-app'
spec:
project: default
source:
repoURL: 'https://github.com/argoproj/argocd-example-apps.git'
targetRevision: HEAD
path: guestbook
destination:
name: '{{clusterName}}'
namespace: guestbook
syncPolicy:
automated:
prune: true
syncOptions:
- CreateNamespace=true
EOF
8. Check the status of the ApplicationSet and the Application.
Confirm the ApplicationSet is created and an Application is generated for each selected managed cluster.
$ kubectl -n argocd get applicationsets
NAME AGE
guestbook-app 4s
$ kubectl -n argocd get applications
NAME SYNC STATUS HEALTH STATUS
cluster1-guestbook-app Synced Progressing
cluster2-guestbook-app Synced Progressing
And on each selected managed cluster confirm the Application is running.
$ kubectl -n guestbook get pods
NAME READY STATUS RESTARTS AGE
guestbook-ui-6b689986f-cdrk8 1/1 Running 0 112s
What’s next
To build an OCM environment integrated with Argo CD with KinD clusters, see Deploy applications with Argo CD for more details.
4.6 - Manage a cluster with multiple hubs
Normally an Open Cluster Management (OCM) hub manages multiple managed clusters and a cluster only registers to one OCM hub. While there might be some user scenarios, where a single cluster may want to join more than one OCM hub as a managed cluster, including:
- In an organization, each department may setup an OCM hub to manage clusters owned by this department, and all clusters are managed by a central OCM hub owned by IT department to enforce organization wide security policies.
- A service provider creates clusters for customers. The underlying system of the service provider uses OCM hubs to manage all the clusters. Once customer gets a cluster from the service provider, they may also want to manage this cluster with customer’s OCM hub.
This document shows how to achieve it with OCM.
Since the OCM agent is hub specific, that means an agent can connect to only one hub. In order to connect to multiple hubs, each hub should have its own agent running. Depdends on where the agent is running, there are two solutions:
- Run all agents on the managed cluster;
- Run the agents in the hosted mode on the hosting clusters;
Run all the agents on the managed cluster
Since there are multiple OCM agents are running on the managed cluster, each of them must have an unique agent namespace. So only one agent can be deployed in the default agent namespace open-cluster-management-agent.
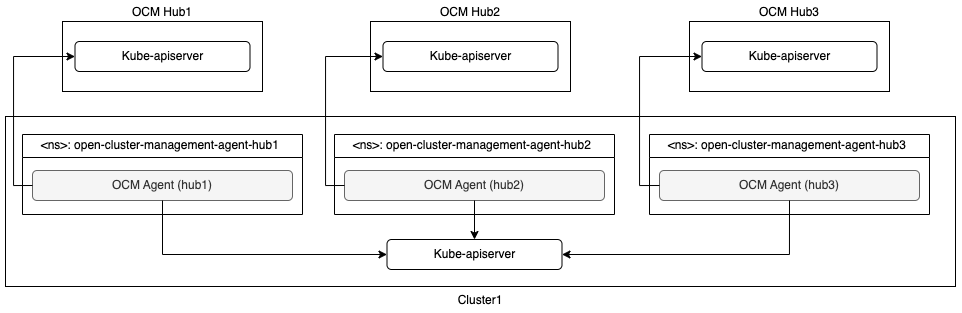
With this architecture, the managed cluster needs more resources, including CPUs and memory, to run agents for multiple hubs. And it’s a challenge to handle the version skew of the OCM hubs.
An example built with kind and clusteradm can be found in Manage a cluster with multiple hubs.
Run the agents in the hosted mode on the hosting clusters
By leveraging the hosted deployment mode, it’s possible to run OCM agent outside of the managed cluster on a hosing cluster. The hosting cluster could be a managed cluster of the same hub.
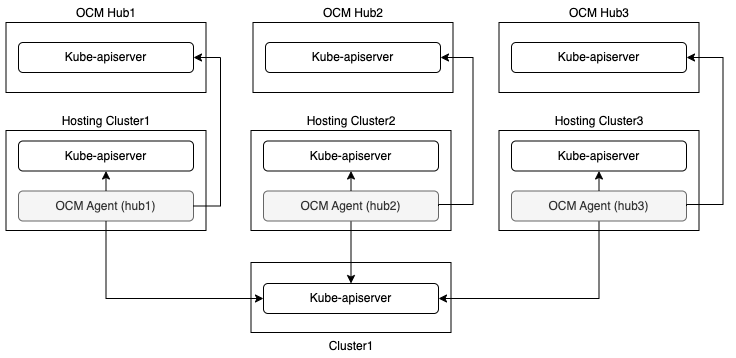
At most one agent can runs in the default mode on the managed cluster in this solution.
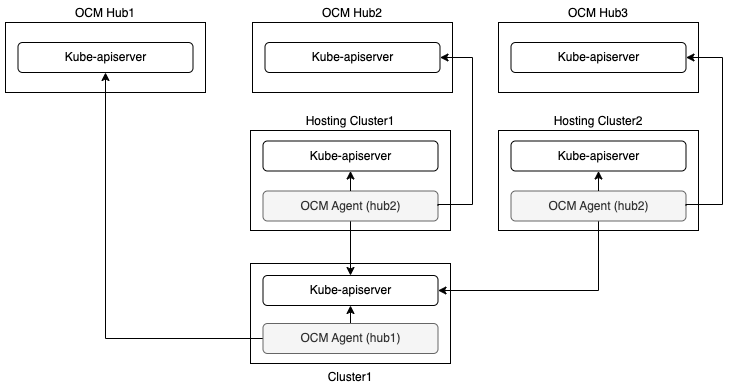
In order to reduce the number of the hosting clusters, agents running in the hosted mode can share the hosting clusters.
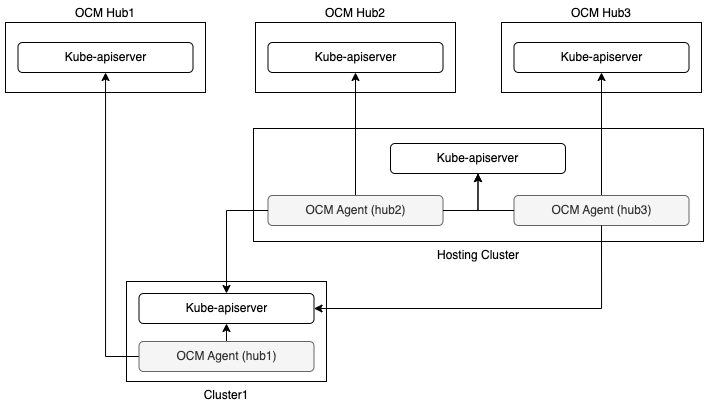
With this architecture, the managed cluster itself needs less resources because at most one agent runs on the managed cluster, while it needs at least one extra cluster as hosting cluster. Since each agent could run on different cluster (managed cluster or hosting cluster), it will not result in any problem if OCM hubs have different versions.
An example built with kind and clusteradm can be found in Manage a cluster with multiple hubs in hosted mode.
4.7 - Migrate workload with placement
The Placement API is used to dynamically select a set of ManagedCluster in
one or multiple ManagedClusterSets so that the workloads can be deployed to
these clusters.
If you define a valid Placement, the placement controller generates a
corresponding PlacementDecision with the selected clusters listed in the
status. As an end-user, you can parse the selected clusters and then operate on
the target clusters. You can also integrate a high-level workload orchestrator
with the PlacementDecision to leverage its scheduling capabilities.
For example, with OCM addon policy
installed, a Policy that includes a Placement mapping can distribute the
Policy to the managed clusters.
For details see this example.
Some popular open source projects also integrate with the Placement API. For
example Argo CD, it can leverage the
generated PlacementDecision to drive the assignment of Argo CD Applications to a
desired set of clusters, details see this example.
And KubeVela, as an implementation of
the open application model, also will take advantage of the Placement API for
workload scheduling.
In this article, we use ArgoCD pull model as an example to demonstrate how, with the integration of OCM, you can migrate ArgoCD Applications among clusters. This is useful for scenarios such as application disaster recovery or application migration during cluster maintenance.
Prerequisites
Before starting with the following steps, we recommend that you familiarize yourself with the content below.
-
Taints of ManagedClusters: Taints are properties of
ManagedClusters, they allow aPlacementto repel a set ofManagedClusters. -
Tolerations of Placement: Tolerations are applied to
Placements, and allowPlacementsto selectManagedClusterswith matching taints. -
ArgoCD Pull Model Integration: The ArgoCD application controller uses the hub-spoke pattern or pull model mechanism for decentralized resource delivery to remote clusters. By using Open Cluster Management (OCM) APIs and components, the ArgoCD Applications will be pulled from the multi-cluster control plane hub cluster down to the registered OCM managed clusters
Setup the environment
Follow the deploy ArgoCD pull model steps to set up an environment with OCM and ArgoCD pull model installed.
If the above steps run successfully, on the hub cluster, you could see the application is deployed to both cluster1 and cluster2.
$ kubectl -n argocd get app
NAME SYNC STATUS HEALTH STATUS
cluster1-guestbook-app Synced Healthy
cluster2-guestbook-app Synced Healthy
Migrate application to another cluster automatically when one cluster is down
-
To demonstrate how an application can be migrated to another cluster, let’s first deploy the application in a single cluster.
Patch the existing
Placementto select only one cluster.$ kubectl patch placement -n argocd guestbook-app-placement --patch '{"spec": {"numberOfClusters": 1}}' --type=merge placement.cluster.open-cluster-management.io/guestbook-app-placement patchedUse
clusteradmto check the placement of selected clusters.$ clusteradm get placements -otable NAME STATUS REASON SELETEDCLUSTERS guestbook-app-placement False Succeedconfigured [cluster1] -
Confirm the application is only deployed to cluster1.
$ kubectl -n argocd get app NAME SYNC STATUS HEALTH STATUS cluster1-guestbook-app Synced Healthy -
Pause the cluster1 to simulate a cluster going down.
Use
docker ps -ato get the cluster1 container ID.$ docker ps -a CONTAINER ID IMAGE COMMAND CREATED STATUS PORTS NAMES 499812ada5bd kindest/node:v1.25.3 "/usr/local/bin/entr…" 9 hours ago Up 9 hours 127.0.0.1:37377->6443/tcp cluster2-control-plane 0b9d110e1a1f kindest/node:v1.25.3 "/usr/local/bin/entr…" 9 hours ago Up 9 hours 127.0.0.1:34780->6443/tcp cluster1-control-plane 0a327d4a5b41 kindest/node:v1.25.3 "/usr/local/bin/entr…" 9 hours ago Up 9 hours 127.0.0.1:44864->6443/tcp hub-control-planeUse
docker pauseto pause the cluster1.$ docker pause 0b9d110e1a1f 0b9d110e1a1f -
Wait for a few minutes, check the
ManagedClusterstatus, cluster1 available status should become “Unknown”.$ kubectl get managedcluster NAME HUB ACCEPTED MANAGED CLUSTER URLS JOINED AVAILABLE AGE cluster1 true https://cluster1-control-plane:6443 True Unknown 9h cluster2 true https://cluster2-control-plane:6443 True True 9hUse
clusteradmto check the placement of selected clusters.$ clusteradm get placements -otable NAME STATUS REASON SELETEDCLUSTERS guestbook-app-placement False Succeedconfigured [cluster2] -
Confirm the application is now deployed to cluster2.
$ kubectl -n argocd get app NAME SYNC STATUS HEALTH STATUS cluster2-guestbook-app Synced Healthy
What happens behind the scene
Refer to Taints of ManagedClusters,
when pausing cluster1, the status of condition ManagedClusterConditionAvailable
becomes Unknown. The taint cluster.open-cluster-management.io/unreachable is automatically
added to cluster1, with the effect NoSelect and an empty value.
```shell
$ kubectl get managedcluster cluster1 -oyaml
apiVersion: cluster.open-cluster-management.io/v1
kind: ManagedCluster
metadata:
name: cluster1
labels:
cluster.open-cluster-management.io/clusterset: default
spec:
...
taints:
- effect: NoSelect
key: cluster.open-cluster-management.io/unreachable
timeAdded: "2023-11-13T16:26:16Z"
status:
...
```
Since the Placement guestbook-app-placement doesn’t define any toleration to match the taint,
cluster1 will be filtered from the decision. In the demo environment, once cluster1 is down,
placement will select one cluster from the rest clusters, which is cluster2.
Taints of ManagedClusters
also describes other scenarios where taints are automatically added. In some scenarios you may not want to
migrate the application immediately when a taint is added, with placement TolerationSeconds defined, it could tolerates the taint
for a period of time before repelling it. In above example, the TolerationSeconds could be defined as below:
apiVersion: cluster.open-cluster-management.io/v1beta1
kind: Placement
metadata:
name: guestbook-app-placement
namespace: argocd
spec:
numberOfClusters: 1
tolerations:
- key: cluster.open-cluster-management.io/unreachable
operator: Exists
tolerationSeconds: 300
tolerationSeconds is 300 means that the application will be migrated to cluster2 after 5 minutes when cluster1 is down.
Migrate application to another cluster manually for cluster maintenance
The above example shows how a taint is automatically added to a cluster and how the application is migrated to another cluster. You can also choose to add a taint manually and repel the application to other clusters.
In the following example, suppose you are going to maintain cluster2, and want to repel the application to cluster1.
-
Before starting, let’s first restart the paused cluster1.
Use
docker restartto restart the cluster1.$ docker restart 0b9d110e1a1f 0b9d110e1a1fWait for a few minutes, check the
ManagedClusterstatus, cluster1 available status should become “True”.$ kubectl get managedcluster NAME HUB ACCEPTED MANAGED CLUSTER URLS JOINED AVAILABLE AGE cluster1 true https://cluster1-control-plane:6443 True True 9h cluster2 true https://cluster2-control-plane:6443 True True 9h -
Add the taint
maintenanceto cluster2 manually.$ kubectl patch managedcluster cluster2 -p '{"spec":{"taints":[{"effect":"NoSelect","key":"maintenance"}]}}' --type=merge managedcluster.cluster.open-cluster-management.io/cluster2 patched -
Use
clusteradmto check the placement selected clusters.$ clusteradm get placements -otable NAME STATUS REASON SELETEDCLUSTERS guestbook-app-placement False Succeedconfigured [cluster1] -
Confirm the application is now deployed to cluster1.
$ kubectl -n argocd get app NAME SYNC STATUS HEALTH STATUS cluster1-guestbook-app Synced Healthy
Summary
In this article, we use the ArgoCD pull model in OCM as an example, showing you how to migrate the ArgoCD applications automatically or manually when the cluster is down or during the cluster maintenance time.
The concept of Taints and Tolerations can be used for any components that consume OCM Placement, such as add-ons and ManifestworkReplicaSet. If you have any questions, feel free to raise them in our slack channel.
4.8 - Pushing Kubernetes API requests to the managed clusters
By following the instructions in this document, an OCM hub admin will be able to “push” Kubernetes API requests to the managed clusters. The benefit of using this method for “pushing” requests in OCM is that we don’t need to explicitly configure any API endpoint for the managed clusters or provide any client credentials as preparation. We just need to enable/install the following OCM addons:
- Cluster-Proxy: Setting up the konnectivity tunnels between the hub cluster and the managed clusters so the hub cluster can connect/access the managed cluster from anywhere.
- Managed-ServiceAccount: Automating the lifecycle of the local service account in the managed clusters and projecting the tokens back to the hub cluster so that the Kubernetes API clients from the hub can make authenticated requests.
- Cluster-Gateway: An aggregated apiserver providing a “proxy” subresource which helps the hub admin to gracefully access the managed clusters by standard Kubernetes API calls (including long-running calls).
Prerequisite
You must meet the following prerequisites to install the managed service account:
- Ensure your
open-cluster-managementrelease is greater thanv0.5.0. - Ensure
kubectlis installed. - Ensure
helmis installed.
Installation
Adding helm chart repo
Making sure the following OCM addons are discovered by your helm environment:
$ helm repo add ocm https://open-cluster-management.io/helm-charts
$ helm repo update
$ helm search repo ocm
NAME CHART VERSION APP VERSION DESCRIPTION
ocm/cluster-gateway-addon-manager 1.3.2 1.0.0 A Helm chart for Cluster-Gateway Addon-Manager
ocm/cluster-proxy 0.2.0 1.0.0 A Helm chart for Cluster-Proxy OCM Addon
ocm/managed-serviceaccount 0.2.0 1.0.0 A Helm chart for Managed ServiceAccount Addon
Install the OCM addons
By the following helm commands to install the addons:
$ helm -n open-cluster-management-addon install cluster-proxy ocm/cluster-proxy
$ helm -n open-cluster-management-addon install managed-serviceaccount ocm/managed-serviceaccount
$ helm -n open-cluster-management-addon install cluster-gateway ocm/cluster-gateway-addon-manager \
# Delegating for secret discovery to "managed-serviceaccount" addon. \
# Skip the option for manual secret management. \
--set manualSecretManagement=false \
# Enabling konnectivity tunnels via "cluster-proxy" addon. \
# Skip the option if the hub cluster and the managed clusters are already mutually accessible. \
--set konnectivityEgress=true
Confirm addon installation
The commands above installs the addon manager into the hub cluster, and the
manager will creating ManagedClusterAddOn automatically into the cluster
namespaces representing the addon is plumbed into the managed cluster. In order
to check their status, run:
$ kubectl get managedclusteraddon -A
NAMESPACE NAME AVAILABLE DEGRADED PROGRESSING
managed1 cluster-gateway True
managed1 cluster-proxy True
managed1 managed-serviceaccount True
Furthermore, after the addons are all deployed successfully, the hub admin will
be able to see a new resource named ClusterGateway registered into the hub
cluster:
$ kubectl get clustergateway
NAME PROVIDER CREDENTIAL-TYPE ENDPOINT-TYPE
managed1 ServiceAccountToken ClusterProxy
Usage
Now the gateway is ready for proxying your requests to the managed clusters dynamically. The easiest way to verify if the proxying framework is working is to run the following command:
$ export CLUSTER_NAME=managed1 # Or any other valid managed cluster name
$ kubectl get --raw="/apis/cluster.core.oam.dev/v1alpha1/clustergateways/${CLUSTER_NAME}/proxy/healthz"
ok
Another nice feature is that you can also easily convert the kubeconfig of the hub cluster into a managed cluster’s kubeconfig by adding the api suffix to the cluster endpoint in your kubeconfig:
$ # Copy and edit your original hub kubeconfig into e.g. managed1.kubeconfig
apiVersion: v1
clusters:
...
--- server: https://x.x.x.x
+++ server: https://x.x.x.x/apis/cluster.core.oam.dev/v1alpha1/clustergateways/${CLUSTER_NAME}/proxy
Then we can access the managed cluster directly via kubectl with the tweaked kubeconfig:
$ KUBECONFIG=managed1.kubeconfig kubectl get ns
However upon your first-time installation, you may encounter the RBAC restriction message such as:
Error from server (Forbidden): namespaces is forbidden: User "system:serviceaccount:open-cluster-management-managed-serviceaccount:cluster-gateway" cannot list resource "namespaces" in API group "" at the cluster scope
That is because we haven’t set up proper RBAC permissions for the egress
service account managed by the ManagedServiceAccount yet. After granting
sufficient permissions for the service account in the managed clusters, you
will be able to freely operate the managed cluster from the hub without asking
for any credential or kubeconfig from the managed clusters. Note that the
service account is also periodically rotated by the addons so there’s no need
to worry in sustainable credential management.
Insight
Overall, the following picture of architecture reveals the internal technique of the request “pushing” framework in the OCM:
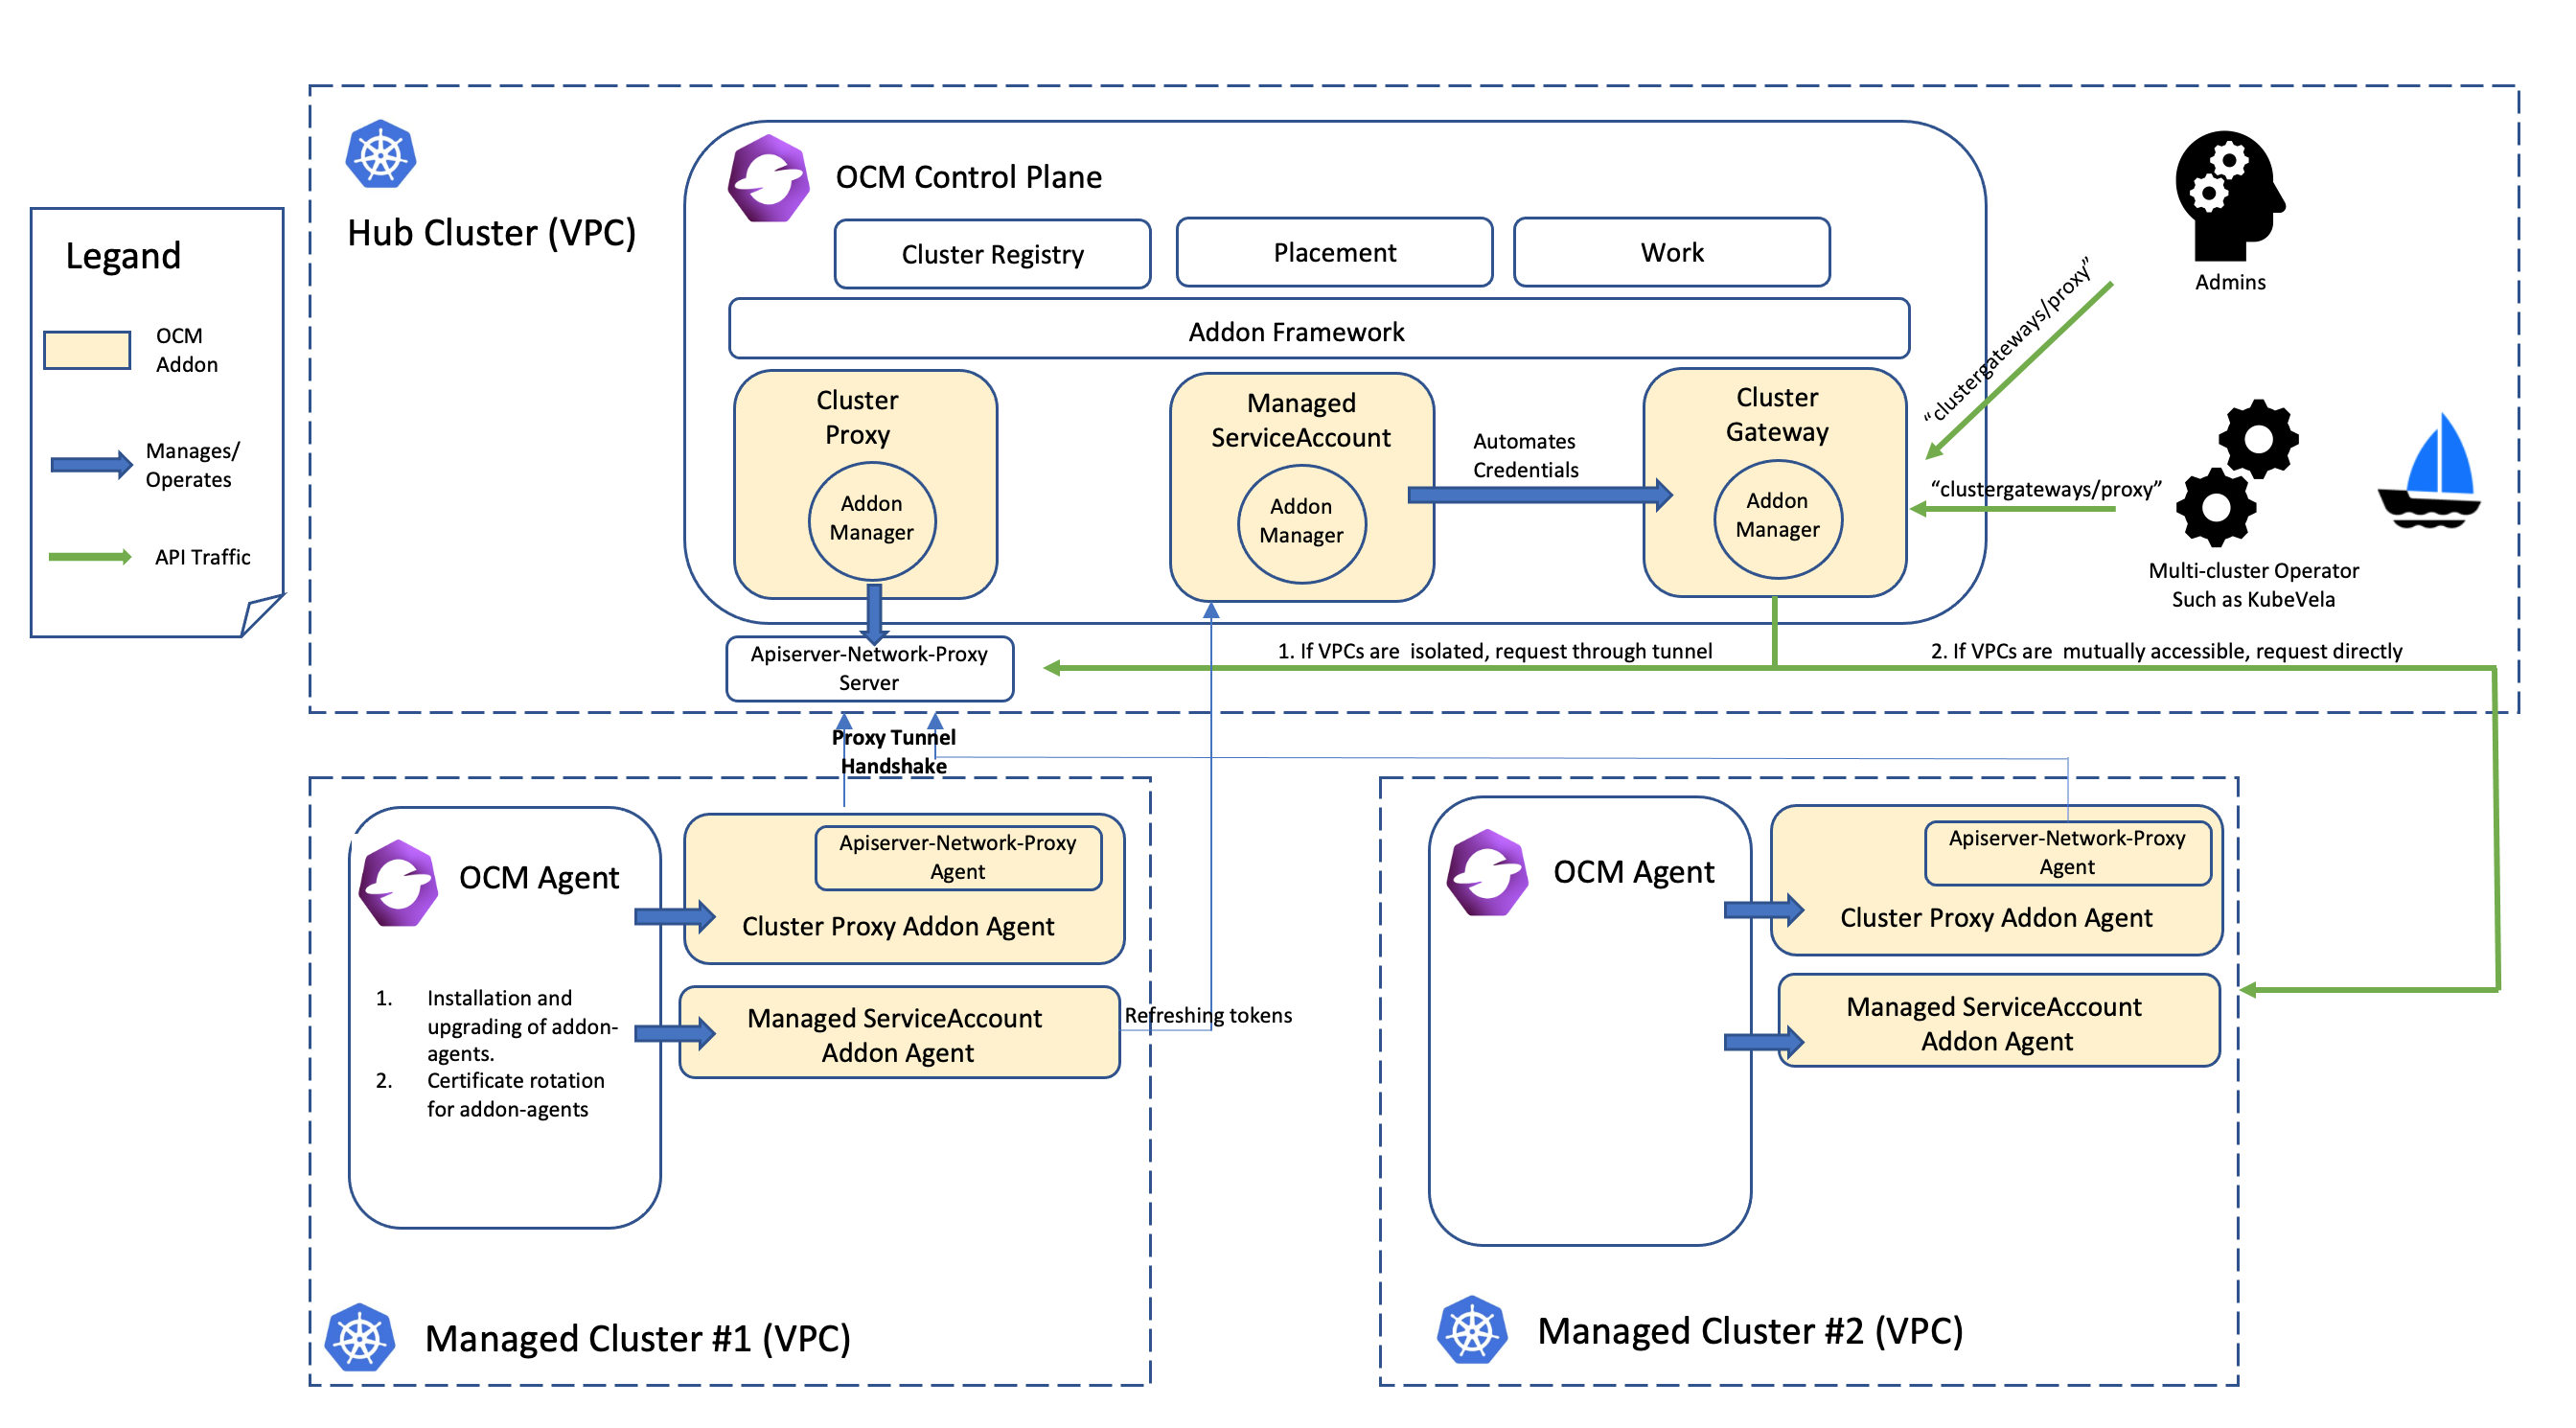
With the help of the framework, we can easily develop a web service or an operator that runs in the hub cluster and is able to access to the managed clusters through the gateway. Note that it’s generally not recommended to list-watch the managed clusters from the hub because it’s in a sense violating the original philosophy of “pull” or “hub-agent” architecture of OCM. In order to coordinate the hub cluster and the managed clusters in your custom system, consider build your own OCM addon based on the addon-framework which provides you utilities for further customization.
4.9 - Register a cluster to hub through proxy server
When registering a cluster to an Open Cluster Management (OCM) hub, there is a network requirement for the managed cluster. It must be able to reach the hub cluster. Sometimes the managed cluster cannot directly connect to the hub cluster. For example, the hub cluster is in a public cloud, and the managed cluster is in a private cloud environment behind firewalls. The communications out of the private cloud can only go through a HTTP or HTTPS proxy server.
In this scenario, you need to configure the proxy settings to allow the communications from the managed cluster to access the hub cluster through a forward proxy server.
Klusterlet proxy settings
During the cluster registration, a bootstrap kubeconfig is required by the Klusterlet agent running on the managed cluster to connect to the hub cluster. When the agent accesses the hub cluster through a proxy server, the URL of the proxy server should be specified in cluster.proxy-url of the bootstrap kubeconfig. If a HTTPS proxy server is used, the proxy CA certificate should be appended to cluster.certificate-authority-data of the bootstrap kubeconfig as well.
apiVersion: v1
clusters:
- cluster:
certificate-authority-data: LS0tLS...LS0tCg==
server: https://api.server-foundation-sno-x4lcs.dev04.red-chesterfield.com:6443
proxy-url: https://10.0.109.153:3129
name: default-cluster
contexts:
- context:
cluster: default-cluster
namespace: default
user: default-auth
name: default-context
current-context: default-context
kind: Config
preferences: {}
users:
- name: default-auth
user:
token: eyJh...8PwGo
Since the communication between the managed cluster and the hub cluster leverages mTLS, the SSL connection should not be terminated on the proxy server. So the proxy server needs to support HTTP tunneling (for example, HTTP CONNECT method), which will establish a tunnel between the managed cluster and the hub cluster and forward the traffic from the managed cluster through this tunnel.
Once the Klusterlet agent finishes the cluster registration, a secret hub-kubeconfig-secret is generated with a new kubeconfig. It has the similar proxy settings and the appropriate permissions. The Klusterlet agent then uses this kubeconfig to access the hub cluster.
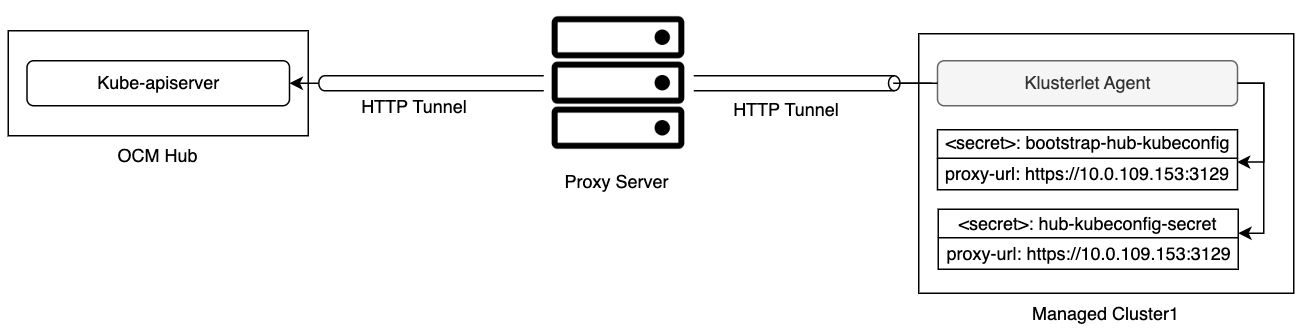
You can find an example built with kind and clusteradm in Join hub through a forward proxy server.
Add-on proxy settings
Typically the add-on agent running on the managed cluster also needs a kubeconfig to access the resources of the kube-apiserver on the hub cluster. The Klusterlet agent will generate this kubeconfig during the add-on registration. If the Klusterlet agent bootstraps with a proxy settings, the same settings will be put into the add-on kubeconfig as well. While agents of some add-ons may access services other than kube-apiserver on the hub cluster. For those add-ons, you may need to add additional configuration with proxy settings by creating a AddOnDeploymentConfig.
apiVersion: addon.open-cluster-management.io/v1alpha1
kind: AddOnDeploymentConfig
metadata:
name: addon-proxy-settings
namespace: cluster1
spec:
proxyConfig:
httpProxy: "http://10.0.109.153:3128"
httpsProxy: "https://10.0.109.153:3129"
noProxy: ".cluster.local,.svc,10.96.0.1"
caBundle: LS0tLS...LS0tCg==
The IP address of the kube-apiserver on the managed cluster should be included in the field noProxy. To get the IP address, run following command on the managed cluster:
kubectl -n default describe svc kubernetes | grep IP:
You also need to associate the configuration to the ManagedClusterAddOn by adding an item to spec.configs.
apiVersion: addon.open-cluster-management.io/v1alpha1
kind: ManagedClusterAddOn
metadata:
name: my-addon
namespace: cluster1
spec:
installNamespace: open-cluster-management-agent-addon
configs:
- group: addon.open-cluster-management.io
resource: addondeploymentconfigs
name: addon-proxy-settings
namespace: cluster1
With the above configuration, the add-on manager of this add-on running on the hub cluster can fetch the proxy settings and then propagate it to the managed cluster side, for example as environment variables by using ManifestWork API. And then the add-on agent can initiate the communication to a particular service on the hub cluster with the proxy settings.
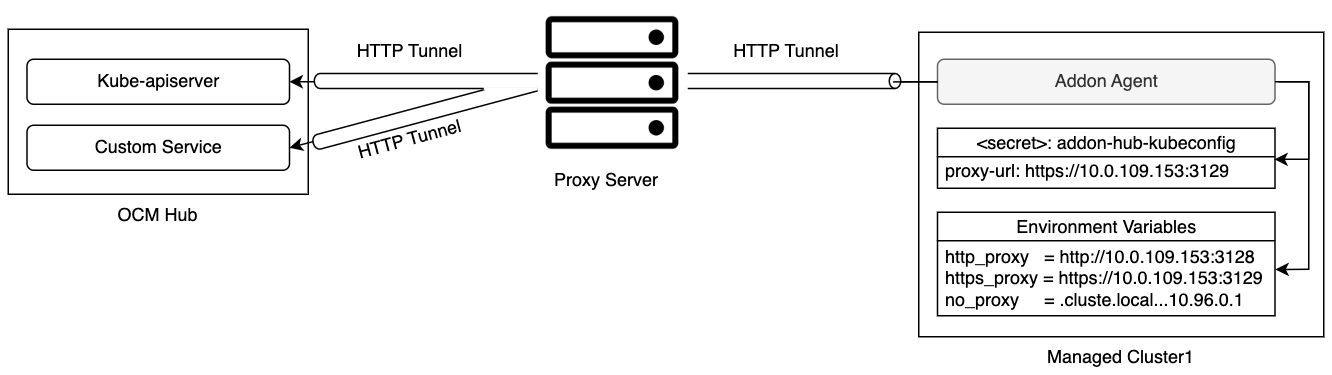
Once both the klusterlet agent and the add-on agents are able to communicate with the hub cluster through the forward proxy server, workloads, like applications, can be scheduled to the managed cluster.
5 - Contribute
We know you’ve got great ideas for improving Open Cluster Management. So roll up your sleeves and come join us in the community!
Getting Started
All contributions are welcome! Open Cluster Management uses the Apache 2 license. Please open issues for any bugs or problems you encounter, ask questions in the #open-cluster-mgmt on Kubernetes Slack Channel, or get involved joining the open-cluster-management mailing group.
Contribute to the Source
- Join the Mailing group
- Attend an upcoming Community meetings
- Fork the repository you wish to work on. For example, API,ocm, etc.
- Get started by following the
CONTRIBUTING.mdguide in the repository you wish to work on
Get Involved / File a Bug
Check out the project and consider contributing. You can pick up an issue to work on, or report a bug by creating a new issue here. When your code is ready to be reviewed, you can propose a pull request. You can find a good guide about the GitHub workflow here.
If you intend to propose an enhancement or a new feature in open-cluster-management, submit a pull request in the enhancements repo. The proposal should follow the kep format.
Certificate of Origin
By contributing to this project, you agree to the Developer Certificate of Origin (DCO). This document was created by the Linux Kernel community and is a simple statement that you, as a contributor, have the legal right to make the contribution. See the DCO file for details.
Talk to Us
- Follow the Mailing group
- Chat with us in the #open-cluster-mgmt on Kubernetes Slack Channel
6 - Releases
Open Cluster Management has approximately a three to four month release cycle. The current release is v1.0.0.
Continue reading to view upcoming releases:
1.0.0, 20 June 2025
🎉 Milestone Release: Open Cluster Management v1.0.0 🎉
The Open Cluster Management team is thrilled to announce the release of OCM v1.0.0! This milestone release represents a significant achievement in our journey to provide a robust, production-ready multi-cluster management platform. With enhanced stability, new powerful features, and improved developer experience, v1.0.0 marks OCM’s readiness for enterprise-scale deployments.
🌟 Key Highlights
Enhanced Cluster Management:
- CEL Selector Support: Advanced cluster selection using Common Expression Language (CEL) for more flexible and powerful placement decisions
- About-API Integration: New cluster properties API enabling better cluster discovery and metadata management
- Workload Conditions: Enhanced status reporting with detailed workload condition tracking
- Deletion Policies: Introduced deletionPolicy for ManifestWorkReplicaSets to control the deletion strategy.
Developer Experience Improvements:
- Resource Requirements Configuration: Fine-grained control over addon agent resource requirements
- Bundle Version Overrides: Flexible version management with
--bundle-version-overridesflag in clusteradm - ManagedCluster Annotations: Expose cluster annotations during join operations for better cluster labeling
Stability & Performance:
- Resource Cleanup: ResourceCleanup feature gate enabled by default for better resource lifecycle management
- Configurable Status Sync: Adjustable work status sync intervals for optimized performance
- Memory Usage Optimization: Reduced memory footprint through filtered resource watching
- Hub QPS/Burst Configuration: Configurable rate limiting for better hub cluster protection
ArgoCD Integration:
- ArgoCD Pull Model: New ArgoCD pull model addon replacing the legacy application-manager
- Simplified Setup: Enhanced clusteradm CLI support for easier ArgoCD integration setup
🔧 Breaking Changes
- ResourceCleanup Feature Gate: Now enabled by default - ensures proper cleanup of resources when ManifestWorks are deleted
- Lease Checking Removal: Removed hub-side lease checking for improved performance
- API Updates: Several API fields made optional for better flexibility (hubAcceptsClient, taint timeAdded)
📊 Community Growth
This release includes contributions from 25 contributors across all repositories, with 8 new contributors joining our community:
New Contributors:
- @gnana997 - API improvements and sigs.k8s.io support
- @Ankit152 - Go 1.23 upgrade and k8s.io packages updates
- @o-farag - ClusterClaimConfiguration API enhancements
- @bhperry - Workload conditions and CEL evaluation functions
- @gitatractivo - Helm chart implementation and documentation
- @jeffw17 - Sync labels support and AWS IRSA documentation
- @ivan-cai - Hub QPS/Burst configuration improvements
- @arturshadnik - ManagedCluster annotations support
- @ahmad-ibra - AWS EKS managed cluster ARN support
We extend our heartfelt gratitude to all contributors who made this milestone release possible!
📦 Core Components
- api v1.0.0 changelog
- ocm v1.0.0 changelog
- addon-framework v1.0.0 changelog
- clusteradm v1.0.0 changelog
We hope this release helps you better manage your Kubernetes clusters, and we look forward to your feedback and contributions! If you have any questions, please don’t hesitate to contact us in our community channels or log issues on our repositories.
Thank you to all contributors for your hard work and to the community for your continued support! Let’s keep the momentum going.
Stay connected and happy managing clusters!
0.16.0, 16 March 2025
The Open Cluster Management team is exicted to announce the release of OCM v0.16.0 with many new features:
Breaking Changes:
- Addon is defaulted to be managed by addon-manager: this is the part of addon evolution work starting
from release 0.14.0, and the self-managed installation of addons is disabled in
v0.16.0. Each addon will need to upgrade the addon-framework to a version equal or higher thanv0.8.2 - (Policy framework) The compliance history API has been removed due to lack of interest.
- (Policy framework) Kubernetes v1.16 is no longer supported with the removal of the
v1beta1CustomResourceDefinition manifests.
Notable features:
- Register cluster to EKS hub: user can now use an EKS cluster as a hub cluster and register other EKS clusters with it, utilizing EKS IRSA and EKS Access Entries features in AWS, see this doc on how to enable and use this feature.
- Auto register CAPI cluster: user can install the CAPI management plane on the OCM hub, and enable
the
ClusterImporterfeature gate on theClusterManager. The CAPI cluster after successfully provisioned will be automatically registered into the OCM hub. - Ignore fields update in
ManifestWorks: when user uses theServerSideApplystrategy in Manifestwork, user can now specify certain fields to be ignored during resource update/override, to avoid apply conflict error. - Support wildcard of ManifestConfigs in
ManifestWorks: theResourceIdentifierfield inManifestWorkscan now recognize*as the wildcard marker, so if there are multiple resources need to use the sameManifestConfigs, user can now set oneManifestConfigwith a wildcardResourceIdentifier - (Policy framework)
OperatorPolicy: Enhanced operator handling, including approving dependent packages and raising operator deprecation. - (Policy framework)
ConfigurationPolicy: AnobjectSelectoris added, allowing users to iterate over objects by label without needingobject-templates-raw. For further filtering, users can invoke the{{ skipObject }}Go template function to conditionally skip a particular object template. - (Policy framework)
ConfigurationPolicy: TheObjectNameandObjectNamespaceGo template variables are added. TheObjectNamespaceinherits its value from thenamespaceSelectorwhile theObjectNameinherits its value from the newobjectSelector. - (Policy framework) The new
governance-standalone-hub-templatingaddon enables hub Go templates (i.e.{{hub ... hub}}) for “standalone” policies. This new addon is a further enablement for users to deploy policies using GitOps pointed directly at managed clusters rather that propagating policies through the hub.
Core components
Addons
- config-policy-controller v0.16.0 changelog
- governance-policy-framework-addon v0.16.0 changelog
- governance-policy-propagator v0.16.0 changelog
- governance-policy-addon-controller v0.16.0 changelog
- multicloud-operators-subscription v0.16.0 changelog
- multicloud-operators-channel v0.16.0 changelog
- managed-serviceaccount v0.8.0 changelog
- cluster-proxy v0.7.0 changelog
0.15.0, 24 Oct. 2024
The Open Cluster Management team is proud to announce the release of OCM v0.15.0!
- Cluster Manager and Klusterlet helm chart: user can now install cluster manager and klusterlet using helm by
adding the
https://open-cluster-management.io/helm-chartsinto the helm repo. - Multiple hubs: by enabling the
MultipleHubsfeature gate on the klusterlet, the klusterlet can switch the connection among multiple hubs if the hub server is down, or when user explictly setshubAcceptClienttofalseon theManagedCluster. See solution on how to use this feature to handle disaster recovery. - Addon support multiple configurations with the same kind: user can now set multiple configurations
with the same kind on the
ManagedClusterAddonandClusterManagementAddon. Which specific configuration is used by the addon is decided by the addon. - Add configured condition in
ManagedClusterAddon: the addon-manager will set condition with the type ofConfiguredon theManagedClusterAddonwhen the configuration of the addon is determined by the addon-manager. This is to avoid an out of date configuration being picked to deploy the addon agent. - Sync between ManagedCluster and cluster inventory API: We introduce the cluster inventory API from sig-multicluster and sync between ManagedCluster and ClusterProfile API. See here for more details on cluster inventory API.
- (Policy framework) Event-driven
ConfigurationPolicyevaluations: By default,ConfigurationPolicyreconciles are now event-driven, lowering resource consumption and increasing efficiency. Users can set a policy to reconcile on an interval as they were previously by configuringspec.evaluationInterval. - (Policy framework) Custom
ConfigurationPolicycompliance messages: Policy authors can now define Go templates to be used for compliance messages, including.DefaultMessageand.Policyfields available for parsing relevant information. - (Policy framework)
dryrunCLI: AdryrunCLI is available to reconcileConfigurationPolicylocally, allowing you to view the compliance and diff resulting from aConfigurationPolicywithout deploying it to a cluster:go install open-cluster-management.io/config-policy-controller/cmd/dryrun@latest - (Policy framework) Customizable hub cluster template access: Users can now set
spec.hubTemplateOptions.serviceAccountNameto leverage a service account in the root policy namespace to resolve hub templates. Without the service account, hub templates are only able to access objects in the same namespace as the policy.
Core components
Addons
- config-policy-controller v0.15.0 changelog
- governance-policy-framework-addon v0.15.0 changelog
- governance-policy-propagator v0.15.0 changelog
- governance-policy-addon-controller v0.15.0 changelog
- multicloud-operators-subscription v0.15.0 changelog
- multicloud-operators-channel v0.15.0 changelog
- managed-serviceaccount v0.7.0 changelog
- cluster-proxy v0.6.0 changelog
0.14.0, 21 Jun. 2024
The Open Cluster Management team is proud to announce the release of OCM v0.14.0!
- Exclude terminating clusters from PlacementDecision: now cluster in terminating state will not be picked by the placement.
- Send available condition events for managed cluster: klusterlet agent will send a Kubenerte event to the cluster namespace upon status change, which makes it eaiser for user to check the state change of the managed cluster.
- Set install namespace of AddonTemplate from AddonDeploymentConfig: consumers of AddonTemplate API can now use AddonDeploymentConfig API to set the installation namespace of the agent.
- Configurable controller replicas and master node selector: user can now set flags
--deployment-replicasand--control-plane-node-label-selectoron klusterlet-operator to customize the replicas of the klusterlet agent. - Add CAPI into join flow: user can now use the join command to add a Cluster API provisioned cluster into OCM hub
from Cluster API management cluster with
--capi-importand--capi-cluster-nameflag. - (Policy Framework)
OperatorPolicyenhancement and stabilization: OperatorPolicy can now be set tomustnothaveto perform cleanup, alongside stabilization improvements. - (Policy Framework) Add
ConfigurationPolicydiff to the status: Adds arecordDiff: InStatusas the default value if it’s not set. In this mode, the difference between the policy and the object on the managed is returned in the status. Sensitive data types are not displayed unlessInStatusis explicitly provided. - (Policy Framework) Add
recreateOptiontoConfigurationPolicy: When a user needs to update an object with immutable fields, the object must be replaced. In this case,recreateOptioncan be set to eitherifRequiredorAlwaysdepending on the requirements.
Core components
Addons
- config-policy-controller v0.14.0 changelog
- governance-policy-framework-addon v0.14.0 changelog
- governance-policy-propagator v0.14.0 changelog
- governance-policy-addon-controller v0.14.0 changelog
- multicloud-operators-subscription v0.14.0 changelog
- multicloud-operators-channel v0.14.0 changelog
- managed-serviceaccount v0.6.0 changelog
- cluster-proxy v0.5.0 changelog
0.13.0, 6 Mar. 2024
The Open Cluster Management team is proud to announce the release of OCM v0.13.0! There are a bunch of new features added into this release.
- Rollout API: we built a common rollout API that has been adopted in
ClusterManagementAddonandManifestWorkReplicaSet, and will be also used in the policy addon in a future release. The API provides users a way to define a workload/addon rolling upgrade strategy across multiple clusters. See here for more details. - More install configurations in Klusterlet: we enhanced the
KlusterletAPI by adding more configuration fields, including resource requests, QPS/Burst and priority class. - Cloudevent support: an experimental feature to wire the work agent with a message broker using the cloudevent protocol. This enables a work agent running in a highly scalable mode. See here for more details.
- Addon-framework is upgraded to v0.9.0 to better support the generic addon-manager and addon rolling out strategy. It is highly
recommended for addons to upgrade the addon-framework dependency to version v0.8.1 or higher. Also, it should be noted that
an RBAC update of the addon hub controller (adding PATCH verbs for resource
clustermanagementaddons) is required during the upgrade. - Application add-on
SubscriptionAPI can now aggregate and report managed clusters’ kustomization errors. - New OperatorPolicy to handle OLM operators: A new OperatorPolicy is added, managed by the
config-policy-controllerPod, aimed at easing the management of OLM deployments. - (Policy framework) Add diff logging to
ConfigurationPolicy: ArecordDiffparameter is added toConfigurationPolicyto enable the diff between the object on the cluster and the policy definition, to be logged in theconfig-policy-controllerPod logs. - (Policy framework) New
OperatorPolicyto handle OLM operators: A new OperatorPolicy is added, managed by theconfig-policy-controllerPod, aimed at easing the management of OLM deployments. - (Policy framework) New Compliance History API: A Compliance History API is added to the policy framework. The compliance history in the policy on the cluster is limited to a non-configurable 10 statuses. The Compliance History API introduces a query-able database to keep track of history over a longer period as well as updates to a given policy.
Core components
Addons
- config-policy-controller v0.13.0 changelog
- governance-policy-framework-addon v0.13.0 changelog
- governance-policy-propagator v0.13.0 changelog
- governance-policy-addon-controller v0.13.0 changelog
- multicloud-operators-subscription v0.13.0 changelog
- multicloud-operators-channel v0.13.0 changelog
- multicloud-integrations v0.13.0 changelog
- managed-serviceaccount v0.5.0 changelog
- cluster-proxy v0.4.0 changelog
0.12.0, 11 Oct. 2023
The Open Cluster Management team is proud to announce the release of OCM v0.12.0! We have made architecture refactors and added several features in this release:
- Component consolidation: we made a big code refactor to merge code in registration, work, placement and registration-operator into the ocm repo. The original separated code repos are currently used for maintaining old releases only. This code consolidation allows us to build more robust e2e tests, and build a single agent binary to reduce the footprint in managed clusters.
- Addon Template API: A new
addontemplateAPI is introduced to ease the development of addons. Users will not need to write code and run an addon-manager controller on the hub cluster. Instead, they only need to define theaddontemplateAPI to create an addon.clusteradmalso has a new commandclusteradm addon create ...to create an addon from resource manifests files. See more details aboutaddontemplatein the addon documentation. - Singleton agent mode: users can now choose to start the agent as a single pod using the
Singletonmode in the klusterlet. - ManagedClusterSet/ManagedClusterSetBinding v1beta1 API is removed.
ConfigurationPolicy: Add theinformOnlyoption toremediationActioninConfigurationPolicy, signaling that the remediation action set on thePolicyshould not override theConfigurationPolicy’s remediation action.- Policy framework: Security, performance, and stability improvements in controllers on both the hub and managed clusters.
ClusterPermission: New custom resource that enables administrators to automatically distribute RBAC resources to managed clusters and manage the lifecycle of those resources. See the ClusterPermission repo for more details.
Core components
Addons
- config-policy-controller v0.12.0 changelog
- governance-policy-framework-addon v0.12.0 changelog
- governance-policy-propagator v0.12.0 changelog
- governance-policy-addon-controller v0.12.0 changelog
- multicloud-operators-subscription v0.12.0 changelog
- multicloud-operators-channel v0.12.0 changelog
- multicloud-integrations v0.12.0 changelog
- managed-serviceaccount v0.4.0 changelog
0.11.0, 1, June 2023
The Open Cluster Management team is proud to announce the release of OCM v0.11.0! There are a bunch of new features added into this release
- Addon install strategy and rolling upgrade: a new component
addon-manageris introduced to handle the addon installation and upgrade. User can specify the installation and upgrade strategy of the addon by referencing placement onClusterManagementAddonAPI. The feature is in the alpha stage and can be enabled by settingfeature-gates=AddonManagement=truewhen runningclusteradm init. - ManifestWorkReplicaSet: it is a new API introduced in this release to deploy
ManifestWorkto multiple clusters by placement. Users can create aManifestWorkReplicaSettogether withPlacementin the same namespace to spread theManifestWorkto multiple clusters, or use the commandclusteradm create work <work name> -f <manifest yaml> --placement <namespace>/<placement name> -r. The feature is in the alpha stage and can be enabled by settingfeature-gates=ManifestWorkReplicaSet=truewhen runningclusteradm init. - Registration auto approve: user can configure a list of user id to auto approve the registration which makes cluster registration simpler
in some scenarios. The feature is in the alpha stage and can be enabled by setting
feature-gates=ManagedClusterAutoApproval=truewhen runningclusteradm init. With this feautre enabled, the user does not need to runacceptcommand on hub afterjoincommand. - ManifestWork can return structured result: previously the feedback mechanism in
ManifestWorkcan only return scalar value. In this release, we add the support to return a structured value in the format of json string. To enable this feature, user can addfeature-gates=RawFeedbackJsonString=truewhen runningclusteradm joincommand. - Policies added support for syncing Gatekeeper manifests directly (previously a ConfigurationPolicy was needed to sync Gatekeeper manifests).
- Templates were enhanced to lookup objects by label, and added
copySecretDataandcopyConfigMapDatafunctions to fetch the entiredatacontents of the respective object. - Improved the integration of the ArgoCD pull model by aggregating the status of deployed resources in the managed clusters and presenting it in the hub cluster’s
MulticlusterApplicationSetReportcustom resource.
Core components
- registration v0.11.0 changelog
- work v0.11.0 changelog
- placement v0.11.0 changelog
- addon-framework v0.7.0 changelog
- registration-operator v0.11.0 changelog
- clusteradm v0.6.0 changelog
Addons
- cluster-proxy v0.3.0 repo
- managed-serviceaccount v0.3.0 repo
- config-policy-controller v0.11.0 changelog
- governance-policy-framework-addon v0.11.0 changelog
- governance-policy-propagator v0.11.0 changelog
- governance-policy-addon-controller v0.11.0 changelog
- multicloud-operators-subscription v0.11.0 release note
- multicloud-operators-channel v0.11.0 release note
- multicloud-integrations v0.11.0 release note
We are pleased to welcome several new contributors to the community: @aii-nozomu-oki, @serngawy, @maleck13, @fgiloux, @USER0308, @youhangwang, @TheRealJon, @skitt, @yiraeChristineKim @iranzo, @nirs, @akram, @pajikos, @Arhell, @levenhagen, @eemurphy, @bellpr, @o-farag. Thanks for your contributions!
0.10.0, 17th, Feb 2023
The Open Cluster Management team is proud to announce the release of OCM v0.10.0! We mainly focused on bug fixes, code refactoring, and code stability in this release. Also we worked on several important design proposals on addon lifecycle enhancement and manifestwork orchestration which will be implemented in the next release. Here are some main features included in this release:
- Argo CD hub-spoke / pull model application delivery integration. See argocd-pull-integration repo for more details.
- Policy templating is enhanced so that when a referenced object is updated, the template is also updated.
- A Policy or ConfigurationPolicy can specify dependencies on another policy having a specified status before taking action.
- A raw string with go templates can be provided in
object-templates-rawto the ConfigurationPolicy, allowing dynamically generated objects through the use of functions like{{ range ... }}.
Core components
- registration v0.10.0 changelog
- work v0.10.0changelog
- placement v0.10.0 changelog
- addon-framework v0.6.0 changelog
- registration-operator v0.9.0 changelog
- clusteradm v0.5.1 changelog
Addons
- config-policy-controller v0.10.0 changelog
- governance-policy-framework-addon v0.10.0 changelog
- governance-policy-propagator v0.10.0 changelog
- governance-policy-addon-controller v0.10.0 changelog
- multicloud-operators-subscription v0.10.0 release note
- multicloud-operators-channel v0.10.0 release note
v0.9.0, 21st, October 2022
Open Cluster Management team is proud to announce the release of OCM v0.9.0! Here are some main features included in this release:
- De-escalate Work Agent Privilege on Managed Clusters In previous iterations of OCM, the Work Agent process is run with admin privileges on managed clusters. This release, to exercise the principle of least privilege, OCM supports defining a non-root identity within each ManifestWork object, allowing end users to give the agent only necessary permissions to interact with the clusters which they manage.
- Support referencing the AddOn configuration with AddOn APIs For some add-ons, they want to run with configuration, we enhance the add-on APIs to support reference add-on configuration, and in add-on framework, we support to trigger re-rendering the add-on deployment if its configuration is changed
- Allow Targeting Specific Services within Managed Clusters The cluster-proxy add-on supports the exposure of services from within managed clusters to hub clusters, even across Virtual Private Clouds. Originally all traffic was routed through the Kubernetes API server on each managed cluster, increasing load on the node hosting the API server. Now the proxy agent add-on supports specifying a particular target service within a cluster, allowing for better load balancing of requests made by hub clusters and more granular control of what resources/APIs are exposed to hub clusters.
- Upgraded ManagedClusterSet API to v1beta2 Update the ClusterSet API and gradually remove legacy custom resources, as well as allow for transformation of legacy resources into analogous v1beta2 resources. v1alpha1 APIs are removed.
- Consolidate the policy add-on template, status, and spec synchronization controllers into a single repository, governance-policy-framework-addon
- Application add-on is now able to expose custom Prometheus metrics via the Git subscription. See the metric documentation for more details.
Core components
- registration v0.9.0 changelog
- work v0.9.0 changelog
- placement v0.9.0 changelog
- addon-framework v0.5.0 changelog
- registration-operator v0.9.0 changelog
Addons
- config-policy-controller v0.9.0 changelog
- governance-policy-framework-addon v0.9.0 changelog
- governance-policy-propagator v0.9.0 changelog
- governance-policy-addon-controller v0.9.0 changelog
- multicloud-operators-subscription v0.9.0 release note
- multicloud-operators-channel v0.9.0 release note
- multicloud-integrations v0.9.0 release note
The release annoucement is also publishded in blog. Thanks for all your contribution!
v0.8.0, 8th, July 2022
Open Cluster Management team is proud to annouce the release of OCM v0.8.0! It includes several enhancement on core components and addons. Notable changes including:
ManifestWorkupdate strategy: now user can setServerSideApplyorCreateOnlyas the manifest update strategy to resolve potential resource conflict inManifestWork.- Global ClusterSet: when user enable the
DefaultClusterSetfeature gate, a globalManagedClusterSetwill be auto-created including allManagedClusters - Configuring feature gates for
klusterletandcluster manager: user can set feature gates when startingklusterletandcluster manager. - Support host alaises for
klusterlet: user can now set host aliases forklusterlet, it is especially useful in on-prem environment. - Running policy addon using
clusteradm: user can now run policy addon directly usingclusteradm
Also we have added two new sub projects:
- multicluster-mesh is an addon to deploy and configure istio across the clusters.
- ocm-vscode-extention is a vscode extension to operator/develop ocm project easily in vscode.
See details in the release changelogs:
Core components
- registration v0.8.0 changelog
- work v0.8.0 changelog
- placement v0.8.0 changelog
- addon-framework v0.4.0 changelog
- registration-operator v0.8.0 changelog
Addons
- multicloud-operators-subscription v0.8.0 changelog
- multicloud-operators-channel v0.8.0 changelog
- cluster-proxy v0.2.2 changelog
- multicluster-mesh v0.0.1 changelog
- config-policy-controller v0.8.0 changelog
- governance-policy-spec-sync v0.8.0 changelog
- governance-policy-template-sync v0.8.0 changelog
- governance-policy-status-sync v0.8.0 changelog
- governance-policy-propagator v0.8.0 changelog
- governance-policy-addon-controller v0.8.0 changelog
CLI extentions
There are 30+ contributors making contributions in this release, they are, @ChunxiAlexLuo, @dhaiducek, @elgnay, @haoqing0110, @itdove, @ilan-pinto, @ivan-cai, @jichenjc, @JustinKuli, @ldpliu, @mikeshng, @mgold1234, @morvencao, @mprahl, @nathanweatherly, @philipwu08, @panguicai008, @Promacanthus, @qiujian16, @rokej, @skeeey, @SataQiu, @vbelouso, @xauthulei, @xiangjingli, @xuezhaojun, @ycyaoxdu, @yue9944882, @zhujian7, @zhiweiyin318. Thanks for your contributions!
v0.7.0, on 6th, April 2022
The Open Cluster Management team is excited to announce the release of OCM v0.7.0! We mainly focused on enhancing user experience in this release by introducing a bunch of new commands in clusteradm. Notable changes including:
- APIs including
placement,placementdecision,managedclustersetandmanagedclustersetbindingare upgraded tov1beta1,v1alpha1version of these APIs are deprecated and will be removed in the future. - User can now use
clusteradmto:- create, bind and view
clusterset - create and view
work - check the controlplane status by using
hub-infoandklusterlet-infosub commands. - upgrade hub and klusterlet
- create, bind and view
- A default
managedclustersetis created automatically and all clusters will be added to defaultmanagedclustersetby default. This feature can be disabled with feature gateDefaultClusterSeton registration controller. - Add the new
policysetAPI that provides a way to logically grouppolicyobjects from a namespace, share placement, and report on overall status for the set in policy addon.
See details in the release changelogs::
- registration v0.7.0 changelog
- work v0.7.0 changelog
- placement v0.4.0 changelog
- addon-framework v0.3.0 changelog
- registration-operator v0.7.0 changelog
- cluster-proxy v0.2.0 repo
- managed-serviceaccount v0.2.0 repo
- clusteradm v0.2.0 changelog
- multicloud-operators-subscription v0.7.0 changelog
- multicloud-operators-channel v0.7.0 changelog
- governance policy propagator v0.7.0 changelog
- config policy controller v0.7.0 changelog
- policy spec sync controller v0.7.0 changelog
- policy template sync controller v0.7.0 changelog
- policy status sync controller v0.7.0 changelog
There are 30+ contributors making contributions in this release, they are, @ChunxiAlexLuo, @dhaiducek, @elgnay, @haoqing0110, @hanqiuzh, @ilan-pinto, @ivan-cai, @JiahaoWei-RH, @jichenjc, @JustinKuli, @ldpliu, @mikeshng, @mgold1234, @morvencao, @mprahl, @nathanweatherly, @philipwu08, @qiujian16, @rcarrillocruz, @rokej, @skeeey, @TheRealHaoLiu, @vbelouso, @vMaroon, @TomerFi, @xauthulei, @xiangjingli, @xuezhaojun, @ycyaoxdu, @yue9944882, @zhujian7, @zhiweiyin318. Thanks for your contributions!
v0.6.0, on 21st, January 2022
The Open Cluster Management team is proud to announce the release of OCM v0.6.0! We made many enhancements on core components and introduced some new addons.
- First release of cluster-proxy addon, Cluster-Proxy addon is to provide a reverse tunnel from the managed cluster to the hub using
apiserver-network-proxy, so user can easily visit the apiserver of the managedcluster from the hub without complicated infrstructure configuration. See here on how to use cluster-proxy in OCM. - First release of managed-serviceaccount addon, Managed-Servicesaccount addon provides a mechanism to project a service account on a managed cluster to the hub. The user can then use this projected account to visit services on the managed cluster.
- Sync status of applied resources in ManifestWork, The users can specify the status field of the applied resource they want to explore in the ManifestWork spec, and get results from the status of the ManifestWork. See here on how to use this feature in Manifestwork.
- Placement extensible scheduling, a new API AddonPlacementScore is added which allows third party controllers to score the clusters based on various metrics. The user can specify what score should be used in the Placement API to select clusters.
- Helm chart interface for addon framework, a new interface is added in addon framework with which the developer can build an addon agent from a helm chart. See example on how to build an addon agent from the helm chart.
- Placement API support for multicloud-operators-subscription, subscription now supports Placement API and can leverage all new features in Placement API to deploy application packages.
We also added many new functions in clusteradm and enhanced the website documentation.
See details in the release changelogs::
- registration v0.6.0 changelog
- work v0.6.0 changelog
- placement v0.3.0 changelog
- addon-framework v0.2.0 changelog
- registration-operator v0.6.0 changelog
- multicloud-operators-subscription v0.6.0 changelog
- cluster-proxy v0.1.3 repo
- managed-serviceaccount v0.1.0 repo
- clusteradm v0.1.0 changelog
- config-policy-controller v0.6.0 changelog
- governance-policy-propagator v0.6.0 changelog
- governance-policy-status-sync v0.6.0 changelog
- governance-policy-spec-sync v0.6.0 changelog
- governance-policy-template-sync v0.6.0 changelog
- ocm-kustomize-generator-plugins v1.3.0 changelog
There are 20+ contributors making contributions in this release, they are @champly, @ChunxiAlexLuo, @dhaiducek, @elgnay, @haoqing0110, @ilan-pinto, @mikeshng, @morvencao, @mprahl, @nathanweatherly, @qiujian16, @rokej, @skeeey, @TheRealHaoLiu, @serngawy, @suigh, @xauthulei, @xiangjingli, @xuezhaojun, @ycyaoxdu, @yue9944882, @zhujian7, @zhiweiyin318. Thanks for your contributions!
v0.5.0, on 8th, November 2021
Open Cluster Management team is proud to announce the release of OCM v0.5.0! We made several enhancements on APIs and addons which include:
- Support deleteOption in ManifestWork.
- Introduce plugin mechanism in Placement API and add resource based scheduling.
- ManagedClusterSet API is upgraded from v1alpha1 to v1beta1.
- Scalability improvement on application manager.
In addition, we also release the first version of clusteradm to ease the installation of OCM, and addon-framework to ease the development of management addons on OCM.
To see details of the changelogs in this release:
- registration v0.5.0 changelog
- work v0.5.0 changelog
- placement v0.2.0 changelog
- addon-framework v0.1.0 changelog
- registration-operator v0.5.0 changelog
- multicloud-operators-subscription v0.5.0 changelog
There are 20+ contributors making contributions in this release, they are @elgnay, @haoqing0110, @hchenxa, @huiwq1990, @itdove, @kim-fitness, @mikeshng, @panpan0000, @philipwu08, @porridge, @qiujian16, @rokej, @skeeey, @suigh, @vincent-pli, @wzhanw, @xauthulei, @xiangjingli, @xuezhaojun, @yue9944882, @zhujian7, @zhiweiyin318. Thanks for your contributions!
v0.4.0 on August 2021
7 - Roadmap
The Open Cluster Management community uses GitHub Project to track the progress of the project.
8 - FAQ
Welcome to our Frequently Asked Questions (FAQ) page! Here, you’ll find answers to some of the most common questions we receive. If you have a question that isn’t covered here, feel free to reach out to us directly.
Questions
What is the difference between Karmada and OCM?
We have a post about this at CNCF blog: Karmada and Open Cluster Management: two new approaches to the multicluster fleet management challenge.
What is the difference between ManifestWork, ManifestWorkReplicaset and AddOn? When to use them?
1. Manifestwork
Definition: Manifestwork is a resource used to define a group of Kubernetes resources that should be applied to a managed cluster from a hub cluster. It allows for the deployment of various resources (like Deployments, Services, etc.) to a specific managed cluster.
Use Case: Use ManifestWork when you want to apply a specific set of resources to a single managed cluster. It is ideal for scenarios where you need to manage resources directly and track their status on that cluster.
Example: Deploying a Deployment and a Service to a managed cluster. You can use clusteradm command clusteradm create work work-example -f xxx.yaml --clusters cluster1 to wrap the kubernetes native resource with a ManifestWork and submit it to a sepecific managed cluster.
Definition: ManifestWorkReplicaSet is an aggregator API that utilizes Manifestwork and Placement to create multiple ManifestWork resources for clusters selected by placements. It allows for the deployment of resources across multiple clusters based on defined rollout strategies.
Use Case: Use ManifestWorkReplicaSet when you need to deploy the same resources to multiple clusters simultaneously, with the ability to control the rollout strategy (e.g., all at once, progressively, etc.). It is useful for managing deployments across a fleet of clusters.
Example: Deploying a CronJob and Namespace to multiple clusters selected by a placement strategy.
3. Add-On
Definition: An Add-On in Open Cluster Management is a mechanism that consists of an Addon Agent (running in managed clusters) and an Addon Manager (running in the hub cluster). It allows for the management of extensions that work with multiple clusters, providing a way to apply configurations and manage the lifecycle of resources across clusters by using the rollout strategy.
Use Case: Use Add-Ons when you need to implement a more complex solution that requires ongoing management and configuration of resources across multiple clusters.
Example: A tool that collects alert events from managed clusters and sends them to the hub cluster.
Summary
- ManifestWork is for single cluster resource management.
- ManifestWorkReplicaSet is for managing resources across multiple clusters with defined rollout strategies.
- Add-On is for implementing extensions that require ongoing management and configuration across multiple clusters, leveraging both an agent and a manager. Also provide the ability to control the addon’s lifecycle with rollout strategy.
9 - Security
The Open Cluster Management (OCM) community welcomes and appreciates responsible disclosure of security vulnerabilities.
If you know of a security issue with OCM, please report it to OCM-security@googlegroups.com. The OCM project owners receive security disclosures by default. They may share disclosures with others as required to make and propagate fixes.
The OCM community security reporting process follows the Kubernetes security reporting process as standard.
Security Vulnerability Response
Each report is acknowledged and analyzed by OCM project owners within 5 working days. This will set off the Security Release Process.
Any vulnerability information shared with OCM project owners stays within the OCM community and will not be disseminated to other projects unless it is necessary to get the issue fixed.
As the security issue moves from triage, to identified fix, to release planning we will keep the reporter updated.
Security Release Process
Refer to the Kubernetes Security Release Process for details on the security disclosures and response policy.